As part of a project I’m in the midst of, I needed to be able to take an array which may have one or more keys with empty values and remove those elements from the array in order to find it’s true length. In this case, I didn’t care about the actual data in the array, just the count() value returned.
After searching through the PHP documentation, I didn’t see any internal functions or methods that would do exactly what I needed, so out to Google I went and after a bit of searching, refining my query and testing, I found the solution which I thought I would share — if nothing else, because I hope it makes it easier for others to find.
The code looks like this:
// @param $a = array passed into the function
// @param $b = result returned

function array_trim($a) {
  $j = 0;
  for($i = 0; $i < count($a); $i++) {
    if($a[$i] != "") {
      $b[$j++] = $a[$i];
    }
  }
  return $b;
}

$b = array_trim($my-array-to-trim);
Simply create a variable, and then pass your array to be trimmed through the function. It takes care of the rest and will output a nicely compressed array of key/value pairs. The empty key/value pairs are removed whether they are at the start, middle or end of the array.
Of course, if there’s a better way, I’m open to suggestions!
A home renovations company flyer came through the mail slot the other day. In and of itself, this is not unusual. But the statement included near the end of the flyer stood out and is a good general business statement that I can’t say I’ve seen anyone really talk about, at least in terms of web design.
The quote is simply:
If we don’t take care of our customers, someone else will
In the web design/programming world this is very true. Designers and programmers are a dime-a-dozen. Face it, it’s true. Whether the majority of these people are true schooled or accredited designers/programmers is another matter, but there is always someone else waiting in the wings to pick-up a new client the moment you falter.
With this in mind, take a bit of time and think about how you can serve your client better; at least say thank you — keep them happy and keep them coming back.
Running your own local server for web development is a great thing whether it be Apache, “Lightty”: lighttpd or something else. It makes it possible to develop and test under similar conditions to a deployment environment (unless of course you’re developing for a large-scale deployment across multiple load-balanced servers and such).
As I’ve said before, Mac OS X shines in these type of situations because of the flexibility of its Unix underpinnings. You can compile and run Unix-oriented application as well as nice-looking GUI apps alongside Java, Perl, Ruby, PHP and more. And since the beginning, Mac OS X has come bundled with the Apache web server for hosting your own sites.
So. Let’s take stock of what we need to get a reasonable framework running for managing development environments with Apache, Virtual Hosts and a good old-fashioned DHCP.
Mac OS X (or some flavour of Windows if you really must).
Apache web server (for this example, but the concept should work for any reasonable web server).
“Web Sharing” enabled via the Sharing Preferences in Mac OS X.
Dynamic DNS account and client software. Various options are available, but we’ll look at using DynDNS’s services in this case.
Custom domain name or choose from one of the free dynamic hostname options.
Getting Your Domain Name
There’s two ways to deal with this — register a domain via your usual registrar and point it to the appropriate DNS service or register the domain with DynDNS. If you plan on using one of their free options, you just need to register for an account to get started. For the sake of this tutorial, let’s assume you’re using their Zone Level services and a custom domain name.
Create an account at DynDNS and go to the “My Services” section.
If you haven’t done so already, register a domain name. Once complete, it should appear under Domain Registration as well as under the My Zones section. You should see an indicator for “Custom DNS”. A subdomain of one of their stock domains will appear under the My Hosts section instead.
In the My Zones section, click on the “Custom DNS” link in the table. This will display your Custom DNS settings including your Hosts (A) records, Alias (CNAME) records, MX records, etc. This is where you can add however many custom subdomains you need.
To add a new Host, click on the “Add New Host” link above the listing of your Host records.
Enter the host you wish to use. For example: subdomain.
For host type, you can leave it at the default which should be dynamic unless you happen to have a static IP address, which unless you’re running off a business-grade internet connection, you probably don’t have.
Your current IP address should be detected automagically.
Click the Add Host button and you’re done.
The Dynamic DNS Client
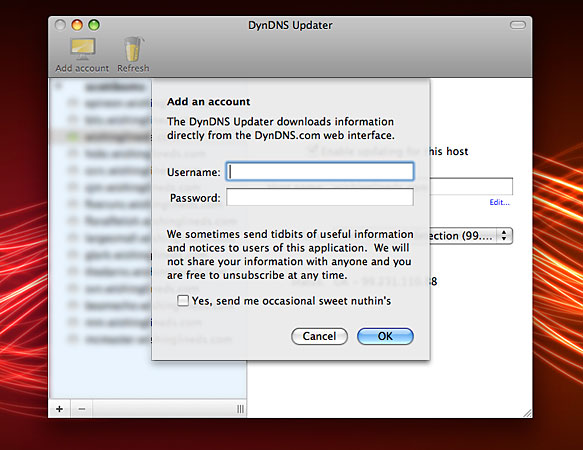
The next thing on the list is to grab a copy of the Dynamic DNS client software. In our case, we’re going to use the official DynDNS Update software which is easier to use and requires less configuration than the alternative client options.
To setup the DynDNS Update software, install it on your system and launch the application.
Click on the Add button to enter your DynDNS account credentials. This is the same information as the DynDNS account you created earlier. Assuming your account info is accepted, any existing DNS addresses will be refreshed within the client.
You will be asked to install the DynDNS daemon which is the background process that will run on your system and update the DynDNS service when your IP address changes.
Click on a host in the sidebar list. The details of the host will appear on the right side of the window. Click the “Enable updating for this host” in order to keep a particular hostname updated.
Adjust the interface option as needed. Typically this should be set to “Web-based IP detection” if you wish to be able to access your system remotely (or to allow others to access your dev environment by name rather than IP).
DynDNS client software for Mac OS X
When you’re done, press the Add button to continue. Back in the main window, click on the Active checkbox for your domain. If the host is found it should return “Ok” and everything is ready to go. Next up — Apache.
Setting Up Apache
Although Apache’s configuration file is long and perhaps a bit drawn out for many, it’s still reasonably easy to read and understand and creating VirtualHosts is not difficult. My personal preference is to keep VirtualHosts separate from the main httpd.conf file for numerous reasons including OS upgrades, cleanliness and ease of management.
The structure I prefer is simple. Create a new folder in /etc/httpd/ called hosts. This is where we will keep our individual VirtualHost settings. One file for each domain. Next, open up the httpd.conf file in your favourite text editor and scroll way down to the end of the file. You should see a section that contains the Include directive.
# script as well as its and *.html, *.css etc. files.
<Directory /Library/WebServer/Documents/validator/htdocs>
  Options ExecCGI FollowSymLinks IncldesNOEXEC Indexes MultiViews
  AllowOverride None
  AddHandler server-parsed .html
  AddCharset utf-8
</Directory>

# Tell httpd that "check" is a CGI script
<Location "/validator/htdocs/check">
  SetHandler cgi-script
</Location>

Include /private/etc/httpd/users/*.conf
# Include configuration files for VirtualHosts
Include /private/etc/httpd/hosts/*.conf
That first line includes the necessary setup to allow each user account in OS X to have their own Sites folder where they can host their web site. We’re going to follow the same methodology with our hosts folder as shown on line 1223 in the screenshot above.
Now that we have Apache set to include all files named with a .conf extension, we can go about setting up our first VirtualHost configuration.
NameVirtualHost *

<VirtualHost *>
  ServerName subdomain.mydomain.com
  DocumentRoot /Library/WebServer/Documents/subdomain
  RewriteEngine On
<Directory /Library/WebServer/Documents/subdomain>
  Options -Indexes ExecCGI FollowSymLinks
  AllowOverride None
  Allow from all
  Order allow,deny
</Directory>
</VirtualHost>
Change the settings you wish to use for the VirtualHost as needed. Copy files in to the appropriate directory for the host and you should be up and running in no-time flat. Questions, comments?
These days it’s difficult to avoid ‘shiny stuff’. It’s everywhere — in product packaging (just take a look at recent cereal packaging design), advertising and on the web. It’s here now, but has been for a while; it’s popularity growing substantially over the last year.
Wishingline Design Studio, Inc. was there very early on and was recently recognized as part of this movement by our inclusion in a chapter at Design Melt Down.