Apple recently posted a great tutorial on their Developer Connection site on how to get the W3C HTML Validator running locally on Mac OS X. If you want or have a need for local access (particularly when offline) to the validator tool, I recommend following along and setting it up on your own systems.
The process involves checking out the project from CVS, updating a few files included in a provided disk image, editing your Apache configuration file, installing OpenSP and a number of required Perl modules and lastly a missing library in Mac OS X called libiconv.
Additional instructions, especially related to Perl can be found at David Wheeler’s site.
“This should be fairly easy and straightforward” I thought to myself when I first started looking at trying to do away with using MacCVSClient to manage collaborative CVS based projects. It bothers me because (a) it’s slow when dealing with large projects and (b) it uses a proprietary binary format for the CVS information files.
In the end it was a fairly simple procedure but I found myself running in circles trying to decipher information from various sources and turn it into something cohesive that was clear enough to a CVS newbie such as myself. Hence this tutorial, which will hopefully grace the Google archives for some time and save others the same frustrations I suffered trying to get this to work.
A Few Assumptions
Although this tutorial is intended for Mac OS X users, the majority of it applies to any Unix-based operating system which can run the bash shell (the default shell in Mac OS X). BBEdit is only available on the Mac though so that portion is of limited widespread appeal.
I’ve purposing left out things related to other shell environments to keep the article length down, but if anyone is stuck there and wants to know how to do this using other shells, drop a note in the comments and I’ll post some additional information or point you to where to get it.
Setup Your Environment
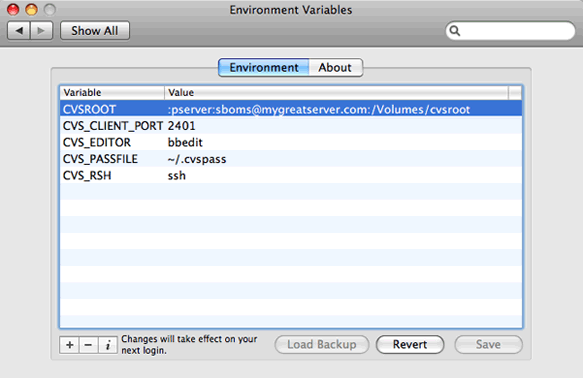
To save yourself some work you will want to set some environment variables to simplify interacting with the CVS binaries. To do this, fire up the Terminal application and type pico .bash_login to create a new file (or edit an existing one) in your home directory.
The first variable to set is CVSROOT which is used to indicate the location of your repository. Assuming you’re dealing with a CVS server running on a second machine and being authenticated using the pserver method, that variable would look like:
The second variable that you may need to set is CVS_CLIENT_PORT, though unless you need to use a port other than the default (2401), you can probably skip this step. If you are using a Firewall (hardware or software) make sure to allow traffic through this port.
export CVS_CLIENT_PORT=2401
The third variable is the CVS_PASSFILE which also is optional but useful if you want to store your unencrypted CVS password somewhere other than the default location in your home directory. Keep in mind that the pserver method sends data in plain text format so it’s possible that it could be read if intercepted by unauthorized parties — both your account information and the repository data itself. For details on improving this situation, see the Bonus Tip below.
The name of the file by default is .cvspass. The information for the CVS_PASSFILE variable should look like this:
export CVS_PASSFILE=~/.cvspass
The last variable we need to be concerned with setting is the CVS_EDITOR variable. Since we’re going to be using BBEdit for managing CVS, you can set this option to use the bbedit shell command instead of another CLI-based text editor such as vi or pico.
Save the changes to your .bash_login file by pressing Control-O to save the file. To apply the changes to your shell, either open a new Terminal window or, in the current window, type source .bash_login which will reload your shell and associated environment variables.
You can check that the new variables are set by typing env which will output a list of all the available environment variables. Assuming the new variables are set, you are set to login to the CVS server and checkout a project.
Caveats
The big caveat with this procedure is that you need to login to CVS via the Terminal or a BBEdit worksheet to perform any actions with its CVS tools. If you’re adventurous you could easily write an AppleScript/Perl or Shell script that will do that work for you and make the process easier, but if you aren’t, then just type login cvs and then enter your CVS user password (if you have one).
Keep in mind that many public CVS servers such as those at SourceForge typically provide anonymous access without the need for a password. You can get the full scoop in the case of SourceForge at their site.
The second caveat, and I’m not sure how much this still applies on Panther and with newer versions of BBEdit but you may also need to create a special environment file specifically for GUI apps to use since they can’t inherit these from the shell.
RCEnvironment PreferencePane for Mac OS X
There are two ways of doing this — either through the command line (by creating a file named environment.plist in a new hidden directory in your home folder called .MacOSX), or you can go the easier route and use RCEnvironment which is a preference pane which provides a GUI for creating and editing this file. Unless you know what you’re doing, I’d suggest using the GUI to get started.
Be sure to logout and login again to make the variables available in the GUI environment.
Bonus Tip
Let’s say you want to ensure that all your CVS-related traffic is tunnelled through SSH, all you need to do is add one more line to your .bash_login file and make a small change to your CVSROOT environment variable. That additional line looks like this:
export CVS_RSH=ssh
The revised CVSROOT variable should use this format:
You should not have to login, but you will be prompted for your password each time you launch a new Terminal session.
Additional Information
Here’s a few additional links for everyone’s benefit (myself included). I will likely revise this tutorial at some point, but until then let me know if something doesn’t work for you or if there is anything notable that appears missing or incorrect.
Although there’s been quite a lot of talk around the Konfabulator / Dashboard controversy there’s been much less talk about the new features added to the WebKit framework which is the underlying rendering engine used in Safari. I suppose this is in part due to NDAs and all that, but since this stuff does seem to be somewhat public knowledge — and is showcased on Apple’s website, I’m curious about other’s thoughts on these new additions.
New UI Objects in the updated WebKit for Mac OS X
Specifically, I’m referring to the new UI widgets — the Search Field and the Range Slider Control. Although I’m happy to see something new in the way of form widgets for the web (really, has anything new happened on this front in the last, oh, five or six years?), it’s frustrating because they’re (currently) not a part of the W3C spec and may not be for some time, if at all, and therefore obviously won’t validate without tweaking your DOCTYPE declaration.
Do you think they’re useful outside of Safari or Dashboard? Would you like to see these form widgets available in other browsers such as Internet Explorer or Firefox? How can you see using the slider control in a real-world application? Are these widgets a step towards allowing developers to build even more expansive, applications on par with desktop equivalents?
The search input field is clearly designed for a specific purpose but I think if implemented appropriately, provides a more user-focused way of implementing basic text search for websites that is both intuitive and actually useful. The ability to provide a search field that remembers search queries across sessions with no special programming or scripting is a real boon for both designers and developers. Although we could debate the issue of how many ways the same task could be implemented, in the end, would it not be better to work from a standardized, lightweight method that gets the job done and works across browsers and platforms. Perhaps with a bit of luck and a bit of time we’ll get there.
So, what to do.
I’ve been debating implementing the search field as a test though it’s general usefulness would be limited since there’s only a small percentage of visitors who would see the benefit. The upside is that the field degrades gracefully so it behaves the same as a regular text input field in unsupported browsers. Safari 1.3 or the beta of Safari 2 is required to use the new WebKit features in Mac OS X.
Although I haven’t checked my site stats specifically looking for visitors using either of those browser versions, I will be monitoring things and maybe these changes will appear… or maybe not.