As Wishingline has slowly grown beyond just one person, the need to change workflows and improve our ability to communicate and collaborate with clients, peers and partners has prompted us to do things a bit differently than in the past. One of these things has been to set up our own internal Subversion server. Yeah — we know git is the new hawtness, but the tools available and integrating git are few, and honestly, our own experience with it has not left us paricularly enamoured.
In setting up a new Subversion server for us to use internally, secured on our network, but also accessible remotely, we started off with our own tutorial from back in 2007, a bit of help from the official Subversion book, and our old friend Google. We ran into a few problems along the way, and so in the hopes of saving others from running into the same issues, this entry will hopefully serve as a straightforward and complete guide to setting up a Subversion server using svn+ssh authentication on Mac OS X (Client and/or Server).
Prerequisites
In order to complete everything below on your own systems, you will need:
- At least two Mac systems: one which will act as a central Subversion repository (server) another as a development workstation.
- Mac OS X: Leopard 10.5.x (ideally 10.5.5) Client or Server. There’s a good chance that you’ll be able to follow this guide on Tiger as well, but YMMV.
- Xcode 3.0 or newer, included on the Leopard install DVD, included with the iPhone SDK and otherwise available free from the Apple Developer Connection site.
- Apple Server Admin Tools 10.5, available for free from Apple.
- A sufficient degree of comfort in working in the Terminal application.
- Administrative access.
A few Notes Before we Start
Nearly all the instructions to follow require extensive use of the Terminal application which can be found in the /Applications/Utilities folder on your Mac. Each line in the code examples that follow should be entered into the Terminal and followed by the Return key.
Setting Up Your Envrionment
As with other Unix operating systems, Mac OS X uses the PATH environment variable to determine where to look for applications when working on the command line. It’s common to install custom builds of Unix software in /usr/local in order to avoid interfering with core system software. A big benefit being that you don’t have to worry about updates to Mac OS X inadvertently overwriting your custom software installs.
To set your the PATH for your user account on your workstation, you will need to either create or edit a .bash_login file which is commonly used to customize the default shell environment on a per-user basis. To open or create the file, in the Terminal, type:
pico ~/.bash_login
If the file does not exist, the following needs to be added at the end of the file in order to set the necessary PATH variables so that you will be able to use the various Subversion applications without needing to specify the full path to them on your systems.
export PATH="/usr/local/aliasbin:/usr/local/bin:/usr/local/sbin:$PATH"
The one oddball in the above PATH is the path to the aliasbin directory. We’ll explain what that’s all about later on. Patience grasshopper!
Save and close the file by typing Control-O and then Control-X. You’ll be returned to a new prompt in the Terminal. Close the window and open a new one to load your changes.
Xcode and Subversion
When you install Xcode 3.0 or newer, a version of Subversion (at the time of this writing, version 1.4.4) is also installed. Although you could use this version and skip a few steps, this tutorial is based on using the latest and greatest.
Step 1: Installing Subversion Prerequisites
Before installing Subversion there are a number of prerequisites which can or should be installed depending on your specific needs. In this particular case, the only one necessary is zlib which is used to add compression support to Subversion.
In order to keep things neat and tidy, source downloads can be saved to the Downloads folder in your home directory or wherever you prefer.
Installing zlib
To download, compile and install zlib, type the following in the Terminal:
cd ~/Downloads

curl -O http://zlib.net/zlib-1.2.3.tar.gz
tar -zxf zlib-1.2.3.tar.gz

cd zlib-1.2.3

./configure --prefix=/usr/local
make && sudo make install

cd ..
Once you get to the sudo make install command, you should be prompted for your administrator password. Enter that when requested in order to complete the installation.
Installing neon
If you want or need WebDAV support in Subversion, you can also install the neon HTTP and WebDAV client library. neon is entirely optional, but if you want to install it, type the following in the Terminal:
cd ~/Downloads

curl -O http://webdav.org/neon/neon-0.28.3.tar.gz
tar -zxf neon-0.28.3.tar.gz

cd neon-0.28.3

./configure --prefix=/usr/local \
--enable-shared=yes \
--with-ssl=openssl \
--with-libxml2

make && sudo make install

cd ..
At this point you should now have the two primary prerequisites installed, meaning you’re now ready to download, build and install Subversion itself.
Step 2: Installing Subversion
Compiling Subversion with all the necessary support libraries is straightforward. If you did not install neon as in the prerequisites above, be sure to omit that line in the configure command below.
cd ~/Downloads

curl -O http://subversion.tigris.org/downloads/subversion-1.5.4.tar.gz
tar -zxf subversion-1.5.4.tar.gz

cd subversion-1.5.4
./configure --prefix=/usr/local \
--disable-mod-activation \
--with-apxs=/usr/sbin/apxs \
--with-ssl \
--with-zlib=/usr/local \
--with-neon=/usr/local \
--without-berkeley-db \
--without-sasl

make && sudo make install

cd ..
You should now have Subversion installed on your system(s) in /usr/local/. You can verify this by checking the version of one of the Subversion applications. Type svn --version in the Terminal.
In order to create a complete client-server configuration with remote repository access, you will need to complete Steps 1 and 2 on both Macs. If you’ve got more than two Macs, repeat as necessary.
Step 3: Workstation Public/Private Key Creation
Public/private keys can be used to secure your network communications even more than relying on simple password authentication. In this particular case, these keys can be used to provide secure authentication to your repository. To create a public/private keypair, in ther Terminal, type:
cd
mkdir ~/.ssh

ssh-keygen -t rsa
If you do not want to use a passphrase as an extra level of security, just press Enter when prompted. The ssh-keygen command will create two files in the .ssh directory, ida_rsa.pub and ida_rsa.
The first, with the .pub extension is your public key which you’ll need to copy to the Mac acting as the repository server into a file named authorized_keys. The second is your private key. Do not share this with anyone. Seriously. The private key will be unique to each system/user and identifies that particular Mac when authenticating to the server or to any other systems sharing the public key. Simply put, in order to authenticate successfully, you need both halves of the key.
Step 4: Setup Users and Groups on the Server
There’s a few different ways users and groups can be managed: the Accounts system preferences panel, the command line and the Mac OS X Server Admin Tools which can also be used on the consumer version of Mac OS X and not just the server edition.
Whether you’re setting up your Subversion server on Mac OS X or Mac OS X Leopard Server, using the Server Admin Tools makes things easy.
Launch the Workgroup Manager application from the /Applications/Server folder and press the Cancel button when prompted to login to the server. Instead, select View Directories from the Server menu and click the lock icon on the Workgroup Manager window to authenticate yourself as an administrator.
Create a Subversion Users Group on the Server
Before users can be given access to the repository, users all need to belong to a common group which will have read/write permissions for the repository on the server.
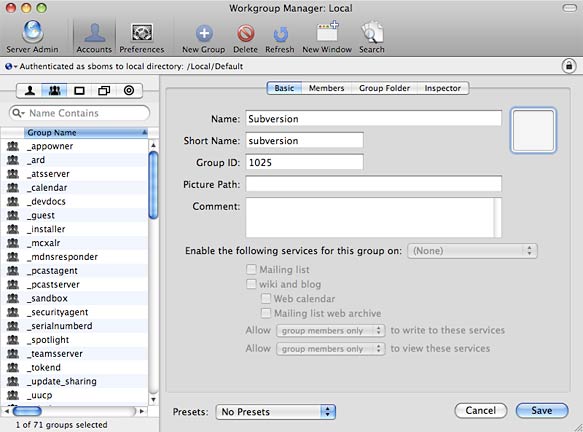
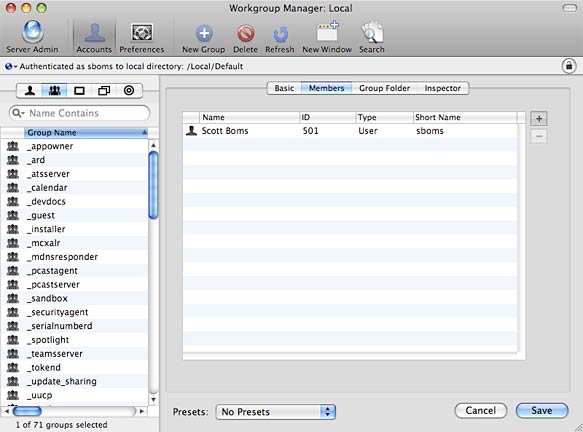
Click on the Groups tab to switch to the Groups view and then click the New Group button to create a new group. Give the group a Name and Short Name and press Save. Click on the Members tab to add users to the group or switch to the Users tab and add users to the group from there. Depending on how many users you need to provide access to, one method might be faster than the other.
Create User Accounts on the Server
Unlike other Subversion authentication methods (file://, svn://), accessing a repository via SSH requires that real user accounts exist on the server. In theory at least, these users should be able to access the server via SSH as any other user, though this can be restricted. More on that later.
Create any needed user accounts by clicking on the New User button in Workgroup Manager.
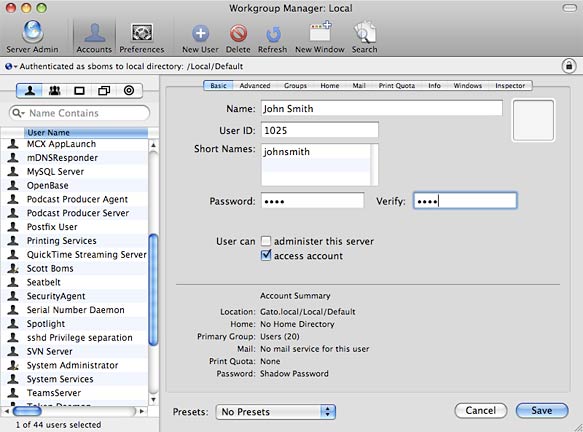
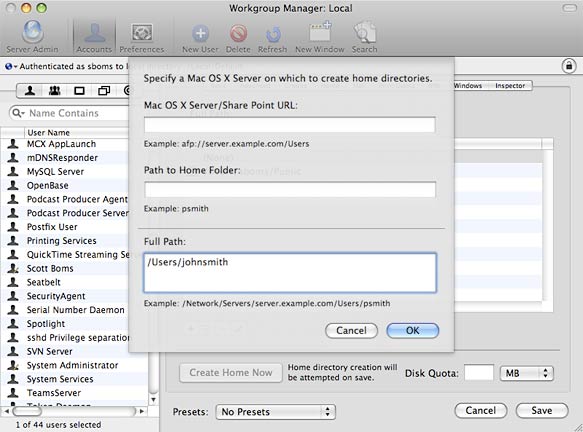
Under the Basic tab, enter a Name, Short Name, Password, and set Administrator Access. Under the Home tab, press the Add button and enter /Users/USERNAME in the Full Path field and press Ok. Save your changes and click the Create Home Now button. This should create a new user just as if you did so using the Accounts preference panel in System Preferences and also generate their home directory.
To finish configuring access for each user to allow passwordless access using their individual public/private keypair, the user’s public key needs to be copied to an authorized_keys file in a .ssh folder in their home directory on the server.
Copy each user’s public key file to the server into their home directory. Exactly how you do this isn’t particularly important, but putting the key in the right place, named correctly and with the correct permissions is.
cd ~/USERNAME
sudo cat id_rsa.pub >> ~/USERNAME/.ssh/authorized_keys
sudo chown -R USERNAME ~/USERNAME.ssh
sudo chmod 700 ~/USERNAME.ssh
sudo chmod 600 ~/USERNAME.ssh/authorized_keys
The cat command will take the contents from a file named id_rsa.pub and append it to the end of a file named authorized_keys or create a new file if it doesn’t exist. Repeat for each user needing access the Subversion server and replace USERNAME with the appropriate value. You can do this from a single administrative user account or by logging in as each individual user in sequence.
If a user has more than one computer which may require access to the repository, you can include more than one public key in the authorized_keys file; just ensure each is on it’s own line. Using the cat command above will do just that.
Step 5: Secure SSHD on the Server
Out of the box on Mac OS X, SSH is relatively secure, but there’s more we can do to improve it’s resiliance, particularly on the server side of things. To enhance the security of the server, edit the /etc/sshd_config file in the Terminal.
cd /etc
cp sshd_config sshd_config.orig
sudo pico sshd_config
Locate and edit the following list of configuration properties for the SSHD daemon process so they appear as shown below. Press Control-O, then Control-X to save the changes.
Protocol 2
PermitRootLogin no
PasswordAuthentication no
X11Forwarding no
UsePAM no
UseDNS no
AllowUsers [list of users -- see Step 4]
The list of users to be allowed should be based on the user’s short name and separated by a space. Note that you can skip changing the PasswordAuthentication setting if you may need to provide password access.
Note: If you need to add a new user later, you will also need to add that user to the AllowUsers setting in the sshd_config file and restart the SSH process on the server. Also, if you really want to secure things a bit more, change the default port to something other than 22. The catch is that you will have to include the custom port as a parameter when connecting via SSH.
Step 6: Create Aliases of the Subversion Applications
In case you were wondering… this is where we get really nerdy.
To allow more than one user commit access to the repository, when logging in via SSH, each authenticated user will run their own instance of the svnserve process on the server. As such, the process needs to run with a specific umask in order to prevent permission problems.
There’s two things we need to do in order to make this work:
- Create a few simple shell scripts that run the appropriate svn application using the required umask. This should be done for
svnadmin,svnlookandsvnserve. - Set the necessary permissions on these scripts.
The commands to do this are:
sudo mkdir /usr/local/aliasbin
sudo pico /usr/local/aliasbin/svnserve
Then in the pico editor, type the following. Replace svnserve in the example with each of svnadmin, svnlook and svnserve.
#!/bin/sh
umask 002
/usr/local/bin/svnserve "$@"
Press Control-O and then Control-X to save your changes, quit the editor and return to a new prompt. Finally, set the necessary ownership and permissions on the scripts.
sudo chmod +x /usr/local/aliasbin/svn*
sudo chown root /usr/local/aliasbin/svn*
sudo chgrp wheel /usr/local/aliasbin/svn*
Step 7: Append the authorized_keys File
In order to ensure that the new svnserve alias is used when a user is interacting with the Subversion server, a special command must be prefixed before each public key listed in a user’s authorized_keys file.
sudo ~USERNAME/.ssh/authorized_keys
Replace USERNAME above with the specific user’s shortname.
command="/usr/local/aliasbin/svnserve -t
--tunnel-user=USERNAME -r /svn" ssh-dsa PUBLIC_KEY
Replace USERNAME above with the specific user’s shortname and note that the command above should be added on a single line with no line breaks, including the entirety of the public key. The value of PUBLIC_KEY should be the existing public key. Save the changes by pressing Control-O and then Control-X.
Step 8: Create a Repository on the Server
You’re most of the way there now… You’re now finally ready to create a new repository and project to test things out. The basics of this are no different than if you were using basic file:// or svn:// methods to access the repository.
Note that you shouldn’t need to specify /usr/local/aliasbin before the svnadmin command because you should have that included first in your PATH variable. If you haven’t done that, go back to step one before proceeding any further.
To create a new repository and versioned project at the root of the server and set the necessary permissions (though technically you could really put this anywhere you wanted on the system), simply execute the following, replacing SVN_USERS_GROUP_NAME with the name of the group set in step four:
sudo mkdir /repository
sudo svnadmin create /repository/test_proj
sudo chgrp -R SVN_USERS_GROUP_NAME /repository
sudo chmod -R 770 /repository
sudo chmod g+t /repository/test_proj/db
The above commands create the repository directory itself, create a new test project (named “test_proj”) and then set the necessary permissions. The one critical command above is the last one which sets a sticky bit on the project’s “db” folder which ensures that permissions are maintained, particularly since more than one user will have write access to the project. This will save you frustration in trying to sort out why a second user all of a sudden cannot commit a change to the repository…
Finally, in order to secure the project so that only authorized users can read and write to it, you should edit the svnserve.conf file for the project and set the appropriate permissions as below. By default anyone who can login to the server should be able to access the repository in a read-only state, but no one has write access. This is clearly not right, so let’s fix that.
sudo pico /repository/test_proj/conf/svnserve.conf
Edit the access rules to appear as follows:
[general]
anon-access = none
auth-access = write
Press Control-O and then Control-X to save your changes and return to a new prompt.
At this point you should have a basic project created and the necessary permissions set to ensure that all users will be able to access it as needed. A caveat to repository access using svn+ssh is that there is no mechanism to restrict access to only specific users on a project by project basis unlike other methods which provide simple facilities for this using configuration files. These configuration files are not used when accessing a repository via svn+ssh.
Note that when you create a new project in your repository, repeat the process of creating the project as illustrated above. You can obviously skip the step of creating the actual repository directory itself.
Step 9: Check out Your Test Project
That’s it. Everything should be set and ready to roll. You can test that your Subversion server is configured properly by performing a simple checkout of your test project.
In a Terminal window on your local workstation, type:
cd ~/Sites
svn+ssh://USERNAME@IP_OR_HOSTNAME/test_proj
If all goes well, the project should download securely over SSH to the Sites folder on your Mac workstation. You’re then free to test committing a change back to the server.
cd ~/Sites/test_proj
touch read_me.txt
svn add read_me.txt
svn commit -m "Initial commit test."
If things work the way they should (cross your fingers), you should see a message indicating your change was committed to the server as version 1.
Wrapping Up and Final Notes
Setting up secure access to a Subversion repository is not for the faint of heart as it turns out and hopefully you made it this far.
As noted earlier, there’s a few other things you might want to know about how things are configured. You’re best to grab a copy of the official Subversion book and read through the relevant chapters. In particular, although you’ve provided secure access using public/private keypairs and set a command value in the authorized_keys file which otherwise prevents normal SSH access into the server, it is possible that a user could gain SSH access through other methods. In order to provide as few permissions as possible, you may want to set a few more restrictions by setting additional options immediately after the command in the authorized_keys file. You can read more on this on page 168 in the official Subversion book.
Questions, comments, or errors/typos in any of the above can and are encouraged to be noted in the comments. Finally — as with any such tutorials, YMMV.
So say you…
Wow, real nice tutorial here. I’ll have to give this a go.
Are you sure about setting the sticky bit on the db directory? It doesn’t preserve permissions, it restricts deletions (see “man sticky”). That will ultimately prevent multiple users from committing files, because subversion needs to delete files created in this directory by other users in previous commits.
Also, I believe there’s a typo in the svnserve alias script. It should contain $@ instead of $0, like so:
/usr/local/bin/svnserve “$@”
Thanks for catching the typo Lorin. That’s corrected now.
In regards to whether it’s correct to set the group “sticky bit” for the directory — that’s right out of the Pragmatic Subversion book and is intended to ensure that individual user ownership of files in the “db” directory doesn’t prevent other user’s in the same group from being able to commit changes.