LIke pretty much every one of my peers, I’m gutted at the news of Steve’s passing. I don’t know what I’d be doing now if not for what Apple and Steve have created or enabled. Thank you Steve, for everything.

LIke pretty much every one of my peers, I’m gutted at the news of Steve’s passing. I don’t know what I’d be doing now if not for what Apple and Steve have created or enabled. Thank you Steve, for everything.
Yesterday I finished up some work on a little pet project I started via the day job back in December ‘10 just before the holidays. Apple had recently released iAd Producer and after spending a bit of time tinkering with it, I thought it would be a fun little project (read: distraction), but potentially useful down the line for myself or others, to produce a set of wireframe objects based on the iAd platform and some of the default widgets and templates included in the iAd Producer software to make designing iAds — from an experience point of view, just a little bit easier.
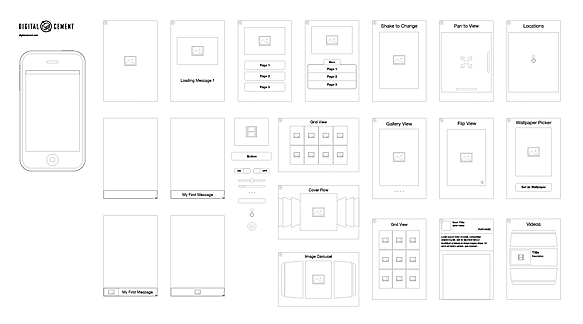
We announced the publication of version 1.0 yesterday and for good measure, I’m mirroring access to the work here. You can download it right now even.
Download the iAd Wireframe Stencils (11.1 MB zip)
The stencils/templates come in two flavours currently — either OmniGraffle and Adobe Illustrator for your wireframing and experience planning pleasure.
If you find them useful, I’d love to know. Same goes for any improvement suggestions, additional elements worth including, etc. For example, is it worth creating a complementary iPad-sized version of these now that iAds have started to be opened up on that platform as well?
If you’re living in the US, today is iPad day, otherwise known as the day consumers get their hands on the future of the modern personal computer. If you’re not, well, then it’s pretty much any old Saturday.
Based on the general reaction of the media, celebrities, and probably most of my US-based friends, Apple’s new iPad device sure sounds like a winner. Hardly surprising given Apple’s basically unbeatable track record over the last few years.
Now if only us Canucks could get our hands on one… Nope. Not feeling left out at all…
On Tuesday, Steve Jobs was quoted in the New York Times when commenting on Amazon’s Kindle ebook reader device as saying:
It doesn’t matter how good or bad the product is, the fact is that people don’t read anymore.
This caught my eye in particular and stopped me in my tracks as it relates to a trend I’ve noticed on Apple’s own site over, let’s say, the last year or so. Less text. More graphics. More video.
Apple’s website, in particular, prior to the big design change that rolled out last year was full of text content. Nearly every page, for virtually every product was loaded with well-written marketing copy. Now, not so much, at least in terms of the amount of text content. It’s still exceptionally written, full of beautiful graphics, strategically on target with Apple’s raison d’étre and Jobs’ infamous RDF — there’s simply less to read.
Jobs goes on to say:
Forty percent of the people in the U.S. read one book or less last year. The whole conception is flawed at the top because people don’t read anymore.
I find these comments fascinating due to the proliferation of book stores here in Toronto and around the world — the big chains and small independents over the last 10 years. It’s completely contrary to my own experience. If I had to guess, I would say my local and extended (interweb-related) social circles read more, not less. Based on my book spending and reading habits over the last few years, I certainly wouldn’t fall into that 40%.
Whether there is any direct connection between Jobs’ feelings on the matter of reading and the amount of text content on the Apple website is not for me to say with any absolute certainty since I do not work for Apple, nor do I have any information on the inner workings of Apple’s web design/content teams, but it does strike me that such a connection could be drawn to explain what happened to all the content.
Leopard, despite having 300 new features being promoted has still managed to tuck away a few more interesting and useful tricks which are now slowly being uncovered. A couple such useful features revolve around what might be one of my favourite new features - screen sharing.
Basically Apple included a full VNC client right into the core of Leopard; something previously only available either via third-party apps or Apple’s own Remote Desktop. If you haven’t tried it, find a friend running Leopard, connect via iChat and share your screen or connect to theirs. Cool, no?

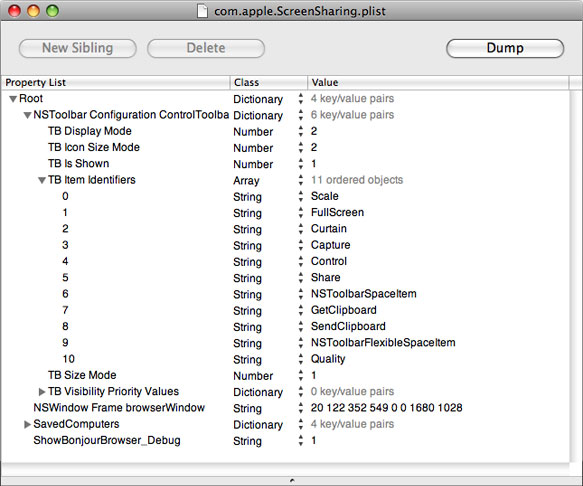
But there are a few more hidden features tucked away in the System/Library/CoreServices folder on your drive. The first is a browser view to see any active systems via Bonjour. You can access this by running a simple defaults command in the Terminal and then opening the Screen Sharing application which you can find in that CoreServices folder.
defaults write com.apple.ScreenSharing ShowBonjourBrowser_Debug 1
The browser may be a bit buggy which would explain why it’s disabled by default, but it’s handy nonetheless. On top of this, you can also access a number of other useful features via the toolbar in the screen sharing app window which bring it a few steps closer to Remote Desktop such as Full-screen mode, Control the other screen, Share Control of the other screen, Capture (take a screenshot), Curtain and adjust Quality. Adding these is simply a matter of editing the application plist file which you can find in your Preferences folder.
Open the com.apple.ScreenSharing.plist file using the Property List editor (installed with the Xcode developer tools included with Leopard) and expand the list items to show the following.
Root
  NSToolbar Configuration ControlToolbar
    TB Item Identifiers
Next, add the followin: FullScreen, Capture, Curtain, Quality, Control, and Share, each with a String class.
Once you’re done, save and start up a new screen sharing session to enjoy the even more useful VNC service built into Leopard.
Believe it or not, I’m in the midst of a not-insignificant design refresh of the blog (no, seriously!) and as part of that I’ve been looking at making some modest accessibility improvements under the hood. Part of that has been adding or improving accesskey support which I quickly discovered has changed in Leopard depending on if you are using the new Spaces feature.
Under normal circumstances accesskeys are triggered by pressing the Control key plus the specific alphanumeric key. If you’ve enabled Spaces, using Control and a numeric key will instead switch spaces, at least by default. Instead you need to use Control-Option plus the number key.
You can change the keyboard settings (use Control, Command, Option or none) from the System Preferences for Spaces to potentially avoid this issue entirely though using Command would conflict with Safari’s bookmark handling features.
On the other hand, using Control and some other alphabetic character should still work as expected and as they did in Tiger if Spaces is not enabled (which is the default in a clean, out of the box Leopard install).
In July I bought an iPhone while down in Austin on a business trip with the understanding that although I would be able to activate it, allowing me to use it as an iPod with WiFi functionality, the phone-related features would not be functional until someone figured out how to un-tether the device from AT&T so that it could be used on the networks of other, non-US carriers such as Rogers in Canada.
In late August, the iPhone was unlocked by a group of industrious hackers. The unlock process wasn’t that simple, but certainly nothing insurmountable for those with a bit of technical knowledge, and made easier shortly after by the release of GUI tools to accomplish the task.
The various tools developed by those interested in the iPhone as a new platform, and otherwise unsatisfied with Apple’s web-oriented SDK, allowed the installation of additional applications on the device — both commonly used open-source applications and software designed just for the iPhone thus making the device even more appealing to many. Games, servers, ringtones, theme customizations and more.
Everything was golden until last week when Apple released a new version of the firmware software for the iPhone which would, in essence, cripple hacked phones. Although this was not unexpected, it essentially sent that group of hackers back to the drawing board to find new methods to activate and unlock the device.
The reason I can live with my iPhone as-is for now is simple: there’s no official word on a Canadian launch of the device. Unless a new method of activating and unlocking the device are developed, I will not be upgrading my iPhone to version 1.1.1 or newer.
My speculation is that by the time Apple and Rogers, the only carrier in Canada with the network capabilities to handle the iPhone (can you say lack of competition?) come to any licensing and marketing agreements, a second generation device will be on the market or near ready for release.
At that point or whenever there is an official release in Canada, moving to an un-hacked, official device will (should) be as simple as purchasing a new iPhone and inserting my existing SIM card from Rogers or getting them to switch the SIM associated with my account. This should mirror the process existing AT&T customers went through when they switched to an iPhone. I do not expect that an existing device purchased in the US will function, even with a valid SIM card.
At least I hope it will be that simple.
The real problem as I see it, ultimately, is two things: Rogers and Apple. There’s no cellular competition in Canada. There’s Bell, Rogers, and Telus. Rogers owns Fido, so they don’t count. Neither Bell nor Telus support GSM so they’re immediately ruled out, leaving only Rogers as a possible carrier. To some extent I think this puts Rogers on the high ground in negotiations, not Apple.
As most Canadians using any kind of smart-phone, mobile carrier data pricing is off the charts, something a lack of competition does not help. $20 a month for 5MB of EDGE data is shameful and unrealistic.
This presents a problem for Apple because they need to force a sea change in how data plans are priced on the chosen carrier here in order to make the iPhone appealing to both existing and new customers. I don’t expect people would stand for an iPhone-only data plan that is miles better than those offered for other devices.
Time will tell how this will all play out in Canada but for now I will continue to happily chirp away on a 1.0.2 firmware version of the iPhone. Oh — and yes, the phone part is actually good. I’m considerably happier with it than the Sony Ericcson device my SIM card came from.
I can’t recall where I saw this tip, but for the sake of propagating it across the interweb, I’m going repeat it.
To give DiskWarrior a swift kick in the pants when booting your machine and during general operation of the application, make yourself a backup copy of the original DiskWarrior CD on DVD instead. Simply pop the disc into your Mac, launch Disk Utility and create a new disk image of the DiskWarrior CD on your Desktop. Burn to DVD media. Done.
Alternatively, use Toast to accomplish the same thing.
Normally OS upgrades seem to go so smoothly… But this one left me (and I’m sure many others) with a nasty surprise — no communication between PHP and MySQL. Not nice. After a couple quick searches and no answers I decided to search out one myself. Discovering the problem was simple, and so apparently, was devising a solution.
If you fire up a quick PHP info file, you’ll see that the MySQL socket specified in the included version of PHP is wrong (or at least different and not what is expected) compared to older OS releases.
In 10.4.4, it is set as with-mysql-sock=/var/mysql/mysql.sock, whereas previously it was /tmp/mysql.sock.
Thankfully, there are at least two things you can do to remedy this.
php.ini file (by default it should be in the /etc directory and find the mysql.default_socket line and simply add /tmp/mysql.sock following the equals sign, save and restart Apache./etc/ named my.cnf. In the file, include a line which reads (on two lines):
[mysqld]
socket=/tmp/mysql.sock
Edit: The original second solution has been removed due to security concerns as indicated by Apple. A revised alternative solution has been added in its place.
Given the last few posts here, backing up data and important files has obviously been on my mind. It’s coincidental more than anything, but I’ve continuously had problems with the primary removable Firewire drive I had bought to store my daily and weekly backups. So much so that it’s now in many pieces in the garbage with the disk platters more or less obliterated. It’s definitely unrecoverable and I feel much better given how much time was wasted repairing the drive and trying to get good successful backups.
What I’m really interested in here, and the main point of this post is this: How are you backing up your important files?
In particular, this is for the web developer folks. How are you backing up your design files (Illustrator, Photoshop, Fireworks) and your code files (HTML, PHP, Rails, MySQL). Perhaps the real first question is: Are you backing up? If so, how often? And to what form of media? If not, why not?
Once you’ve completed a project and it goes live, what then? Do you make a full backup of all the project files? Do you keep data available “online” (on disk) so that it’s easy to make changes down the road? Are you using a version control system such as CVS or Subversion? Do you develop using a local environment such as is available on Mac OS X? Do you clone your backups and keep a second copy offsite somewhere?
I’m pondering how I want to proceed with backups since my experiences with a certain brand of Firewire hard disks has left me with an extremely low opinion of their hardware and service technicians. The immediacy and economical value of using hard disks as opposed to tape has become more apparent in recent years as disks have grown larger and the cost per GB has decreased.
Tape is a good longer-term archival medium, but in my experience I often have to retrieve files for old projects quickly to make minor changes. Being able to mount a hard disk, grab the file and make the changes is just so much more efficient than finding the right tape, un-archiving the file off tape, making the change and then re-archiving the file.
Perhaps it makes sense to use both. Tapes for archival purposes. Once a week, perform a full backup to tape as well as archive completed work. And do daily backups to hard disk. I guess it ultimately depends on needs and practicality.
What do you think? What do you do?
Because I apparently can’t help myself — I’ve added 4 more Quick Picks to what is now somewhat officially dubbed the ‘Backup 3 Quick Picks Pack’, bringing the total number of included Quick Picks so far to 14.
New in version 1.0.4 are Quick Picks for:
Download version 1.0.4 (Zip file)
I’m likely going to stop posting regular updates here unless there’s a good reason not to do so. Instead, you’ll be able to get updates via MacUpdate or Apple’s Mac OS X Downloads page. I’m still debating whether I want to list it at VersionTracker.
After the release of my Catalog Quick Pick plugin for Apple’s Backup application, I had a request for two more Quick Picks, so I whipped them up and updated the full archive. Easy peasy.
For any additional requests, please post them in the comments of the previous post.
Thanks to David Watanabe for his improvements to the NewsFire RSS Quick Pick. A new version has been posted along with three new Quick Picks for ecto, Transmit and Linotype’s FontExplorer X.
Like most people, in practice I don’t end up backing up my system as often as I should. Knock on wood — I haven’t ever really been bit badly by this.
That said, the latest version of Backup included with my .Mac account has inspired a new sense of purpose in making backups and really utilizing all that storage space included with the account. Sure I used it before, but certainly not enough to feel like I was making the most of the service.
So, in the hopes of kicking my own butt and hopefully one day saving my bacon, I’ve put together a few Quick Pick plug-ins for Backup 3 which I’m making freely available to anyone who wants them.
Download all my Backup 3 QuickPicks
Ah, the thing I missed yesterday… Right. Easy as pie. Unzip the archive and drop the Quick Pick file(s) into /Library/Application Support/Backup/QuickPicks/. I could build an installer for all this, but I don’t think it’s necessary or worth the effort.
If you can think of something else you’d like a Backup 3 Quick Pick for, drop a note in the comments. I’ve got a few more ideas cooked up, but this is good for now. Enjoy!
I had 10 seconds to spare today and decided to whip up a quick Backup 3 plug-in to backup my Catalog disc database. It was partially an excuse to see how easy it was and an excuse to skip out on doing real work for a few minutes and let my mind unwind.
It’s so easy to get Quick Picks working that I may have to write a few more of them so I can really get my money’s worth out of my .Mac account. If I do and they’re useful to others, I will certainly post them here for your downloading pleasure.
Welcome to the long-delayed (and awaited) Wishingline Design Studio, Inc. 1.0 site. It’s been a long journey from original concept through revision after revision after revision to get to where we are right now. That being said, there’s still work to be done and bugs to fix and pieces otherwise missing or incomplete. These will all be attended to shortly.
For those interested, here’s a quick laundry list of some of the basic features of the site.
My Dashboard Widget Xcode Template is now listed on MacUpdate with 704 downloads and counting. Since there are scattered rumours of Tiger already being delivered to some users (a week early), get your copy while it’s hot!
The Dashboard is a bit of a web developer’s paradise - standards-based code with only one browser required for development and testing. Plus, the use of web plug-ins as well as system level scripting languages (AppleScript, Ruby, Perl, etc.). The possibilities are almost endless really.

Creating widgets for the Dashboard isn’t really that hard, but there are a handful of useful things to know before you get started and I’ll try to outline a few that will hopefully save a bit of debugging and gray hairs along the way.
Default.png. It gets used as the drag image when a user decides to try your fancy new widget in the Dashboard.version.plist file and keep it up to date if you modify your widget.Icon.png and keep it in the main directory of your widget bundle.Dashboard under this path:/Library/Application Support/Apple/Developer Tools/Project Templates/The template will do a lot of the preliminary work for you. It creates the base HTML, CSS and JS files along with the necessary property list XML files - and will automatically modify certain properties in and of those files based on the name you give the project.
The Info.plist file contains all the current allowed properties for a widget. Disable or remove as necessary, but they’re all there to save you looking them up in the documentation.
Well… what are you waiting for? Let’s see those widgets!
I’ve been waiting for a good solution to secure ftp for a long time now and finding this link just made my day. The English translation isn’t perfect, but follow along with the Terminal commands and you should be good to go.
Do make a backup of any files first though — just in case.
During the process of making some of the small design and features changes that have seen the light of day on this site, I split out the sidebar calendar widget into its own include file. The Movable Type manual suggests this as a way of reducing the processing required during rebuilds of the index templates. Makes sense. Why do something more than once if you don’t have to.
One of the other things that made the cut was a complete refactoring of the actual HTML for the calendar since it was unnecessarily bloated. This was a good opportunity to play with the CSS a bit and give the calendar a bit more visual flair.
The thing I want to point out is that there’s a single TD element with an ID applied, indicating the current date. I made this change/addition but then realized that it’s not practical if I don’t post every day or I don’t rebuild the template every day to have the ID change positions appropriately.
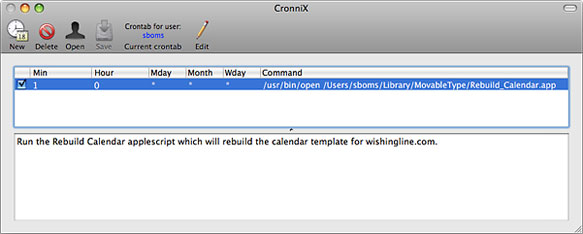
Given that I’m currently using static publishing through Movable Type, I needed a way to automatically rebuild this template daily and ideally without me needing to remember to actually do it myself. Due to limitations at my host, I discovered that my options for automating this were limited so I rolled my own solution using a bit of AppleScript and a cron job on my main development system which stays on pretty much all the time.
For this to work, you first need to turn on the option for “Enable Accessibility for Assistive Devices” in the Universal Access preferences in Mac OS X which allows you to target menus and execute keyboard commands programatically using AppleScript. Essentially this allows you to make just about anything scriptable whether an application supports it natively with a built-in scripting dictionary or not.

The general rundown of how the script works is this - the script launches via cron, opens a specified URL (the path to the Movable Type rebuild script along with the template ID) which, once loaded, causes the button on the page to be clicked using an accesskey which then rebuilds the template at which point the script closes. Sounds simple right? There was one snafu along the way, but luckily it was easy to resolve.
That one snafu? I had to modify one of Movable Type’s internal templates (specifically /tmpl/cms/rebuild_confirm.tmpl) to add the necessary accesskey which would allow the script to programatically press the button causing the template to be rebuilt. Not having the accesskey meant that there was no mechanism to actually press the button on the page.
The script then, when running and after the page has fully loaded (checked using do JavaScript( document.readyState = "complete" )) uses the keystroke command to execute the keyboard command for the accesskey. In this case set to Control-S in the template.
I had a tough time sorting out exactly how to format the keystroke command (lousy AppleScript docs…), but for future reference and anyone else struggling it is:
tell application “System Events” to keystroke “s” using {control down}
I was missing the tell statement. It was late when I was working on this part so I’ll blame it on being tired…
Mac OS X, being a Unix-based OS includes the cron scheduling utility. cron is used in the system to run a series of regular tasks for doing things like cleaning up and archiving log files but is really a general-purpose scheduling utility and a perfect fit for what was needed here to automate running this script. To add the task to the schedule, it’s simply a matter of editing your crontab file and adding the new command. In this case, I set it to run every day at 12:01 AM.
Note that you may want to prepend the command with /usr/bin/open in order to actually open the application bundle (the AppleScript) via the shell. This shouldn’t be necessary since the path is already included in the default Mac OS X shell environment, but it’s probably good form just in case.
The crontab file can be edited by typing crontab -e in the Terminal or you can use a GUI application such as CronniX which is a bit easier and also makes testing things easy. If everything works, you’re good to go.
One minor caveat to all this is that you need to have saved your Movable Type administration login information so the browser can access it without intervention. This means in your System Keychain. I don’t recommend running something like this on a public computer, but in a secured environment (e.g. home computer behind a firewall), you should be sufficiently safe.
You can download a generic version of the script via the link below.
Rebuild Movable Type Template AppleScript - 5 KB (.sit file)
Following up on a tip posted yesterday over at Mac OS X Hints which made the little (invisible) bell above my head go “ding ding ding” — I noticed that menu items in applications on Mac OS X use curly quotes and not straight quotes which follows good typographic form. That being said, I realized that this might be the reason why I hadn’t been able to create a new keyboard shortcut for the “Update songs on …” command in the iTunes File menu.
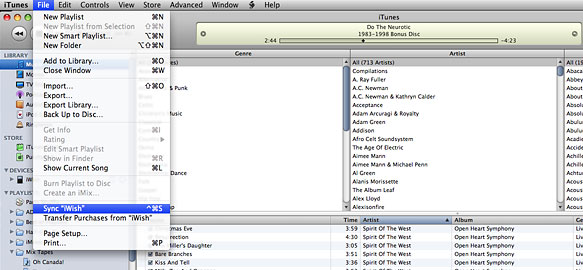
Earlier I tried with regular quotes and noted that it simply didn’t work. I gave up quickly on this one because it wasn’t terribly important, but I’m now happy to report: problem solved.
So for anyone who may not know how to create curly quotes (or typographers quotes as they’re often called), press Option-Left Square Bracket for the opening quotation mark and Option-Left Shift-Square Bracket for the closing quotation mark. For single quotes, use the Right Square Bracket key; the remainder of the key sequence is the same.
Taking cues from an old project originally started by Aaron Faby, I’m making a new version of the MySQL Preference Pane available for public consumption as part of my MySQL Tools package.
The MySQL Tools package includes a Startup Item and a custom PreferencePane for Mac OS X 10.2 or 10.3. The software is being distributed via an installer package which will install the files in the /Library folder at the root level of your hard drive. Some manual configuration is currently required following the installation though I am going to work on adding the necessary preflight/postflight scripts to the installer to take care of this.
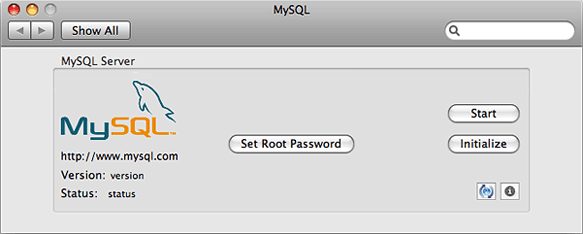
There is also one potential security issue with the software (see the Read Me portion of the installer for additional details) which I am also intending to address so I do not recommend using this in potentially high-risk deployment environments at the moment. It should be fine for local testing and development though.
New in this version is:
I have a few ideas for additions and fixes to improve the tools which will appear in future releases.
Having had the benefit of using Mac OS X Panther since it’s introduction at WWDC back in June of 2003, I’ve had a bit longer than the average user to tinker, poke around and undoubtedly break things. One welcome addition in Panther has been the inclusion of X11 (XFree86), albeit one that is not installed by default (it’s included on Install Disc 3). X11 is not something terribly useful to most users, which is why it’s an optional install, but for those that do, having the software available saves us from using other third-party implementations.
The X11 environment brings a wide variety of X-Windows-based GUI applications running on other Macs, Linux or other *nix flavours to your desktop.
For myself, this is extremely useful since I need access to server tools which would otherwise be difficult to access remotely, leaving me stuck sitting in freezing cold server rooms. Not much fun for anything longer than 5 minutes. While I try to do as much admin work as possible through the commandline, sometimes it’s just faster and easier to use a GUI. The big difference, though one which likely only affects a small selection of apps is that Apple’s X11 implementation is integrated with the Quartz graphics engine in Mac OS X itself.
A good example of how I’m using X11 in a real-world situation is using rdesktop to access Windows Terminal Services, a replacement option for Microsoft’s own Remote Desktop application to manage an Exchange Server run out of Chicago, IL. One less piece of proprietary Microsoft software is always a good thing in my books.
I’m also using X11 to help manage a few IRIX-based SGI servers. Combining SSH and X-Windows on Mac OS X is a great set of tools to securely access GUI services running on the SGI servers. For example, once I SSH into the server, it’s just a matter of typing toolchest to bring up the GUI tools on my Mac in the X11 environment.
First, make sure you’ve installed X11. You’ll find it in your Applications/Utilities folder if it has been installed otherwise get installing (Disc 3 in Panther). In order to continue you’ll also want to be comfortable working in the Terminal. The instructions will be reasonably verbose in case you’re not quite a Unix guru.
/etc/sshd_config file which is the configuration file for the SSH daemon.
sudo cp /etc/sshd_config sshd_config.origThe sudo command will allow you to execute the cp (copy) command with root permissions giving you full read/write access to the filesystem. You will need an administrator password. Enter it when prompted.
sudo pico /etc/sshd_configsshd_config file should now be visible in your Terminal window. Locate that line that reads #X11Forwarding no and change it to remove the octothorp character at the beginning of the line to activate it. We also need to change the line to replace no with yes.
The final line should look like: X11Forwarding yes
Save your changes by pressing Control-X which will display a save prompt. Press ‘y’ (or Return) to accept and then press Return a second time to select the previous filename. This will save the file and return you to a new Terminal prompt.
Now that we have X11 configured, if you have a second computer available you can test a remote connection.
ssh -X [USERNAME][IP_ADDRESS]@@.
Replace @ and [IP_ADDRESS]@ with the appropriate values and enter a password for the requested remote account. Assuming you are successful here, pass go and collect $200 and go to step 3.
/usr/X11R6/bin/xeyes
/usr/X11R6/bin/xclock
exit in the xterm window when you are done. This will disconnect you from the remote server.And that’s all there is to it. Happy managing.