The best part Ethan Marcotte’s new book, Responsive Web Design (available from the fine people at A Book Apart on June 7th) is that it’s brimming with his thoughtful ideas and unique approach. Actually, the best part of the book is the immediate and concise way he ties together everything you need to know to start practicing “responsive” design yourself. On the other hand, the best part is his hilarious self-deprecating humour that makes it almost impossible to read without hearing his voice narrating it in your head. That’s just me? Oh.
Responsive Web Design by Ethan Marcotte (published by A Book Apart)
The prescience and immediate relevancy of this book cannot and should not be understated as the world of web design is further inundated by new devices and greater uncertainty, demanding an increased need for flexibility to understand and manage it all.
And while the concept of responsive web design might not be a silver bullet (it never claimed to be), Ethan’s book does a brilliant job of wrapping what you need to know into a straightforward and accessible package — covering both the lenses through which to approach deciding whether it’s an appropriate choice for a given project, and how to go about making it happen if it is.
Responsive Web Design is 155 pages of compact insight and unquestionably one of the most important books you’ll read many, many times this year.
If you thought slab serifs were hot a few months ago, then they must be on fire right now given the release this week of not one, but two smokin’ new families of slab serifs — Neutraface Slab from House Industries and Sentinel from Hoefler & Frere-Jones.
Neutraface Slab by House Industries and Sentinel from Hoefler and Frere-Jones
If anyone’s looking for me, I’ll be burying my wallet in the back yard.
Since I seem to be on a roll blogging for the first time in ages, I was thinking this morning that now would be a good time to assemble a new set of wallpaper images for the iPhone and iPod touch. As with previoussets, these are taken from a handful of recent favourite photos from my Flickr photostream.
Wishingline iPhone lock screen wallpapers (set 3)
As before I only ask that people link back to this post instead of redistributing the individual download archives or wallpaper images themselves.
I’ve toyed with the idea of posting more multimedia content (ok, any) here over the last while with the thought that this Notebook should be equal parts content generated by us and content from others that we’ve discovered or been led to in our interweb travels.
To that end, this inspiring 2008 TED Talk from well-known designer Paula Scher provides food for thought by looking at how the best design work is “serious” and the implications of when work becomes “solemn”.
For the past few weeks we’ve been working on designing and building out a site for a client and since selecting Movable Type 4 as the CMS, we thought it would be worth giving the relatively new Virtual MT a try as part of our development process. Although our overall experience using VMT so far has been great, we ran into one small nit: the default site isn’t served from the root URL of the server and instead uses a subdirectory path. This (probably) should be a user-defined option, but isn’t currently, so we set out to resolve this for ourselves.
Let’s be honest — Movable Type has always been a bit of a pain to run on Mac OS X unless you happen to be or know someone well-versed in the black art of the command line and Perl. A black art if you’re a designer at least. This is exactly why VMT is great, particularly if you’re already used to running Windows in Parallels or VMWare for browser testing and debugging.
Virtual MT comes pre-packaged as part of a lightweight Ubuntu Linux OS. Downloading and running an instance (or multiple instances) of VMT is simple and we’ll cover the process using Parallels 4 before walking through the configuration change to allow the default site to be served from the root path of the included Apache web server.
Downloading and Running VMT
Get started by downloading a copy of Virtual MT which comes in both Open Source and Commercial (Pro) flavours. Unzip the downloaded archive and read the included Read Me file. No really, read it.
Parallels Virtual Machine list
Next, locate the VM Image file for Parallels (or your preferred Virtual Machine software) in the unarchived folder in your Downloads directory. In the case of Parallels, this file should end with a .pvs extension. Double-click the file to add it to the Parallels Virtual Machine library. Parallels 4 will request the VM image be converted to the newer bundle format.
The Virtual Machine book screen in Parallels
Click on the Virtual Machine and start it. In a web browser, go to the Configuration Page URL displayed in the running Virtual Machine window.
The running Virtual Machine window in Parallels
Complete the base configuration to enable access to the VM and Movable Type itself.
The configuration screen for the Movable Type JumpBox
Once the base configuration is complete, go back to the main Configuration Page and click on the SSH/SFTP icon. Check the checkbox to enable SSH/SFTP access and then save the change.
The Movable Type configuration home screen
At this point you should have a fully functional, ready to customize virtualized install of Movable Type. No mucking about in the command line or Perl module installation required. Next — improving the configuration.
VMT Configuration Changes
In order to “correct” the configuration of VMT, provide access to the VMT install at the root of the included Apache web server and make accessing the MT insall and any published templates easy, you may want to install either MacFuse or ExpanDrive which let you access the virtual OS filesystem just like any other shared disk. Alternatively, Transmit or any other software that supports SFTP connections will also work, though direct access in the Finder is considerably more user-friendly.
And now the nerdy part. To make the necessary Virtual Machine configuration changes, run the following two commands in a new Terminal window. Replace VIRTUAL_IMAGE_IP_ADDRESS with the one provided in the VM window on your computer.
After entering your admin password when prompted, in the pico text editor, change the contents of the jumpbox-app file to match the following:
# Alias /movabletype/blogs /var/data/mt-blogs
Alias /movabletype /var/data/movabletype

<Directory /var/data/movabletype>
  AddHandler cgi-script .cgi
  Options +ExecCGI
  # Uncomment the following lines to enable FastCGI
  # <FilesMatch "^mt(?:-(?:comments|search|tb))?\.cgi$">
  #   SetHandler fastcgi-script
  # </FilesMatch>
</Directory>

<Directory /var/data/mt-blogs/*>
  AllowOverride All
</Directory>

# Uncomment the following lines to enable FastCGI
# FastCgiServer /var/data/movabletype/mt.cgi
# FastCgiServer /var/data/movabletype/mt-search.cgi
# FastCgiServer /var/data/movabletype/mt-tb.cgi
# FastCgiServer /var/data/movabletype/mt-comments.cgi

RewriteEngine on
# RewriteCond /jumpbox/var/widget-on !-f
# RewriteRule ^(/?|/index.(html|php|htm))$ /movabletype/blogs/my_blog [R]
# RewriteCond /jumpbox/var/widget-on !-f
# RewriteRule ^/jblogin.(html|php)$ /movabletype/mt.cgi [R]

# DocumentRoot /var/www
DocumentRoot /var/data/mt-blogs
Save your changes by typing Control-O and then Control-X. To then restart Apache so it will reload the newly updated configuration, type the following in the Terminal.
sudo /etc/init.d/apache2 restart
Updating Movable Type’s Publishing Paths
The last thing that needs to be done is to update the Publishing Path values for each blog instance in Movable Type so content will be published to /var/data/mt-blogs instead of the default location. This is done from the Preferences > Publishing screen in the Movable Type admin interface.
Set the value of Site URL to the IP address of the VM and set the Site Root to /var/data/mt-blogs. If running more than one blog instance, change these values apporpriately. Save the changes and re-publish. And that, as they say, is that. Enjoy!
Note: The current (as of this writing) release of Virtual MT is slightly out of date with the recent 4.23 release of Movable Type though it’s simple enough to update your own base install in VMT.
One of the things that annoyed me with the process of setting up a Subversion server with SSH access, aside from the sheer complexity, was the number of steps required just to create a new project. Once was bad enoug, but repeating those steps each time to create a project just didn’t scale…
So, a bit of Bash scripting later and everything is much, much easier.
Assumptions
The instructions and script that follow assume you completed the earlier tutorial carefully when setting up your own Subversion server. It may not be appropriate or work as expected otherwise. As always, YMMV.
Creating, Configuring and Using the Script
Somewhere in your $PATH on the system acting as your Subversion server (I suggest /usr/local/bin), create a new file named svnproj, set the file as executable and then finally open the file for editing.
#!/bin/sh

REPOSITORY="/svn"     # Set to your repository path
USER="admin_user"     # Set to your system admin user

# ====================================================
# Do not change anything below the line above

PROJECT_NAME="$1"

if [ $# -eq 0 ] ; then
  echo "Usage: newproj PROJECT_NAME"
  exit
fi

echo "------------------------------------------------"
cd ${REPOSITORY}
svnadmin create ${PROJECT_NAME}

echo "Created project: '$PROJECT_NAME'"
echo "Configuring svnserver.conf for restricted access"

cp ${REPOSITORY}/${PROJECT_NAME}/conf/svnserve.conf \
${REPOSITORY}/${PROJECT_NAME}/conf/svnserve.conf.default
cat > ${REPOSITORY}/$PROJECT_NAME/conf/svnserve.conf << "EOF"
[general]
anon-access = read
auth-access = write

[realm]
realm = Projects
EOF

echo "Successfully set svnserve.conf"

chown -R ${USER} ${REPOSITORY}/$PROJECT_NAME
chmod -R 770 ${REPOSITORY}/$PROJECT_NAME
chmod g+t ${REPOSITORY}/$PROJECT_NAME/db

echo "------------------------------------------------"
echo "Done"
The script requires you to set two internal variables in order for it to actually work; one which sets the location of your repository, and a second which sets the admin username on your system which will be the default owner of files and folders in the repository. You can find these at the top of the script, named REPOSITORY and USER respectively.
Running the script is as simple as:
sudo svnproj PROJECT_NAME
If you happen to run the script without the PROJECT_NAME parameter, it will simply output the usage note and exit gracefully. Whether you need run the script via sudo ultimately depends on where your repository is located on your server.
Our particular version of this script does one additional thing — it creates a post-commit hook script and automatically inserts the necessary code to output commit messages as an RSS feed per these instructions.
As Wishingline has slowly grown beyond just one person, the need to change workflows and improve our ability to communicate and collaborate with clients, peers and partners has prompted us to do things a bit differently than in the past. One of these things has been to set up our own internal Subversion server. Yeah — we know git is the new hawtness, but the tools available and integrating git are few, and honestly, our own experience with it has not left us paricularly enamoured.
In setting up a new Subversion server for us to use internally, secured on our network, but also accessible remotely, we started off with our own tutorial from back in 2007, a bit of help from the official Subversion book, and our old friend Google. We ran into a few problems along the way, and so in the hopes of saving others from running into the same issues, this entry will hopefully serve as a straightforward and complete guide to setting up a Subversion server using svn+ssh authentication on Mac OS X (Client and/or Server).
Prerequisites
In order to complete everything below on your own systems, you will need:
At least two Mac systems: one which will act as a central Subversion repository (server) another as a development workstation.
Mac OS X: Leopard 10.5.x (ideally 10.5.5) Client or Server. There’s a good chance that you’ll be able to follow this guide on Tiger as well, but YMMV.
Xcode 3.0 or newer, included on the Leopard install DVD, included with the iPhone SDK and otherwise available free from the Apple Developer Connection site.
A sufficient degree of comfort in working in the Terminal application.
Administrative access.
A few Notes Before we Start
Nearly all the instructions to follow require extensive use of the Terminal application which can be found in the /Applications/Utilities folder on your Mac. Each line in the code examples that follow should be entered into the Terminal and followed by the Return key.
Setting Up Your Envrionment
As with other Unix operating systems, Mac OS X uses the PATH environment variable to determine where to look for applications when working on the command line. It’s common to install custom builds of Unix software in /usr/local in order to avoid interfering with core system software. A big benefit being that you don’t have to worry about updates to Mac OS X inadvertently overwriting your custom software installs.
To set your the PATH for your user account on your workstation, you will need to either create or edit a .bash_login file which is commonly used to customize the default shell environment on a per-user basis. To open or create the file, in the Terminal, type:
pico ~/.bash_login
If the file does not exist, the following needs to be added at the end of the file in order to set the necessary PATH variables so that you will be able to use the various Subversion applications without needing to specify the full path to them on your systems.
The one oddball in the above PATH is the path to the aliasbin directory. We’ll explain what that’s all about later on. Patience grasshopper!
Save and close the file by typing Control-O and then Control-X. You’ll be returned to a new prompt in the Terminal. Close the window and open a new one to load your changes.
Xcode and Subversion
When you install Xcode 3.0 or newer, a version of Subversion (at the time of this writing, version 1.4.4) is also installed. Although you could use this version and skip a few steps, this tutorial is based on using the latest and greatest.
Step 1: Installing Subversion Prerequisites
Before installing Subversion there are a number of prerequisites which can or should be installed depending on your specific needs. In this particular case, the only one necessary is zlib which is used to add compression support to Subversion.
In order to keep things neat and tidy, source downloads can be saved to the Downloads folder in your home directory or wherever you prefer.
Installing zlib
To download, compile and install zlib, type the following in the Terminal:
cd ~/Downloads

curl -O http://zlib.net/zlib-1.2.3.tar.gz
tar -zxf zlib-1.2.3.tar.gz

cd zlib-1.2.3

./configure --prefix=/usr/local
make && sudo make install

cd ..
Once you get to the sudo make install command, you should be prompted for your administrator password. Enter that when requested in order to complete the installation.
Installing neon
If you want or need WebDAV support in Subversion, you can also install the neonHTTP and WebDAV client library. neon is entirely optional, but if you want to install it, type the following in the Terminal:
cd ~/Downloads

curl -O http://webdav.org/neon/neon-0.28.3.tar.gz
tar -zxf neon-0.28.3.tar.gz

cd neon-0.28.3

./configure --prefix=/usr/local \
--enable-shared=yes \
--with-ssl=openssl \
--with-libxml2

make && sudo make install

cd ..
At this point you should now have the two primary prerequisites installed, meaning you’re now ready to download, build and install Subversion itself.
Step 2: Installing Subversion
Compiling Subversion with all the necessary support libraries is straightforward. If you did not install neon as in the prerequisites above, be sure to omit that line in the configure command below.
cd ~/Downloads

curl -O http://subversion.tigris.org/downloads/subversion-1.5.4.tar.gz
tar -zxf subversion-1.5.4.tar.gz

cd subversion-1.5.4
./configure --prefix=/usr/local \
--disable-mod-activation \
--with-apxs=/usr/sbin/apxs \
--with-ssl \
--with-zlib=/usr/local \
--with-neon=/usr/local \
--without-berkeley-db \
--without-sasl

make && sudo make install

cd ..
You should now have Subversion installed on your system(s) in /usr/local/. You can verify this by checking the version of one of the Subversion applications. Type svn --version in the Terminal.
In order to create a complete client-server configuration with remote repository access, you will need to complete Steps 1 and 2 on both Macs. If you’ve got more than two Macs, repeat as necessary.
Step 3: Workstation Public/Private Key Creation
Public/private keys can be used to secure your network communications even more than relying on simple password authentication. In this particular case, these keys can be used to provide secure authentication to your repository. To create a public/private keypair, in ther Terminal, type:
cd
mkdir ~/.ssh

ssh-keygen -t rsa
If you do not want to use a passphrase as an extra level of security, just press Enter when prompted. The ssh-keygen command will create two files in the .ssh directory, ida_rsa.pub and ida_rsa.
The first, with the .pub extension is your public key which you’ll need to copy to the Mac acting as the repository server into a file named authorized_keys. The second is your private key. Do not share this with anyone. Seriously. The private key will be unique to each system/user and identifies that particular Mac when authenticating to the server or to any other systems sharing the public key. Simply put, in order to authenticate successfully, you need both halves of the key.
Step 4: Setup Users and Groups on the Server
There’s a few different ways users and groups can be managed: the Accounts system preferences panel, the command line and the Mac OS X Server Admin Tools which can also be used on the consumer version of Mac OS X and not just the server edition.
Launch the Workgroup Manager application from the /Applications/Server folder and press the Cancel button when prompted to login to the server. Instead, select View Directories from the Server menu and click the lock icon on the Workgroup Manager window to authenticate yourself as an administrator.
Create a Subversion Users Group on the Server
Before users can be given access to the repository, users all need to belong to a common group which will have read/write permissions for the repository on the server.
Creaing a new group in Workgroup Manager
Click on the Groups tab to switch to the Groups view and then click the New Group button to create a new group. Give the group a Name and Short Name and press Save. Click on the Members tab to add users to the group or switch to the Users tab and add users to the group from there. Depending on how many users you need to provide access to, one method might be faster than the other.
Adding members to a group in Workgroup Manager
Create User Accounts on the Server
Unlike other Subversion authentication methods (file://, svn://), accessing a repository via SSH requires that real user accounts exist on the server. In theory at least, these users should be able to access the server via SSH as any other user, though this can be restricted. More on that later.
Create any needed user accounts by clicking on the New User button in Workgroup Manager.
Creating a new user account in Workgroup Manager
Under the Basic tab, enter a Name, Short Name, Password, and set Administrator Access. Under the Home tab, press the Add button and enter /Users/USERNAME in the Full Path field and press Ok. Save your changes and click the Create Home Now button. This should create a new user just as if you did so using the Accounts preference panel in System Preferences and also generate their home directory.
Setting a user’s home directory in Workgroup Manager
To finish configuring access for each user to allow passwordless access using their individual public/private keypair, the user’s public key needs to be copied to an authorized_keys file in a .ssh folder in their home directory on the server.
Copy each user’s public key file to the server into their home directory. Exactly how you do this isn’t particularly important, but putting the key in the right place, named correctly and with the correct permissions is.
The cat command will take the contents from a file named id_rsa.pub and append it to the end of a file named authorized_keys or create a new file if it doesn’t exist. Repeat for each user needing access the Subversion server and replace USERNAME with the appropriate value. You can do this from a single administrative user account or by logging in as each individual user in sequence.
If a user has more than one computer which may require access to the repository, you can include more than one public key in the authorized_keys file; just ensure each is on it’s own line. Using the cat command above will do just that.
Step 5: Secure SSHD on the Server
Out of the box on Mac OS X, SSH is relatively secure, but there’s more we can do to improve it’s resiliance, particularly on the server side of things. To enhance the security of the server, edit the /etc/sshd_config file in the Terminal.
cd /etc
cp sshd_config sshd_config.orig
sudo pico sshd_config
Locate and edit the following list of configuration properties for the SSHD daemon process so they appear as shown below. Press Control-O, then Control-X to save the changes.
Protocol 2
PermitRootLogin no
PasswordAuthentication no
X11Forwarding no
UsePAM no
UseDNS no
AllowUsers [list of users -- see Step 4]
The list of users to be allowed should be based on the user’s short name and separated by a space. Note that you can skip changing the PasswordAuthentication setting if you may need to provide password access.
Note: If you need to add a new user later, you will also need to add that user to the AllowUsers setting in the sshd_config file and restart the SSH process on the server. Also, if you really want to secure things a bit more, change the default port to something other than 22. The catch is that you will have to include the custom port as a parameter when connecting via SSH.
Step 6: Create Aliases of the Subversion Applications
In case you were wondering… this is where we get really nerdy.
To allow more than one user commit access to the repository, when logging in via SSH, each authenticated user will run their own instance of the svnserve process on the server. As such, the process needs to run with a specific umask in order to prevent permission problems.
There’s two things we need to do in order to make this work:
Create a few simple shell scripts that run the appropriate svn application using the required umask. This should be done for svnadmin, svnlook and svnserve.
Then in the pico editor, type the following. Replace svnserve in the example with each of svnadmin, svnlook and svnserve.
#!/bin/sh
umask 002
/usr/local/bin/svnserve "$@"
Press Control-O and then Control-X to save your changes, quit the editor and return to a new prompt. Finally, set the necessary ownership and permissions on the scripts.
In order to ensure that the new svnserve alias is used when a user is interacting with the Subversion server, a special command must be prefixed before each public key listed in a user’s authorized_keys file.
sudo ~USERNAME/.ssh/authorized_keys
Replace USERNAME above with the specific user’s shortname.
Replace USERNAME above with the specific user’s shortname and note that the command above should be added on a single line with no line breaks, including the entirety of the public key. The value of PUBLIC_KEY should be the existing public key. Save the changes by pressing Control-O and then Control-X.
Step 8: Create a Repository on the Server
You’re most of the way there now… You’re now finally ready to create a new repository and project to test things out. The basics of this are no different than if you were using basic file:// or svn:// methods to access the repository.
Note that you shouldn’t need to specify /usr/local/aliasbin before the svnadmin command because you should have that included first in your PATH variable. If you haven’t done that, go back to step one before proceeding any further.
To create a new repository and versioned project at the root of the server and set the necessary permissions (though technically you could really put this anywhere you wanted on the system), simply execute the following, replacing SVN_USERS_GROUP_NAME with the name of the group set in step four:
The above commands create the repository directory itself, create a new test project (named “test_proj”) and then set the necessary permissions. The one critical command above is the last one which sets a sticky bit on the project’s “db” folder which ensures that permissions are maintained, particularly since more than one user will have write access to the project. This will save you frustration in trying to sort out why a second user all of a sudden cannot commit a change to the repository…
Finally, in order to secure the project so that only authorized users can read and write to it, you should edit the svnserve.conf file for the project and set the appropriate permissions as below. By default anyone who can login to the server should be able to access the repository in a read-only state, but no one has write access. This is clearly not right, so let’s fix that.
Press Control-O and then Control-X to save your changes and return to a new prompt.
At this point you should have a basic project created and the necessary permissions set to ensure that all users will be able to access it as needed. A caveat to repository access using svn+ssh is that there is no mechanism to restrict access to only specific users on a project by project basis unlike other methods which provide simple facilities for this using configuration files. These configuration files are not used when accessing a repository via svn+ssh.
Note that when you create a new project in your repository, repeat the process of creating the project as illustrated above. You can obviously skip the step of creating the actual repository directory itself.
Step 9: Check out Your Test Project
That’s it. Everything should be set and ready to roll. You can test that your Subversion server is configured properly by performing a simple checkout of your test project.
In a Terminal window on your local workstation, type:
cd ~/Sites
svn+ssh://USERNAME@IP_OR_HOSTNAME/test_proj
If all goes well, the project should download securely over SSH to the Sites folder on your Mac workstation. You’re then free to test committing a change back to the server.
If things work the way they should (cross your fingers), you should see a message indicating your change was committed to the server as version 1.
Wrapping Up and Final Notes
Setting up secure access to a Subversion repository is not for the faint of heart as it turns out and hopefully you made it this far.
As noted earlier, there’s a few other things you might want to know about how things are configured. You’re best to grab a copy of the official Subversion book and read through the relevant chapters. In particular, although you’ve provided secure access using public/private keypairs and set a command value in the authorized_keys file which otherwise prevents normal SSH access into the server, it is possible that a user could gain SSH access through other methods. In order to provide as few permissions as possible, you may want to set a few more restrictions by setting additional options immediately after the command in the authorized_keys file. You can read more on this on page 168 in the official Subversion book.
Questions, comments, or errors/typos in any of the above can and are encouraged to be noted in the comments. Finally — as with any such tutorials, YMMV.
It only took 9 months, but it seemed like a good time to put together a second set of free (as in beer) wallpaper photos produced specifically for the iPhone or iPod touch. These are taken from some of my favourite photos from my Flickr photostream over the last few months along with a few other unpublished photos.
A preview of a 2nd set of iPhone lock screen wallpaper images
As with Set 1, I ask that instead of redistributing the download, that people link back to this post.
Way back in February 2006 I put together a pair of Mac folder icons for Rails developers consisting of one to use for Rails projects and another for the Lighttpd server folder. Due to the recent release of Leopard which completely changed the standard folder design used throughout the system (for better or worse depending on your point of view on the obvious accessibility problems this introduced), I’ve revised the icons so they’ll blend in more naturally with their new surroundings.
512px size Ruby and Rails and Lighttpd folder icons for Leopard
The new icon set includes the whole range of sizes from 16px all the way up to the giant 512px icon size. As is the case with any downloads I make available here, please do not redistribute the icons or attempt to pass them off as your own.
As an early Christmas present to whomever would like them, I’m offering up a set of free (as in beer) wallpaper photos produced specifically for the iPhone. These are taken from some of my favourite photos from my Flickr photostream over the last few years.
I’m calling this “Set 1” assuming that I’ll eventually do more.
A preview of a first set of iPhone lock screen wallpaper images
My only request is that they are not re-distributed (please link back to this entry instead) and any contained/embedded attributions remain intact.
Believe it or not, I’m in the midst of a not-insignificant design refresh of the blog (no, seriously!) and as part of that I’ve been looking at making some modest accessibility improvements under the hood. Part of that has been adding or improving accesskey support which I quickly discovered has changed in Leopard depending on if you are using the new Spaces feature.
Under normal circumstances accesskeys are triggered by pressing the Control key plus the specific alphanumeric key. If you’ve enabled Spaces, using Control and a numeric key will instead switch spaces, at least by default. Instead you need to use Control-Option plus the number key.
You can change the keyboard settings (use Control, Command, Option or none) from the System Preferences for Spaces to potentially avoid this issue entirely though using Command would conflict with Safari’s bookmark handling features.
On the other hand, using Control and some other alphabetic character should still work as expected and as they did in Tiger if Spaces is not enabled (which is the default in a clean, out of the box Leopard install).
Leopard is out and it’s generally good aside from a few minor hiccups, surprises and unexpected changes deeper down in the OS affecting the Unix core.
One such hiccup is that the native bindings that allow Ruby and MySQL to communicate are a bit harder to get working than in Tiger unless you happened to just go a straight upgrade to Leopard in which case they should still be working.
Once you’ve got that installed along with the Xcode Developer Tools (found on your Leopard DVDs in the Optional Installs folder) you are ready to fire up the Terminal and install the MySQL Gem. You’ll be prompted for your admin password after the first command.
sudo -s
ARCHFLAGS="-arch i386" gem install mysql -- --with-mysql-dir=/usr/local/mysql
If you’re on a PPC system, just replace `-arch i386` with `-arch ppc` and you should be good to go.
In releasing Creative Suite CS3, Adobe forgot, or for whatever reason decided not to update the Flash Player icons as part of the general installation thus adding one of a few rough edges around what is otherwise a pretty good software package (truly horrible and inconsistent software updaters aside).
Replacements for missing Adobe FlashPlayer CS3 icons
Although there are a number of different sets of replacement icons for the various Creative Suite applications to be found around the net, for myself at least, I prefer having something that blends in seamlessly with the originals, at least until Adobe releases a proper update (since we know they’ve designed the icon already). Therefore I took it into my own hands to put something together and have decided to share it.
Included are resources for the Mac OS X and Windows versions (sorry, no 512 px versions yet) along with 16, 32, 48 and 128px transparent PNGs. I will not be releasing the PSD source for this, so don’t bother asking. Thx.
I just finished the first annual A List Apart 2007 Web Design Survey and you should too. The survey took less than 5 minutes to complete and you’ll be offered a chance to win tickets to an upcoming An Event Apart conference or a 30 GB iPod provided you pass along your e-mail address at the end.
For freelance designers, as with larger agencies, clients are our bread and butter. Without them there’s really not much point. Without them we’d all be queued up in the unemployment lines.
Design is this big unknown to people. They can usually recognize it or point out things that have been “designed”, but ask them to describe the process of getting from an idea to a final product and many wouldn’t have the first idea where to start.
It’s our responsibility to educate clients so that our working relationships are easier and the work more enjoyable — whether it be setting reasonable expectations, clarifying deliverables, ensuring clients understand that we can only do so much without requiring input from them, and making sure that they understand what they’re paying for and why it’s important.
This is something I think we’re collectively still failing to do.
What Problems?
There are a myriad of problems facing designers today. New technology, new communication mediums, uneducated clients, uneducated designers, too much work, too many distractions. The list goes on and on. Rather than try to cover an impossible amount of information, I’m going to take a stab at highlighting a few particular problem areas based on my own experiences.
These are:
The design process
Enticement (AKA Don’t Waste My Time)
Work on spec
Timely responsiveness and communications
The Design Process
Design can be a tricky thing. It’s hard to quantify and harder to explain. Every designer has their own process for getting from an initial brief (if you’re lucky enough to get one) to a final, billed and closed docket.
A project might involve research, user studies, competitive analysis, initial concept development, wireframing, design, code, database design, etc. There’s a million things that could go into any one project. Every project is unique in its own way with its own hurdles to leap over.
No wonder it’s difficult to educate clients on what we do.
Some clients, for the sake of reducing their costs might ask to cut out, for example, wireframing. They don’t see the value in it. They don’t get the warm and fuzzy feeling of seeing Photoshopped comps; something that looks “real”. Sure there are times when wireframes might not be necessary but it’s during projects where they could be critical that it becomes our responsibility to educate our clients as to why they should seriously reconsider.
Few clients understand the research process that should be included at the start of any design project. This usually means putting on your thinking cap and figuring out what the real problem you need to solve is and perhaps even scribbling down a few possible solutions. Research might mean doing some of the other things I mentioned earlier — like talking to the user base of a particular website (assuming there is one already) or even creating potential user profiles to understand who it is you’re going to design for, because we all know it really shouldn’t be the client themselves (although they are important in the equation too).
Not doing research up front is like writing an essay with no background on the topic. The up front process work is as important as everything else, including the outcome because if you get that wrong, there’s a good chance the final product won’t fit the bill either.
Enticing The Designer
Initiating contact with a designer can be a real problem. While we have to remember that while it’s our job to foster a good relationship with our clients, they too have a role to play. It’s just as important for the client to provide value to the relationship — it’s not just why they’d want to work with you — it’s why you’d want to work with them in return.
An introductory e-mail such as the following does nothing to provide a reason to open a line of communication with a potential client.
Please call me asap regarding a new business concept.
That was the contents of a real e-mail I received — the entire e-mail. No phone number. No name either. Even better was this one:
how much?
Um… too much for you. If you have to ask then it’s definitely too much.
I get these regularly, and while these are extreme cases, the moderately bad ones aren’t much better.
When vying for the attention of a designer, here’s a few things to keep in mind — we need real information. Don’t waste our time with pointless e-mails like the examples above. Give us a problem to solve. Be clear. Concise. Tell us why we should be interested. Sell it to us. Why would we want to work with you? And assuming you get that far, commit to the project. Prove to us you’re serious.
The need to react quickly and make decisions in existing work and when dealing with new/potential work is a real challenge for designers. A lack of commitment from the client usually indicates problems down the road. And while your first instinct might be to just say “yes”, you’re better served by knowing when to say “no” and saying that more often.
No Spec!
Our time is not free. There — I said it.
Freelance designers and larger agencies are businesses and face similar problems to their clients — paying the bills being one of them. It’s not unusual for a client to ask for extra work to be done and be surprised when they receive an invoice for services rendered. Design is not a free ride and you get what you pay for. Billable time is more than time spent working in Photoshop or developing HTML or CSS. It’s also that up-front research and preliminary process work which is often overlooked, misunderstood, and rarely billed.
If a client asks for work on spec, just say no. You don’t want those clients no matter who they are. Doing work with no guarantee of a contract is not worth it and does nothing but hurt yourself and other designers by setting expectations which should never be there in the first place. It’s like asking a carpenter to build a bookshelf, deciding you aren’t happy with their workmanship and then going to a different carpenter to build the bookcase. Like I said, say no to work on spec.
Communicating and Responsiveness
Communications is a cornerstone of design. We use visuals to communicate ideas, values, and meaning. Design is more than just making something look pretty.
Steve Jobs said “design is how it works”, and while I agree, it is also about how it looks — at least that’s the belief held by many clients. Clients understand beauty; many don’t fully grasp how function fits into the picture.
It’s easy to find clients that can tell you they want a website that looks like “x site”, but it’s difficult to find one that can provide you with solid, rational thinking as to why that would be beneficial to them.
Clients are often good at saying, “I like this” or “I want something that looks like this”, but are challenged to tell you why with certainty or empirical evidence. It can be even worse when they don’t like something.
These are the same clients who may not fully comprehend what they’re asking of the designer. They’ve forgotten about the real key players — the people that go to their website and actually use it or buy their products. Those are the truly important people and the ones who often have no voice in the design process.
Ask a client why they want something (or don’t want something) and you shouldn’t be surprised if they can’t tell you. I think of this as a variant of “the customer is always right” — meaning, just do as you’re told. There’s a catch to consider though.
The client is (presumably) paying the bill. The job of the designer is, on some level, to please the client. The thing is though — it’s also our job to do what’s right. To do what’s right for the user — and that’s a tough thing sometimes because often, what is right for the real users of a particular website/application is something that is a tough sell for a client. The designer is typically the voice of the end user. Without us standing up for them, they have no voice. If we give in to the client every time, then the end-user loses but ultimately, so does the client even if they don’t recognize it right away.
There’s a certain amount of trust that needs to be established so that the client understands that, as the designer, you have theirs and their client’s best interest in mind rather than pursuing frivolous and selfish creative goals. Constant communication, debate and honesty are all good ways to foster trust with your clients and mitigate problems before they get out of hand.
We have to know when to fight for something and when to let go. To take something from the 37signals train of thought — ask yourself — “does it matter?” If the answer is yes, fight for it. If not let it go and focus on the important things.
On the topic of responsiveness — and this ties in with meeting deadlines — the client is just as responsible for keeping a project on track as is the designer. A project can quickly come to a crashing halt when the designer is stuck waiting for feedback or the answer to a question from the client. The problem also being that the designer is expected to eat that wasted time and scramble to get the project done on time no matter what.
Communications should go both ways. Respond in a timely fashion. Everyone is busy — that’s a given. If you want your work to be taken seriously, you have to take it seriously and attempt to stay on top of it and provide responses so that things move forward, not stop dead in their tracks. Don’t assume the designer is a mind reader. We’re not. If you want us to do something, say so. Tell us why. And don’t wait two days to tell us either.
Designers should assume the same of their clients — spell things out in a way that people can actually understand. Treat your clients the same way you would like to be treated. If after a sufficient amount of time they aren’t responding accordingly, don’t be afraid to call them on it.
Wrap Up
Being a designer can be a fun and often exciting job. Being a designer, whether you work for yourself or an agency means the general rules of business and etiquette apply. We don’t work for free. We expect committments. We expect to be treated fairly and with the same respect we should be offering our clients. We expect honesty and integrity and are more than happy to educate clients on what it is we really do and why this is valuable to them.
Hopefully there are a few good lessons here. Feel free to share your own or your comments.
After a long transition, I’ve officially made the move over to TextMate from BBEdit during the last 6 months or so as the amount of Rails development I’ve been doing has increased. In that time though I haven’t had much opportunity to really dig into some of power features or to really even get a handle on all the keyboard shortcuts which brings us to the impetus behind creating this desktop — to help improve my (and possibly others’) TextMate skills.
I changed my mind since there’s been enough interest that I’ve put together a smaller 1280 × 800 size version for MacBook users (myself included). You can grab the smaller version here and a new, updated large version here (with a correction suggested by Wolf Rentzsch).
Comments and suggestions for improvement are welcomed.
Jon Hicks and Shaun Inman made me do it. I couldn’t bear to use Helvetica (too obvious), and since that would probably be considered contrary to the message, it’s Paralucent for this one.
Design is more than Choosing Nice Fonts desktop wallpaper
Don’t get me wrong, Firefox is a great browser as are its numerousoffspring, but like competitive browsers such as Safari and Internet Explorer, it has its own set of quirks and anomalies to frustrate web designers and developers.
Absolutely positioned scrollbars within Firefox
My current gripe is the way scrollbars are handled in relation to absolutely positioned elements. Simply: they’re not handled well.
The problem is that if you attempt to position an element (such as a DIV) above another element which has `overflow: auto` set and a lower z-index value, the scrollbar from the lower element pokes through the element with the higher z-index as you can see in the screenshot. Ugly.
Safari gets it right and there’s no show-through of the scrollbar since the z-index values seem to be honoured correctly. Heck, even IE6 gets it right.
I’ve scoured countless pages via Google looking to see if there’s an answer to this and haven’t found one. Even the latest build of Bon Echo, Firefox v2 still contains this bug/quirk.
The worst part is that I’m not even sure what the problem is other than its specific to Mozilla-based browsers. Is it an XUL problem? General CSS spec implementation problem? Something else…?
Clean, (at least reasonably) semantic code is something I strive for when writing code as part of web projects at Wishingline Design Studio, Inc. It’s not always easy or possible due to numerous factors, but it’s a worthy goal nevertheless.
This is especially true of more marketing or information-driven sites where I feel there’s a greater likelihood of visitors using screen-readers or requiring enhanced accessibility. Try to provide a reasonably good experience for everyone — within reason. This is a philosophy I know is shared by many web professionals who care about standards, usability and accessibility.
What I’ve noticed of late is that a good portion of “Web 2.0”-style applications don’t necessarily follow those rules. Even 37 Signals’ applications are cluttered with non-semantic code, inline-styles and hordes of inline javascript. So much for the separation of content from style from behaviour.
What I’m curious about is how much does this matter? Is it bad or just personal taste? Do the requirements for web applications differ greatly compared to more informational pages (eg. blogs, marketing-oriented product websites, etc.)? Should they? Can we just get away with that sort of thing more easily with web applications than with regular vanilla web pages because of their general intended audience? Is it just a matter of the complexity of one type of web page vs another?
The browser cache is both our friend and our enemy. As web designers and/or developers the cache is our friend because it’s useful for making sites render faster and therefore seem more responsive to the end user, but it’s our enemy because can wreak havoc when changes to a CSS file are made and the browser doesn’t want to let go of the old, cached version.
It’s a pain to have to clear your cache all the time to make sure changes are working as expected during development as well as after deployment to a live environment. Thankfully there is a nice, simple solution aside from sending no-cache headers, which I’ve found don’t always work. I’ve used it myself on a number ofoccasions and have seen it used elsewhere.
So what is it you ask?
Simply add a post-style variable parameter to the end of the link to your stylesheet(s). I like to use a version numbering type scheme myself. Something like www.yoursite.com/css/main.css?v=1.000. This keeps the browser from caching the CSS file, ensuring that the browser is grabbing the right version without having to clear caches and restart browsers.
Mac OS X is great in part for its flexibility and the ease at which you can get all different types of software running and working together; whether it is Unix, Cocoa, Carbon, Java, Ruby, PHP, etc. Dan, as always, did a great job at demonstrating how to get a custom Ruby on Rails environment setup on Tiger. I felt it was just that good that I used it myself recently when I spent a couple days rebuilding my primary development environment.
Lighttpd and Rails icons preview
For the coupe de grace, I decided to whip up a set of special icons — one of Lightty and another for Rails and I’m making them available for whoever wants them. Both icons included in the set contain open and closed folder states at 128, 32 and 16 pixel sizes.
In the last few months I’ve had the opportunity to explore the Flickrpublic APIs using Dan Coulter’s phpFlickr wrapper classes to handle the API calls and database caching to speed things up.
Although the Flickr APIs are constantly evolving, the phpFlickr classes have pretty much kept up with that evolution and made it very easy to search, view and manage your photos and photosets. As a web developer this is pretty handy because it means there’s another option for creating photo galleries or special applications without having to reinvent the wheel in terms of managing photos or managing multiple photo galleries with different content.
Just about everyone I know who’s seen Flickr thinks it’s great, so why not make the most of what it can do for you?
Getting Started/Installation
The phpFlickr classes are simple to use. Start by downloading the latest version and sign-up for a Flickr Developer API key. You’ll need to the API key to interact with the Flickr APIs and it’s helpful for them to understand how the APIs are being used.
Once you’ve download the phpFlickr package, you’ll need to un-tar the file and upload it to your web server (or drop it into your development environment). That’s it for installation, you’re now ready to start working with the classes.
Searching
The example we’ll use to get you started in using the class will be simple: find a set of photos based on a particular tag. Here’s the entirety of the code. I’ll explain it in a moment.
Save the code into a new file named search.php into the phpFlickr directory on your web server or in your test environment and test accessing the file in a browser. You should have a number of images returned if your query found anything that matched.
The basics of what the code does is simple, so let’s look at it line by line.
Line 2: Include the phpFlickr classes. This needs to be called before the page content loads.
Line 3: Create a new instance of phpFlickr using your API key.
Line 5: Provide a $tag variable to search by. This can be any literal string.
Line 6: Provide a $num variable to tell the script how many results to return (up to 500).
Line 7: Provide a $username to tell the script whose photos to search. This is the full nickname of the user.
Line 8: Setup a counter variable to iterate through the results.
Line 9: Create an $nsid variable which will hold the NSID of the Flickr user based on their $username.
Line 10: Get the chosen user’s base photo URL.
Line 11: Execute the API call based on the above parameters.
Line 12: Although commented out, this would display the contents of the data array returned from Flickr.
Line 13: Start displaying the results.
Line 14: Print an error if no results are returned.
Line 17: Loop through the results if multiple photos are returned and print out a link to view the photo on Flickr
Line 18: Display the Medium sized photo. Other options are “Square”, “Large” and “Original”.
Line 19: Add 1 to the counter variable’s current value.
Hopefully this, along with the other examples available will give you a start at using the Flickr API.
I’ve spent the last couple days hacking around with phpFlickr for a project I’m working on. phpFlickr is a PHP wrapper class written by Dan Coulter which implements all of the available FlickrAPI calls and makes developing around Flickr fairly easy. Not really simple, but not too bad if you know what you’re doing.
The class also incorporates the ability to cache the API method calls locally to either the filesystem or a database to speed things up which is a nice touch and can really help with the overall performance. I’m going to be using the class extensively throughout the site I’m currently developing and will be incorporating some of that work later in this site as well.
If there’s any interest, I could be persuaded to post a few examples on how to use the class here once things wrap up and I can breathe again. Just drop a note in the comments.
On a side note, is it just me or is the FlickrExport plug-in for iPhoto busted? I’ve got the latest release installed and it hasn’t been working right for a while now. It probably is just me ;)
Given the lastfewposts here, backing up data and important files has obviously been on my mind. It’s coincidental more than anything, but I’ve continuously had problems with the primary removable Firewire drive I had bought to store my daily and weekly backups. So much so that it’s now in many pieces in the garbage with the disk platters more or less obliterated. It’s definitely unrecoverable and I feel much better given how much time was wasted repairing the drive and trying to get good successful backups.
What I’m really interested in here, and the main point of this post is this: How are you backing up your important files?
In particular, this is for the web developer folks. How are you backing up your design files (Illustrator, Photoshop, Fireworks) and your code files (HTML, PHP, Rails, MySQL). Perhaps the real first question is: Are you backing up? If so, how often? And to what form of media? If not, why not?
Once you’ve completed a project and it goes live, what then? Do you make a full backup of all the project files? Do you keep data available “online” (on disk) so that it’s easy to make changes down the road? Are you using a version control system such as CVS or Subversion? Do you develop using a local environment such as is available on Mac OS X? Do you clone your backups and keep a second copy offsite somewhere?
I’m pondering how I want to proceed with backups since my experiences with a certain brand of Firewire hard disks has left me with an extremely low opinion of their hardware and service technicians. The immediacy and economical value of using hard disks as opposed to tape has become more apparent in recent years as disks have grown larger and the cost per GB has decreased.
Tape is a good longer-term archival medium, but in my experience I often have to retrieve files for old projects quickly to make minor changes. Being able to mount a hard disk, grab the file and make the changes is just so much more efficient than finding the right tape, un-archiving the file off tape, making the change and then re-archiving the file.
Perhaps it makes sense to use both. Tapes for archival purposes. Once a week, perform a full backup to tape as well as archive completed work. And do daily backups to hard disk. I guess it ultimately depends on needs and practicality.
Welcome to the long-delayed (and awaited) Wishingline Design Studio, Inc. 1.0 site. It’s been a long journey from original concept through revision after revision after revision to get to where we are right now. That being said, there’s still work to be done and bugs to fix and pieces otherwise missing or incomplete. These will all be attended to shortly.
For those interested, here’s a quick laundry list of some of the basic features of the site.
Designed for 1280 pixel wide monitors. Yes, you heard me. It will display fine at 1024 though. Go big or go home.
Search features use XMLHTTPRequest via the Bitflux Livesearch open-source process. This means that support for IE 5:mac and older versions of Explorer on Windows are broken. We are aware of this and are active researching a nice way to have those browsers degrade rather than throwing up JS exceptions.
Some headings are styled using sIFR 2.0 to provide custom fonts where we would otherwise have to be producing large numbers of images and thus, reducing bandwidth requirements and providing better accessibility. It degrades silently in browsers which do not have Flash or who have Flash content blocked. More coming on this in future revisions.
Check whether we’re online via the iChat widget in the main navigation bar. If the dot is green, we’re online, if not we’re away or offline.
The site is built using CSS/XHTML and should be fully-validating. You can check using the links at the bottom of each page if you don’t believe us.
A spiffy new Favicon.
Category-based Portfolio content — view all projects or break-down by category.
My Dashboard Widget Xcode Template is now listed on MacUpdate with 704 downloads and counting. Since there are scattered rumours of Tiger already being delivered to some users (a week early), get your copy while it’s hot!
The Dashboard is a bit of a web developer’s paradise - standards-based code with only one browser required for development and testing. Plus, the use of web plug-ins as well as system level scripting languages (AppleScript, Ruby, Perl, etc.). The possibilities are almost endless really.
Widgets in the Mac OS X Dashboard
Creating widgets for the Dashboard isn’t really that hard, but there are a handful of useful things to know before you get started and I’ll try to outline a few that will hopefully save a bit of debugging and gray hairs along the way.
RTFM. Read the developer documentation. No, seriously there’s good, useful information in there.
Always, always, always have a default image in the main directory of your widget. Name it Default.png. It gets used as the drag image when a user decides to try your fancy new widget in the Dashboard.
Create a version.plist file and keep it up to date if you modify your widget.
Be sure to create an Icon for your widget to show in the Widget Bar. Name the file Icon.png and keep it in the main directory of your widget bundle.
Test your widget in Safari during development and keep an eye on the Console for debugging messages.
Download my Dashboard Widget Xcode Template (Works in Xcode 1.x and above, so yes, it works on Panther). Decompress the archive and place the contents in a new folder called Dashboard under this path:
The template will do a lot of the preliminary work for you. It creates the base HTML, CSS and JS files along with the necessary property list XML files - and will automatically modify certain properties in and of those files based on the name you give the project.
The Info.plist file contains all the current allowed properties for a widget. Disable or remove as necessary, but they’re all there to save you looking them up in the documentation.
Well… what are you waiting for? Let’s see those widgets!
Content. It’s the thing that gives people a reason to go anywhere beyond the homepage on your site. It’s a big reason why people visit a site in the first place and it’s still amazing the number of clients that do not understand that.
Designing around the content
In starting work on the Wishingline Design Studio, Inc. site and generally any project, my own methodology starts by mapping out preliminary content which allows me to take into consideration site architecture and design elements. Aside from providing structure, and ensuring work is on-strategy, our job as designers is to make content both visually appealing and readable. Not knowing what the content will be greatly affects design decisions. It should at least.
What information does the client want to make available? How should it be organized? What parts are simple, small and fairly static (unchanging) and what parts are likely to grow and expand? Will there be long passages of text, possibly spanning multiple pages (or long individual pages)? Where will images, flash and other multimedia content be used for more than decoration? Will there be content that appears in multiple places on the site?
In organizing site content I like to start using a flat hierarchy; that is, no hierarchy and then start to tie pieces together. Are there things that belong in more than one place? Sticky notes can be a real time-saver here. Low-tech often works best at this point.
Create meaningful primary categories that will become your first level hierarchy and work your way down. Do things need to be separated out further? For example, if you’re maintaining a news archive, does it make sense to organize the archived content by year? By month? Some other way? At all? Some sections may be flat (no sub-categories) and others may result in multiple levels. This is where you should start thinking long-term about maintenance and future redesigns.
When structuring your content, try to keep in mind what the user will have to do to actually find and get to the content. Make it as easy as possible. Complex hierarchies are often a deterrent for less savvy users because it’s easy to get lost. Typically I refer to Microsoft’s site as an example of this. I always get lost myself anytime I need to look for information there.
Determining such things before putting pencil to paper or fingers to keys can save you in the long run. What I mean is, try to avoid writing or designing anything until you know how content will be organized and fit together.
Cut from the same cloth?
In general I’ve found most designer or agency sites follow a fairly common structure in terms of content. There are things that a site must have along with others that could fall under the nice to have banner. There should be information on the business itself — what it does, who is behind the business, philosophies and strategies along with a portfolio of work, or case studies. Exactly what content is needed is up to you, the designer and the client. Thankfully this is easier if you’re your own client ;-)
More and more agencies and freelancers are also adding blogs to their sites to better communicate to clients, peers and attract new potential clients. A blog can also act as a great marketing tool to get your name out into the world. Just look at a high-profile agency such as Coudal Partners who does just that. In my case, I started backwards — starting with the blog and working out, building the informational side of the site second. My mother’s always said I was a little backwards. Hi mom!
Taxonomy
Another often overlooked component of the content process is taxonomy. What are things going to be called? Are you going to use consistent labelling throughout the site? Are labels clear and understandable by the user? For many users it’s unsettling to look at unusual site taxonomies and know what to do.
Unusual labelling can lead to users shaking their heads, getting frustrated and giving up, probably never to return. That’s bad for business. All is not lost though. An unusual taxonomy can be made usable but providing users with additional hints in the HTML using title attributes, alt tags, or rollovers whenever possible. Make icons clear and easily identifiable. Some visual icons are easily recognizable (eg. print — usually a printer icon) while some may be more abstract or difficult to instantly recognize.
As an example — labelling your design portfolio as just that, you’re less likely to confuse a user than if you were to label it “catalogue”. Some users will explore but many do not have the time, patience or willingness to learn your taxonomy and explore. Clarity is often better for the user experience than simply being clever. Generally the idea is not to confuse or confound the user but rather to engage and delight them.
Depending on the needs of your site or a project, creating a taxonomy guide could be a helpful document to ensure consistent and easily identifiable labelling.
Know your audience
When mapping out content it’s also good practice to begin with a reasonable understanding of your target audience. Who are you trying to communicate with? What is important to them? What information do they want and expect from you? What tone should the writing use? Funny? Serious? Playful and creative?
Content is just one of the hooks that gets people coming back to your site, but if the content is boring or not on strategy, you may miss the boat. This means speaking to your audience (and not speaking down to them). It means engaging them and giving them a reason to return.
The most universal hook is humour. Make people laugh or chuckle and they’re more likely to stay interested than if you take the dry and uninteresting corporate-speak route. In many cases that is what is required though; but there are still ways to keep content lively and interesting.
Mapping and architecture
Mapping out the content may mean putting together a rudimentary sitemap diagram or perhaps a more complex one showing how pages interrelate to each other or by indicating where different types of content fit into page layouts. It can also be useful to indicate where modular code such as “includes” are used by creating page schematics.
Content boxes illustration
Why would you want to map out your site and content? Planning up front will save you time in the end; trust me. If you’ve thought through the problem, the solution will be easier to manage and implement and you’ll be less likely to second-guess yourself. Second-guessing means re-work, and no one likes re-work. Not me anyway.
A good example of this would be writing a contact form more than once if you’re going to potentially re-use the same code in a number of different places. The key here is finding those bits and reusing them as “includes”. Consider how the final pages will be structured. This will allow you to develop code in a way that makes using these include files easy and in a way that can accomodate subtle differences in different contexts throughout a site. Don’t repeat yourself.
A simple, real-world example is the calendar displayed in the sidebar of this site (at is exists today). This is a single index template in Movable Type which is included in other templates where required. The code is not repeated in multiple places. Instead a single line of code adds that external template code into others which makes maintenance and troubleshooting easy.
Wrapping Up
Hopefully by this point you’ve got a few ideas on how to get organized and think about site organization and structure. The key for much of this is to put yourself in the shoes of the user and look at things from their perspective. It’s about the experience. Make it a good one.
One of the challenges with any design project is selecting an appropriate colour palette. It’s often overlooked; an afterthought for web projects when perhaps it should be one of numerous driving forces.
Colours each have their own meanings or associations, and the options for choosing the right ones to use — past experience and colour knowledge, sampling photographs/illustrations, colour swatches, magazines, visits to local paint stores, going for a walk in the park, or even using one of the myriad of web-based colour tools such as the Behr’s EXPLORE Colour Tool are virtually unlimited. The method of selection isn’t important, but the output is.
Colour choices can be equally as important as the visual aspects of a design itself. Poor colour choices can destroy beautiful designs causing viewers to move on rather than take valuable time to absorb the content or message. In the same vein as using the wrong colours, too much or too little colour may have the same effect.
For example, if you were looking to evoke feelings of calm, serenity and a sense of something being “classic”, you wouldn’t necessarily choose red as your primary colour. Instead you might look at greens, blues and whites since green traditionally symbolizes nature, freshness, harmony and safety. Blue is stability, depth, trust, and wisdom. White is light, goodness, purity and is considered to be the colour of perfection.
Most sites start with primary and secondary colours, often drawn from a company identity or set of visual brand guidelines. Tertiary colours are often used to add complexity to the colour palette — as accents or to draw attention to parts of the site. Well thought out choices can pull viewers in, grab attention and trigger the desired emotional response. Throw in some good typography and you’ll really be on your way.
Choosing colours for the web
In the early days of the web (mid-to-late 90’s) designers were more restricted with regard to colour choices due to limitations in what could be expected on the viewer’s end. Large displays capable of rendering millions of colours was not the norm as they are now. Today the majority of users have more powerful computers with larger, brighter displays capable of moving the industry beyond imagery restricted to the Web colour palette. The internet, like the real world can be a colourful place.
At this point in time, millions of colours and 1024×768 resolution are taken to be the lowest common denominator though there’s still reason to take into account users with smaller, lower resolution display capabilities. It’s safe to export GIF images using the Adaptive colour palette, along with a trend towards using 24 bit PNG images which also support full alpha transparency and improved colour fidelity despite a lack of full support in Internet Explorer 6.
When selecting colours to use, bear in mind the gamma differences between Windows and the Mac. Colours typically look darker on Windows-based computers than they do on the Mac. There’s a option in Photoshop that help you get a better idea of what your images and colour selections will look like on a PC and I highly recommend making use of it.
Complexity By Design
The thing which typically separates small-frys from the bigwigs in terms of colour decisions really comes down to complexity. This means selecting a palette which is both complementary but also offers a degree of contrast and variety. This means not using only blue and orange or red and green — it may mean adding magenta, brown, yellow or some other colour to provide additional visual interest.
A handful of good examples of this in my opinion can be seen on sites such as Terminus 1525, Masterfile, Basecamp and of course Apple, just to name a few. Doug Bowman’s Stopdesign site another great example of the use of colour complexity in design. Doug is consistent in his colour choices but with adds complexity with his use of accent and highlight colours to divide content and provide a sense of navigational space.
Using The Colour Palette
Colours can be used to liven up otherwise stark designs, to call attention to items, or may be the focal point of the design itself. The use of colour is dependent on the needs of the design and the intentions of the designer. Do the colour choices add to or detract from the underlying message? For example, photography sites are often stark in terms of their use of colour because of the affect it can have on the photographs themselves. In such cases, neutral (white, black or shade of gray) is usually better.
A sample of the Wishingline site colour palette
Web designers need to be concerned about colour for a number of reasons, but one of the more notable ones is that colour can be used to instruct users about how a site is structured or how it works. Link colours are a perfect example. Links can change colours when the user mouses over them, clicks on them or has visited a link. Interactions such as this subtly tell users something about how the site works, sets expectations and aids in learning.
Colour can be used to create logical sections for sites — use red as a primary colour for the ‘news’ section and ‘blue’ for the company info section for example. Wired used to do this on their site but recently removed the feature. See Stopdesign for an example of this in use.
But colour should not be used in a vacuum. Considerations should also be made to accomodate people who are colour blind or who may not be able to see all colours.
Making Intelligent Colour Choices
Although I haven’t talked much about what I’m planning for the Wishingline site throughout this article, but you can infer some ideas based on the colour swatches above (not finalized and may change dramatically). I’m still tinkering with the site’s primary and secondary colours; making sure everything is happy, harmonious and has the right balance of complexity and appeal.
Colour choices can be based on current trends, mood, meaning and on existing branding information, but whatever the case they should complement the design rather than detract from it. This means do not use a red background with blue type on it!
Start by picking one or two colours that complement each other then spread out from there choosing secondary and tertiary colours. Remember not to go overboard though — too many colours is somehow worse than not enough. I tend not to count shades of a base colour as colours in the palette, but whether you do is personal preference.
Serious Colour
If you’re really serious about colour, I can’t more highly recommend getting yourself a set of Pantone Colour Books — it’s one thing to see colours on screen, but it’s another entirely to see them on paper they way they’re often intended. Pantone offers a set which is both affordable and an excellent investment.
As an aside, do yourself a favour and read Dave Shea’s piece on CMYK for RGB designers if you haven’t already. It’s a good primer on CMYK, Spot and RGB colours, their differences and uses.
Server-side parsing tools are fantastic and can save you enormous amounts of time and effort in producing large-scale websites. At the same time they tend to have their own bugs and intricacies which can confound and perplex the best of us. This was the case today.
Background and the Problem at Hand
We’re preparing to promote a number of changes, fixes, new features and general improvements tonight on the Masterfile.com site. In the testing of said features we’ve encountered the usual fare — bugs. The latest one being related to a small, but generally significant change we’ve been trying to get out the door for some time — moving the site completely to UTF-8.
In a nutshell, we encountered a problem where somewhere along the way, character encodings were getting mangled. As a result, text was not rendering properly and search links generated zero result queries. This is bad and obviously unacceptable.
The Solution
While perhaps not the most elegant solution, we found a little piece of JavaScript code which batch-translates the raw UTF-8 encoded pages to the equivalent HTML entities. It’s simple and not overly tedious. It kindly ignores the surrounding HTML code completely and only translates accented characters as well.
Here’s the code and a brief description of how to use it:
Create a simple form in a new HTML page with two textarea fields and a submit button. The first will be the input, the second will display the output and should be set with the readonly attribute. The submit button should have an onclick attribute which calls the javascript function. Take a quick look at the sample page I’ve put together to see how it works.
Arvind at Movalog, along with some assistance created a nice alternate version of the Livesearch functionality that integrates with Movable Type and still allows the traditional CGI-style search function to work. While I haven’t had much time to investigate this in depth, it doesn’t strike me as quite the same thing as I’ve implemented and described, but is instead closer to the Google Suggest functionality or something in between.
Nevertheless, it’s very interesting and I’m going to look at how these two options might be combined to overcome the shortcomings I outlined in the earlier post. I’d really like to see the original search functionality remain available as a fall-back alternative for users in unsupported browsers or with Javascript disabled.
It’s been about two weeks since I posted the Livesearch functionality tutorial here and in the time I’ve been looking at the SQL query to see if there’s room for improvement.
I noticed that some of the results for certain queries didn’t make sense. What I realized I had forgotten was that it’s raw, Markdown formatted text stored in the database tables and the results reflect all positive matches to the string a user submits through the feature. This includes matching bits of URL strings…
In effect what I thought was wrong, wasn’t. It was a matter of false expectations of what the results should be, that they weren’t as good as they should be or that I had made a mistake with the query. The query correctly checks against the entry_textentry_title fields. Taking this a step further, we could add MySQL’s full-text search to make searching even more robust.
Another small catch to keep in mind is that searches are case-insensitive meaning that a search for “Apple” should yield the same results as “apple”.
The point I’m trying to make here is simply that you should look closely at the results to ensure that everything is working as you expect. Test a handful of queries using the command line or some other database management tool.
Other Examples Of Using XMLHTTPRequest
This XMLHTTPRequest thing is really starting to take off now that newer browsers are supporting the feature more consistently and that the web community has started to take notice.
As a result you’ll likely see the Livesearch functionality cropping up on more and more blogs/websites in the near future and in more innovative and creative ways. Two other excellent examples of the XMLHTTPRequest object can be found over at map.search.ch and of course Google Suggest.
Since I slipped up yesterday and inadvertently posted an entry destined for my ‘Hits, No Misses…’ links blog on the main blog I encountered the problem of a small blip in the sequential numbering of my entry IDs. Thankfully this is fairly easy to correct and stuck me as a good little mini-tutorial for anyone who may not know how to do this.
Using my own situation as an example let’s say you just posted an entry to your blog and it is recorded in the database as mt_entry number 439. You then notice you posted it to the wrong blog. Oops.
MT Entries table statistics in MySQL
To remedy the situation you re-post the entry to the correct blog (this is easy with ecto) which then leaves you with two entries. Next you delete the first entry (the one posted to the wrong blog) leaving the second entry with an ID of 440.
If you were to look at the mt_entry table for your Movable Type install using something like phpMyAdmin you’d notice the last two entries were now 438 and 440 and the next autoindex value would be 441. Clearly there’s a blip in the system, but it’s an easy fix.
Un-Blipping The System
To get things back to normal you’ll need to have access to your MySQL database through the command line or something like phpMyAdmin. Start by looking at the mt_entry table. Note the last entry ID (based on the example, this will be 440) and change the ID to the missing ID. In this case it would be 439.
Now that the IDs are back in sequential order there’s still the matter of the autoindex value which, if left alone, will result in the next new entry to have an ID of 441. In order to fix this, we have to reset the autoindex value so the next ID will be 440 instead of 441. To do this, simply execute this query on the me_entry table:
ALTER TABLE mt_entry AUTO_INCREMENT=1
You can now safely rebuild your indexes and archives to see the changes reflected in your site.
Alternatively, you can probably avoid at least part of this procedure by not double-posting the entry to two different blogs and simply change the entry_blog_id value and rebuild. Note to self for next time this happens…
It’s been a while since I’ve done a tutorial on anything so as a last-minute holiday treat I’ve got one cooked up on a feature that I’ve wanted to explore implementing here for some time.
Resources
Let’s get the resources out of the way so you know where to get the relevant pieces of open-source code and can see a nice implementation of what we’re going to build.
Garrett Murray: Maniacal Rage — For doing a nice implementation of this with a couple of extra features than those than come out of the box and which I have attempted to appropriate into my own version. Cheers, mate!
Laying The Groundwork
Follow along and you should have a basic framework for implementing livesearch functionality on your own site. Start by downloading the required BitFlux JavaScript file and take note of the installation details. We’ll go over them here, but read through the content on the topic there first.
Take the ‘livesearch.js’ file and copy it to your site wherever you keep your Javascript files. For the purposes of this tutorial, I’ll assume this file will be located in the root directory of your site.
In the livesearch.js file locate the first line that contains /livesearch.php?q= near the end of the file. To specify the search variable as something other than “q”, change this here and in the lines that follow. There are a total of three instances that will need to be changed.
As an example, to rename the variable to “s”, the replacement text would be /livesearch.php?s=. Also note that you can rename the livesearch.php file to something else if desired. This script will do the work of performing the search and returning the results back to the browser. Just be sure to make the same changes in the Javascript if you rename the file.
Determine the necessary SQL query to search your Movable Type entries. Exactly how you decide to do this is really up to you. The SQL here is more of a quick example and you may want something more robust.
SELECT entry_id, entry_title, entry_excerpt,
DATE_FORM(entry_created_on, '%Y_%m') AS date
FROM mt_entry WHERE entry_text LIKE '%$s%'
ORDER BY entry_created_on DESC
The $search variable included in the SQL should also match the name passed from the search form. Exactly what is returned is entirely up to you. In this case, the query returns the entry ID, title, and excerpt with the results sorted by date in descending order.
To restrict the results to a single blog if you have more than one, you would also want to filter by the entry_blog_id in the WHERE clause. For example, WHERE entry_blog_id = '1' AND entry_text LIKE '%$s%', etc.
It would be useful to split the results into multiple pages if a large result set is sent back (eg. 10 results at a time) but that’s outside the scope of this tutorial.
The next piece of the puzzle is to return the results in a standard XML format to be parsed by the XMLHTTPRequest JavaScript object. The Wiki page describes the format required but you can see it more clearly here in context of the PHP you will need to return a correctly formatted result set.
You may not want to copy this verbatim, but it should be enough to give you a good start on how to return the results. Include links and such where appropriate and watch out for whitespace parsing and validation issues with the XML returned. Note that you don’t have to use an unordered list here, this is just a suggestion to keep thing clean and arguably semantically correct. It’s also easy to style with CSS.
Once your PHP script is completed, test it manually to see if it’s returning results as expected. Upload the file to your server and call it along with the appropriate search query appended. For example,
yoursite.com/livesearch.php?s=querystring
If all goes well and matches are returned you should see a nicely formatted list of results. If not, you’ve got some SQL or PHP debugging to do.
Implementation
Implementing livesearch into Movable Type, replacing the default search functionality is straightforward, but presents a few challenges. The first thing to take into account is where search is located throughout the site. For now, I’m assuming that search functionality is only available within the Main Index template.
In that Main Index template, locate the search form code. The default search form in Movable Type does not include an ID/name attribute and uses a button we technically will no longer need. Change the form code to:
Formatting is important here. Make sure the third line with the DIVs has any whitespace removed. Whitespace appeared to cause problems returning results during my testing.
Next, in the HEAD section of the template, include the livesearch.js file and initialize the livesearch script by attaching an onload event to the BODY tag.
<body onload="liveSearchInit();">
There are better ways to handle this, especially if you need to be able to execute multiple functions on the DOM when the page loads, but this is suitable for this simple example. Save the template changes and style as desired with CSS. Repeat as required wherever the search form appears.
Caveats
This isn’t foolproof of course. It doesn’t work in some browsers, or in some cases, not completely. It doesn’t work at all in IE 5 for the Mac or Opera 7.x (and one can assume earlier versions as well). It mostly works in OmniWeb 5.1 beta 5 based on very minimal testing. And there’s also the issue of graceful degradation. Users with Javascript turned off are out of luck with search since livesearch relies entirely on Javascript. Providing a fallback for those users would be a worthwhile addition.
I’ve been waiting for a good solution to secure ftp for a long time now and finding this link just made my day. The English translation isn’t perfect, but follow along with the Terminal commands and you should be good to go.
Do make a backup of any files first though — just in case.
During the process of making some of the small design and features changes that have seen the light of day on this site, I split out the sidebar calendar widget into its own include file. The Movable Type manual suggests this as a way of reducing the processing required during rebuilds of the index templates. Makes sense. Why do something more than once if you don’t have to.
One of the other things that made the cut was a complete refactoring of the actual HTML for the calendar since it was unnecessarily bloated. This was a good opportunity to play with the CSS a bit and give the calendar a bit more visual flair.
The thing I want to point out is that there’s a single TD element with an ID applied, indicating the current date. I made this change/addition but then realized that it’s not practical if I don’t post every day or I don’t rebuild the template every day to have the ID change positions appropriately.
Given that I’m currently using static publishing through Movable Type, I needed a way to automatically rebuild this template daily and ideally without me needing to remember to actually do it myself. Due to limitations at my host, I discovered that my options for automating this were limited so I rolled my own solution using a bit of AppleScript and a cron job on my main development system which stays on pretty much all the time.
Turn On System Events Scriptability
For this to work, you first need to turn on the option for “Enable Accessibility for Assistive Devices” in the Universal Access preferences in Mac OS X which allows you to target menus and execute keyboard commands programatically using AppleScript. Essentially this allows you to make just about anything scriptable whether an application supports it natively with a built-in scripting dictionary or not.
Mac OS X Universal Access for assistive devices preferences
How It Works
The general rundown of how the script works is this - the script launches via cron, opens a specified URL (the path to the Movable Type rebuild script along with the template ID) which, once loaded, causes the button on the page to be clicked using an accesskey which then rebuilds the template at which point the script closes. Sounds simple right? There was one snafu along the way, but luckily it was easy to resolve.
That one snafu? I had to modify one of Movable Type’s internal templates (specifically /tmpl/cms/rebuild_confirm.tmpl) to add the necessary accesskey which would allow the script to programatically press the button causing the template to be rebuilt. Not having the accesskey meant that there was no mechanism to actually press the button on the page.
The script then, when running and after the page has fully loaded (checked using do JavaScript( document.readyState = "complete" )) uses the keystroke command to execute the keyboard command for the accesskey. In this case set to Control-S in the template.
I had a tough time sorting out exactly how to format the keystroke command (lousy AppleScript docs…), but for future reference and anyone else struggling it is:
tell application “System Events” to keystroke “s” using {control down}
I was missing the tell statement. It was late when I was working on this part so I’ll blame it on being tired…
Making It Run
Mac OS X, being a Unix-based OS includes the cron scheduling utility. cron is used in the system to run a series of regular tasks for doing things like cleaning up and archiving log files but is really a general-purpose scheduling utility and a perfect fit for what was needed here to automate running this script. To add the task to the schedule, it’s simply a matter of editing your crontab file and adding the new command. In this case, I set it to run every day at 12:01 AM.
CronniX, cron process management for Mac OS X
Note that you may want to prepend the command with /usr/bin/open in order to actually open the application bundle (the AppleScript) via the shell. This shouldn’t be necessary since the path is already included in the default Mac OS X shell environment, but it’s probably good form just in case.
The crontab file can be edited by typing crontab -e in the Terminal or you can use a GUI application such as CronniX which is a bit easier and also makes testing things easy. If everything works, you’re good to go.
A (Minor) Caveat
One minor caveat to all this is that you need to have saved your Movable Type administration login information so the browser can access it without intervention. This means in your System Keychain. I don’t recommend running something like this on a public computer, but in a secured environment (e.g. home computer behind a firewall), you should be sufficiently safe.
Code Download
You can download a generic version of the script via the link below.
Following up on a tip posted yesterday over at Mac OS X Hints which made the little (invisible) bell above my head go “ding ding ding” — I noticed that menu items in applications on Mac OS X use curly quotes and not straight quotes which follows good typographic form. That being said, I realized that this might be the reason why I hadn’t been able to create a new keyboard shortcut for the “Update songs on …” command in the iTunes File menu.
Apple iTunes File menu screenshot
Earlier I tried with regular quotes and noted that it simply didn’t work. I gave up quickly on this one because it wasn’t terribly important, but I’m now happy to report: problem solved.
So for anyone who may not know how to create curly quotes (or typographers quotes as they’re often called), press Option-Left Square Bracket for the opening quotation mark and Option-Left Shift-Square Bracket for the closing quotation mark. For single quotes, use the Right Square Bracket key; the remainder of the key sequence is the same.
Taking cues from an old project originally started by Aaron Faby, I’m making a new version of the MySQL Preference Pane available for public consumption as part of my MySQL Tools package.
The MySQL Tools package includes a Startup Item and a custom PreferencePane for Mac OS X 10.2 or 10.3. The software is being distributed via an installer package which will install the files in the /Library folder at the root level of your hard drive. Some manual configuration is currently required following the installation though I am going to work on adding the necessary preflight/postflight scripts to the installer to take care of this.
MySQL Server PreferencePane for Mac OS X
There is also one potential security issue with the software (see the Read Me portion of the installer for additional details) which I am also intending to address so I do not recommend using this in potentially high-risk deployment environments at the moment. It should be fine for local testing and development though.
New in this version is:
Full Mac OS X installer for the software
First implementation of a Software Update mechanism to look for new versions of the software
Link to get more information on MySQL
Small improvements to the StartupItem
Code cleanup and bug fixes
I have a few ideas for additions and fixes to improve the tools which will appear in future releases.
One of the things we’re trying to accomplish with the big re-branding project I’m working on is facilitating global colour changes throughout the entire site via CSS (obviously). One of the items on the list causing problems is Opera’s handling of the input type=image element. Everything works as expected in older versions of the browser (as it does in every other browser out there, including IE5), but not the 7.x series which appears to contain a bug.
Implementation Details
The site currently (and going forward) uses a lot of image-based input objects (buttons) as opposed to the native OS-level widgets. These are also translated into around 40 locales — so there’s a lot to deal with. The newer buttons have been created as transparent GIFs using pixel font type. The idea is to apply a background colour and border to finish off the buttons with CSS.
Transparent image buttons
In Safari, IE, OmniWeb, Firefox, Camino and Mozilla applying a background-color property to an assigned class or ID on these input elements works as expected but in Opera 7.x this property appears to have no effect. I’m assuming part of this is related to that property is not necessarily appropriate for input objects, but every other browser seems to support it when the input type is set to ‘image’ so why doesn’t Opera (anymore)?
I took a look through some of the Opera docs and I’m not entirely sure what to make of things. For an experiment I tried creating a regular input element and styled the background. Of course it bloody well worked in Opera but failed in Safari. Very frustrating.
Up For Suggestions
While I continue to ponder this, does anyone have any ideas or pointers to articles or tips that might help? We’re looking at the feasibility of converting the inputs to plain vanilla images with links, but I’m not sure it will be possible given the use of a lot of complex Javascript. That, and the short timeline we have until launch.
Following in the footsteps of John Gruber I’ve put together a codeless language module for BBEdit 8 for the Velocity template engine. I have a few thoughts on the new version of BBEdit but I will save them for another day.
For those unfamiliar with Velocity (the large majority I suspect), it is, according to the Velocity overview “…a Java-based template engine. It permits anyone to use the simple yet powerful template language to reference objects defined in Java code.”
Continued, “When Velocity is used for web development, Web designers can work in parallel with Java programmers to develop web sites according to the Model-View-Controller (MVC) model, meaning that web page designers can focus solely on creating a site that looks good, and programmers can focus solely on writing top-notch code. Velocity separates Java code from the web pages, making the web site more maintainable over the long run and providing a viable alternative to Java Server Pages (JSPs) or PHP.”
Martin Pittenauer of The Coding Monkeys, tired of looking at poorly formatted source directly in Apple’s Safari web browser cooked up a small hack which instead hijacks Safari’s source view and instead displays it in SubEthaEdit. He was also good enough to post the source code for this making it possible to change it, allowing the source to be viewed in applications other than SubEthaEdit.
While I think SubEthaEdit is really cool, it’s not my primary editor. I’m a BBEdit man myself as are many of my contemporaries. And so out of SubEthaFari comes my switched-up bundle renamed (for lack of a better idea at the time), “BBEditSource”.
Why is this useful you ask? The answers should be at least partly obvious. Automatic syntax colouring, line numbers, and the ability to sort out rendering problems and code validation (especially if you use a lot of includes and need to be able to figure out if there are missing tags and such).
Being the responsible developer I strive to be, I’ve made the bundle available for download along with my modified source code. The download links are available at the end of this post.
Installation Notes
BBEditSource can be installed in two different locations in Mac OS X, your Library folder or within the system-level Library folder found at the root level of your hard drive where it will be available to all users on the system.
BBEditSource is known to work in Safari 1.2 and the 1.3 Developer Beta. It’s possible that it may work in earlier versions no access to those versions currently limits my ability to test again this theory to deny or confirm it. Your mileage may vary.
Note that you should not have SubEthaFari and BBEditSource installed at the same time to avoid potential conflicts. If you are experiencing problems or unexplained crashes using BBEditSource, leave a post in the comments.
Create a new folder called InputManagers inside the ~/Library folder or in /Library/ at the root level of your computer.
Drag the folder named “BBEditSource” to the InputManagers folder to install the bundle.
Launch Safari and visit a web site. In the View menu, choose View Source. The source code should be displayed inside a local copy of BBEdit instead of within Safari.
Downloads
Files are available for download as compressed Stuffit (.sit) archives. Click on the link to download the files to your Desktop. The source code has been saved in Xcode 1.2 format and may not be fully compatible with older versions. Visit Apple’s Developer Connection web site to download the latest version of Xcode for Mac OS X (free).
Apple recently posted a great tutorial on their Developer Connection site on how to get the W3C HTML Validator running locally on Mac OS X. If you want or have a need for local access (particularly when offline) to the validator tool, I recommend following along and setting it up on your own systems.
The process involves checking out the project from CVS, updating a few files included in a provided disk image, editing your Apache configuration file, installing OpenSP and a number of required Perl modules and lastly a missing library in Mac OS X called libiconv.
Additional instructions, especially related to Perl can be found at David Wheeler’s site.
Although there’s been quite a lot of talk around the Konfabulator / Dashboard controversy there’s been much less talk about the new features added to the WebKit framework which is the underlying rendering engine used in Safari. I suppose this is in part due to NDAs and all that, but since this stuff does seem to be somewhat public knowledge — and is showcased on Apple’s website, I’m curious about other’s thoughts on these new additions.
New UI Objects in the updated WebKit for Mac OS X
Specifically, I’m referring to the new UI widgets — the Search Field and the Range Slider Control. Although I’m happy to see something new in the way of form widgets for the web (really, has anything new happened on this front in the last, oh, five or six years?), it’s frustrating because they’re (currently) not a part of the W3C spec and may not be for some time, if at all, and therefore obviously won’t validate without tweaking your DOCTYPE declaration.
Do you think they’re useful outside of Safari or Dashboard? Would you like to see these form widgets available in other browsers such as Internet Explorer or Firefox? How can you see using the slider control in a real-world application? Are these widgets a step towards allowing developers to build even more expansive, applications on par with desktop equivalents?
The search input field is clearly designed for a specific purpose but I think if implemented appropriately, provides a more user-focused way of implementing basic text search for websites that is both intuitive and actually useful. The ability to provide a search field that remembers search queries across sessions with no special programming or scripting is a real boon for both designers and developers. Although we could debate the issue of how many ways the same task could be implemented, in the end, would it not be better to work from a standardized, lightweight method that gets the job done and works across browsers and platforms. Perhaps with a bit of luck and a bit of time we’ll get there.
So, what to do.
I’ve been debating implementing the search field as a test though it’s general usefulness would be limited since there’s only a small percentage of visitors who would see the benefit. The upside is that the field degrades gracefully so it behaves the same as a regular text input field in unsupported browsers. Safari 1.3 or the beta of Safari 2 is required to use the new WebKit features in Mac OS X.
Although I haven’t checked my site stats specifically looking for visitors using either of those browser versions, I will be monitoring things and maybe these changes will appear… or maybe not.
Shaun Inman, who is close in the race to become my new web hero a couple days ago posted a few smokin’ (read: extremely useful) web development favlets for your browser. For the uninitiated, favlets are typically small snippets of Javascript code which can be stored as bookmarks in your browser. Favlets can do things like adjust the size of your browser window, change elements on a site — really just about anything you can do with Javascript in general.
To add any of Shaun’s favlets to your browser bookmarks, simply drag the links on the page to the bookmarks bar and reorganize/customize as desired. Be sure to read through the comments for additional browser compatibility notes.
Andy Budd put up a great post on his blog today focused on the margin property in CSS. In the post, he uses a series of examples illustrating how the margin property is supposed to behave along with how to get around some peculiarities found in certain browser implementations.
If you’ve done any research on writing semantic markup (XHTML) and styling it with CSS, the best way to start debugging rendering issues is to first test in a standards-compliant browser such as Firefox or Safari and work back to Windows IE or whichever browser(s) that need to be supported to avoid using unnecessary hacks or workarounds.
Although I’ve got a good handle on using the margin property and how and when margins are expected to collapse, I did learn a few things I didn’t know and gained some valuable insight on how to work around margin-related rendering issues. Be sure to read through the comments for a few other useful tips.
I’m not sure who first said this, but it rings true to me and should for anyone else who feels as though their sense of ambition is squashed based on their working environment.
How can I soar with eagles when I work with turkeys?
In the hope of solving my own problem, I put together a straightforward cheat sheet for John Gruber’sMarkdown text formatting software. The cheat sheet, available in PDF format has been designed for 11×17 printers though it will scale happily to 8.5×11 size for those wanting a smaller-scale version. Print it out, hang it on your wall, share it with your friends.
I’m considering revising it to include more extensive, in-context examples though comments and suggestions will help lead me either way.
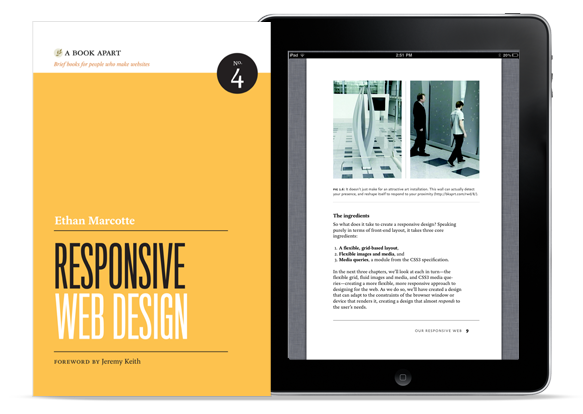

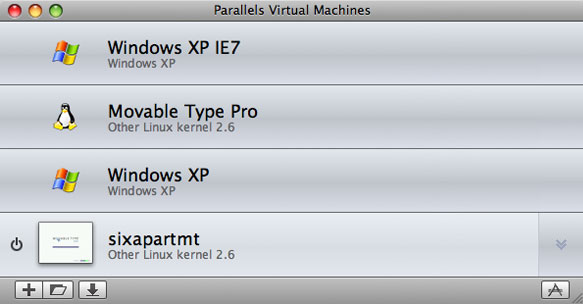
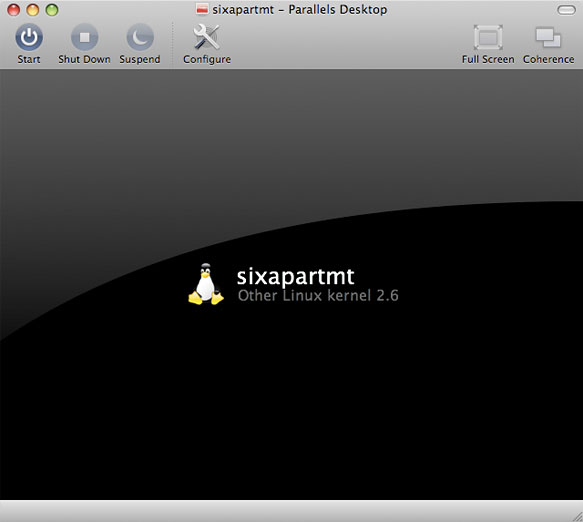
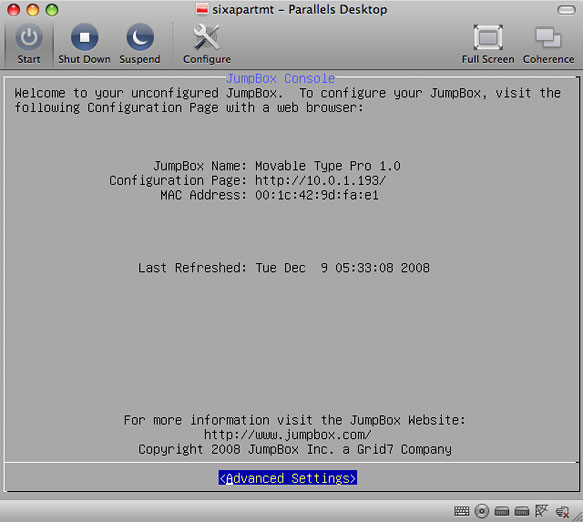
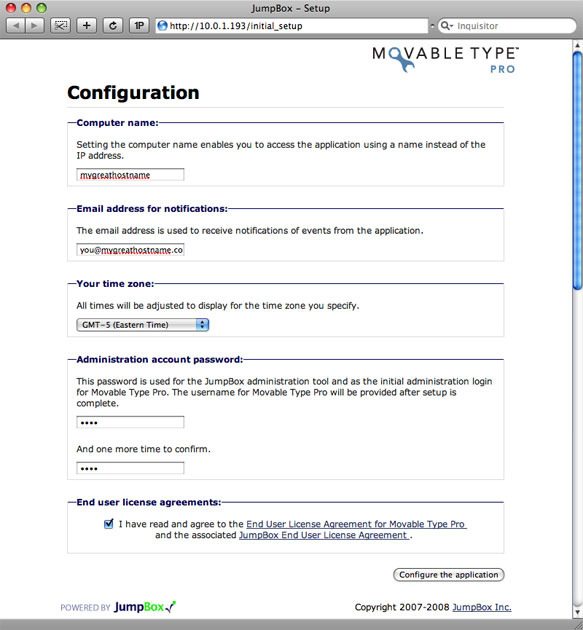
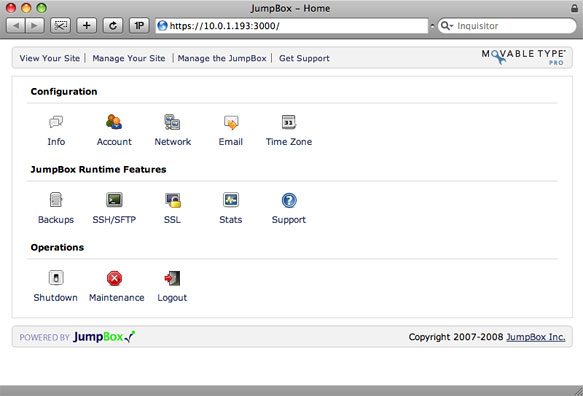
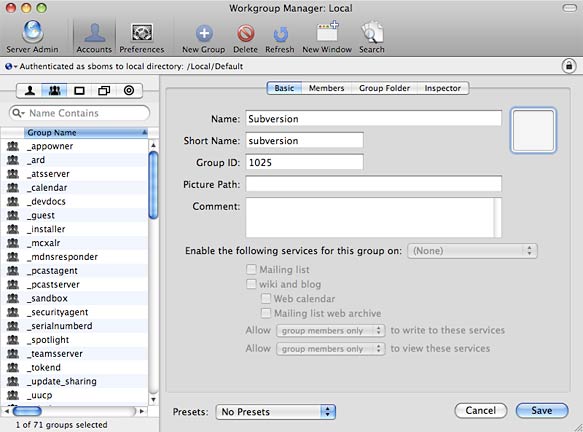
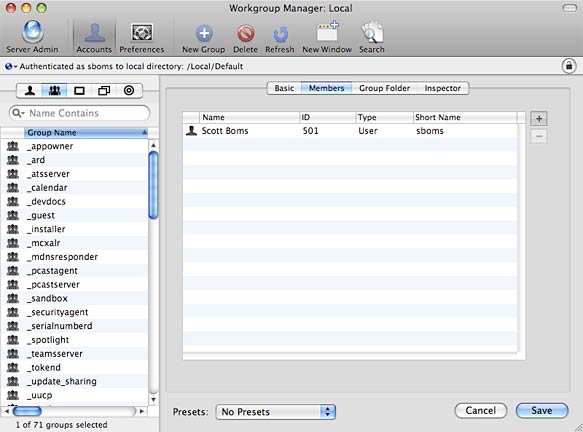
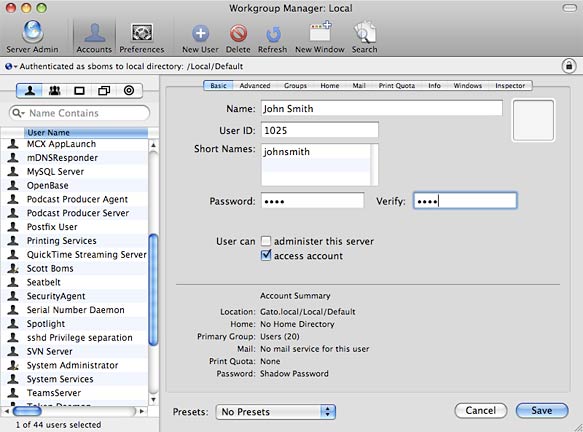
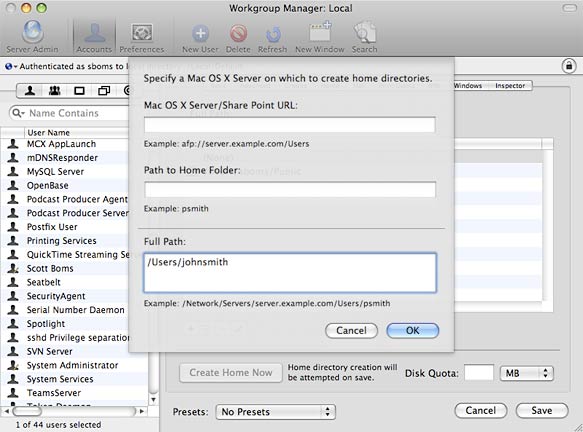


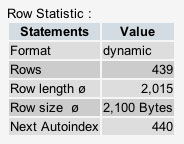

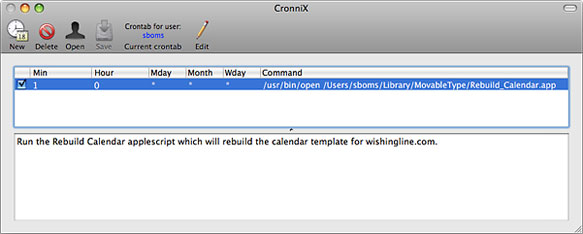
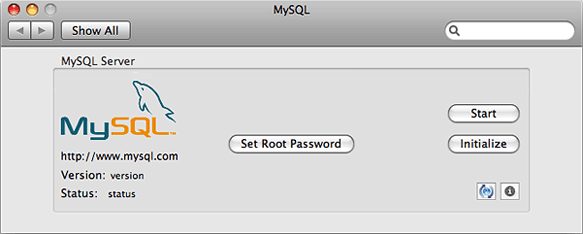


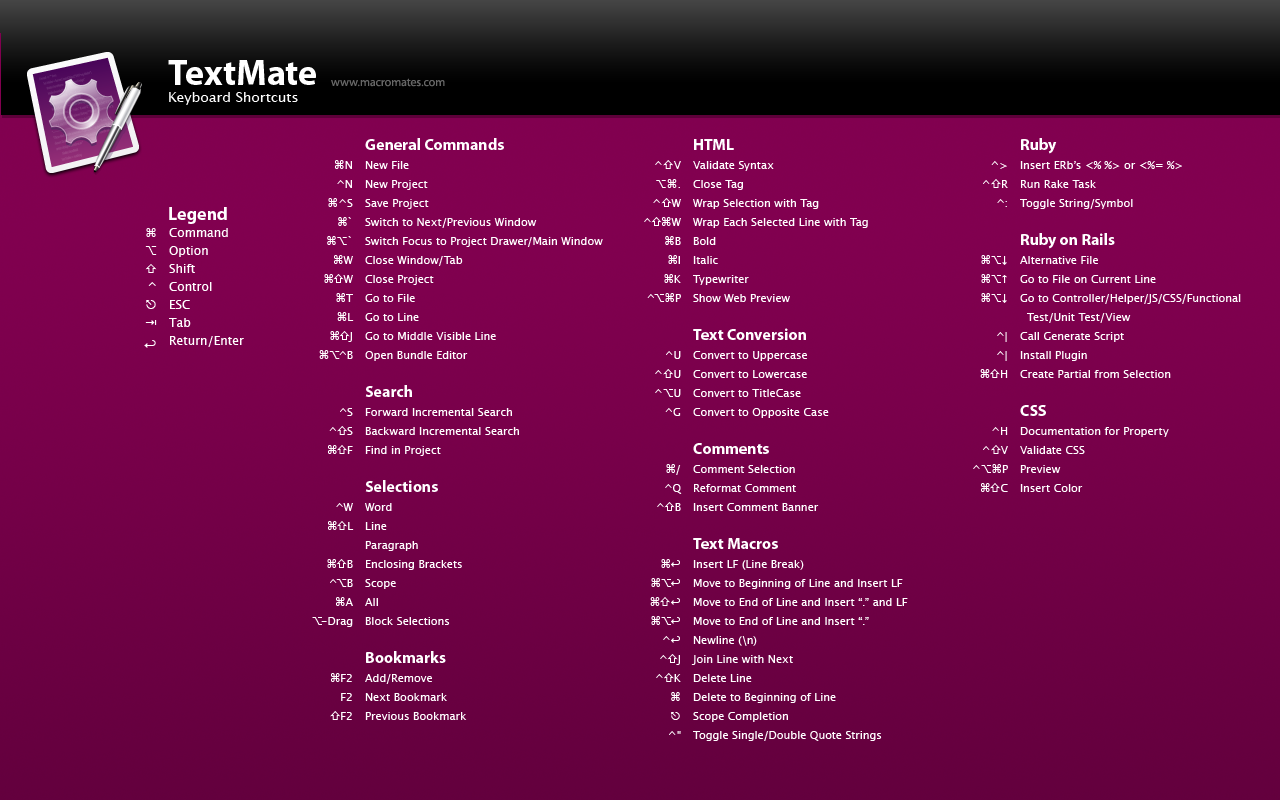