The other day I was invited to take a peek behind the curtain at a new web font related technology that’s nearly ready to hit the streets from the fine folks at Extensis. Needless to say I was very interested and excited by what they’ve been up to.
But first a bit of context…
How (Most) Web Designers Work Today
During TypeCon in New Orleans this past July, one of the things Brian, Luke and I covered during our talk on web fonts was process — exactly how (most) web designers work, and what happens to the particular artifacts we produce as a result of that work. In particular, design mockups, and most importantly though, how those relate to a web designer’s somewhat contentious relationship with fonts.
Web designers have wanted the same control over typography print designers have taken for granted for decades, including being able to use the same variety of typefaces. Hacks such as sIFR and Cufon aside, it’s really only during the last two years, thanks to the encouraging work of type designers, foundries and browser makers, that the tide has really turned and we’re inching closer to that reality.
Unlike print though, where designers create final artwork files that are the final output of the design phase of a project (a newspaper advertisement, a book layout, product packaging), the large majority of web designers create mockups, a transitional artifact created for the benefit of clients and others involved in producing the actual end product — a functioning website.
Mockups are not the end result, and so purchasing desktop font licenses for what is effectively a throwaway product is counter-intuitive. Web fonts are part of the real end product of a web designer’s work, not their desktop equivalents. But that’s not the way we’ve had to work.
And it’s certainly not that web designers don’t want to pay for fonts — quite the opposite in fact. Web designers have flocked to web font services such as FontDeck, Typekit, and WebINK, and more will come as these services are more readily adopted by those beyond the early adopters.
During our talk at TypeCon, we further explored a suggestion which originated from Elliot Jay Stocks illustrating how web fonts might be integrated into a desktop design application such as Photoshop. In July no such thing existed; it was just an idea. And while the software is not available quite yet, I can happily say that it does now thanks to the team behind WebINK, Extensis’ web font service.
Introducing the Web Font Plugin for Photoshop
To address this disconnect in how web designers work, Extensis has created a piece of software that bridges their WebINK web font service and Photoshop, thus allowing web designers to use web fonts as though they were traditional desktop fonts in the popular design tool.
The WebINK Web Font plugin for Photoshop CS5
The web font plugin for Photoshop will be included with Suitcase Fusion 3 and available in beta in the coming weeks. Most importantly, it will continue to function beyond the software’s 30 day trial. There’s no requirement to purchase or use Suitcase — it’s simply the delivery mechanism for the plugin itself and assists in integrating the plugin with their WebINK web font service.
At the moment the functionality is simple and straightforward. Once the software is installed, open the Panel in Photoshop, sign in to your account and start working with their library of web fonts.
Transferring PSD files to others is seamless too, provided they have a WebINK account and the plugin installed. Designers will also be free to create JPEG, PNG and PDF files without watermarks or licensing restrictions beyond anything they’re already used to. Of course, there are still a few unanswered questions such as what happens without a network connection, but it’s a very promising start and raises the bar for competing web font services. Nudge, nudge Typekit and FontDeck.
Update (September 12, 2011)
Extensis has soft-launched the software’s microsite and you can download a 30 day free trial of Suitcase Fusion 3 and the Web Font plugin for Photoshop at webfontplugin.com. Go. Download. Create.
Given the reduced amount of writing I’ve been doing the last, oh, year or so, and the amount of photography gear I’ve acquired during that same time, I think it’s safe to say I’ve rekindled an old love of documenting important events and daily minutiae in photo form, more than in words.
Mix in additional complexity from having multiple cameras — my trusty Canon 30D, the main workhorse of the lot, a Polaroid SX70 land camera, a newer 600 speed Polaroid camera and of course the ubiquitous iPhone which generally acts as my go-to camera when out and about, and the whole thing gets to be a bit much most of the time. Particularly with competing requests for my attention.
Enter the recent release of what some might call “yet another camera app” for the iPhone: Instagram. Boring, right? Actually, not so much.
This one has thus far proven to be special in a way I didn’t expect. It doesn’t do too much that I’d call “new” but what it does do is take all that tedious work and, for lack of a better way to say it, makes it fun again. Or at least makes it “easy”.
Instagram’s killer feature is that it can simultaneously upload a photo to my photostream on Flickr while sharing it on Twitter. It’s also very quick about it all and happens to produce generally great results.
What would make me happier though is if Instagram would share a short link from Flickr instead of their own when passing off to Twitter. It’s simply because I prefer to have my photo content in one bucket, not spread around in too many sites simultaneously despite it meaning additional redundancy. Allowing the user to define their preferred social sharing mechanism would be a nice touch.
And while I really don’t need another social network/app to monitor, Instagram hasn’t been too obnoxious about it, at least not yet. Frankly, it’s been fun so far. I hope it continues to be.
For as long as I’ve been using Mac OS X I’ve found myself exploring the Unix underbelly of the operating system and hand-rolling my own web development environment using various open source web projects such as MySQL, Ruby, Rails, Python, Django, etc. The popular stuff at least.
As such I’ve tinkered away at automating the process, because, well, installing all that software is time-consuming, tedious, and really — who doesn’t have better things to do?
So after much tinkering, tweaking and head-scratching I built a little project that I open-sourced and dubiously called …And the Kitchen Sink because that’s what it felt like. Eveything… and the kitchen sink.
Recently, Kenny Meyers goaded me into moving the project to Github and I’ve been maintaining both the original on Google Code and the Github version. That does sound like fun, doesn’t it?
And now that the next big cat, Snow Leopard will be officially out of the bag tomorrow (it’s helpful to have access to pre-release builds via the Apple Developer ConnectionFYI), one would think the logical next step would be to test things to make sure they still work, especially given that Snow Leopard is 64bit through and through. I did. They didn’t.
After several long nights and more head-scratching, now …And the Kitchen Sink is too.
Everything… And The New Hawtness
Aside from ensuring the script built everything as 64bit binaries (just like in Snow Leopard itself) I actually went quite a bit further and radically changed the way the script worked and have started splitting up several core tasks into smaller individual ones that can be run in sequence rather than one big-ass monolithic process.
Par exemple — now you can: download the various included packages, compile everything, and then finally setup MySQL (unless you screw things up real bad, this only needs to be done once). If you’ve tried the old version, trust me, this is a hands to the sky kind of improvement.
What You Can Do
There’s still other changes and improvements coming — my plan (in as much as I have one) is to either split things into “bundles” (eg. a Ruby bundle, a Django bundle, etc.) or allow some sort of flexible configuration to decide what actually gets installed. I’m not there with that yet.
In the meantime the thing desperately needs some “in the wild” testing. That’s where you come in. So go, download, read the “README” file (for reals), try it out, report bugs and make suggestions. The best ones get a cupie doll. If it changes your life, I happily accept donations.
One last note — keep in mind that I’m not a developer, ok? I just play one in my spare time.
Last year when I originally moved the Wishingline site and a handful of others over a shiny new slice at Slicehst one of the issues I ran into was handling outgoing mail from contact forms, Movable Type, etc. I’m no server admin and despite knowing enough to be dangerous, setting up a secure mail server that can handle multiple domains was definitely outside my comfort zone.
Thanks to Ethan, I discovered a gem of an open source project called MSMTP which was just what I needed; the exception being that I couldn’t figure out how to use it with multiple domains. Until last week that is.
Of course it’s really easy.
Installing and Configuring for Multiple Domains
MSMTP provides two ways you can configure the software using a simple and well-documented configuration file format. It’s all plain text so it’s easy to create, edit and back up.
Installing the Software
Installing MSMSTP requires the following packages which can be installed using the aptitude tool on Ubuntu. Installation on other *nixes may vary.
Once you have everything installed, you need to create a configuration file either in /etc/msmtprc or by creating a user-specific one in your user’s home directory. If you need mail services for more than one domain, I suggest using the global configuration option.
I’m going to assume you’re reasonably comfortable working in a Unix environment from here on out though if you know what you’re doing you can do all of this just as easily using ExpanDrive and TextMate without having to touch the Terminal.
$ sudo nano /etc/msmtprc
Once the nano editor has opened a new blank file for you, enter the following and replace the example configuration as needed. I’m including examples for two domains so you get the idea.
# Account: domain1.com
account         domain1
host            smtp.gmail.com
port            587
auto_from       off
auth            on
user            hello@domain1.com
password        PASSWORD
tls             on
tls_starttls    on
from            robot@domain1.com
maildomain      domain1.com
tls_trust_file  /etc/ssl/certs/ca-certificates.crt
logfile
syslog          LOG_MAIL

# Set a default account to use
account default : domain1

# Account: domain2.com
account         domain2
host            smtp.gmail.com
port            587
auto_from       off
auth            on
user            hello@domain2.com
password        PASSWORD
tls             on
tls_starttls    on
from            robot@domain2.com
maildomain      domain2.com
tls_trust_file  /etc/ssl/certs/ca-certificates.crt
logfile
syslog          LOG_MAIL
Repeat as necessary to add more domains. Save your changes by typing Control-O and pressing Enter. Then type Control-X to exit the editor.
Virtual Host Configuration
Assuming you’re using PHP with Apache as your web server, you can add the last two lines in the example below to each virtual host to specify which configuration account you’d like to use to send mail.
<VirtualHost *:80>
  ServerAdmin webmaster@domain1.com
  ServerName domain1.com
  DocumentRoot /home/user/sites/domain1/
  DirectoryIndex index.html index.php

  # MSMTP configuration for this domain
  php_admin_value sendmail_path "/usr/bin/msmtp -a domain1 -t"
</VirtualHost>
Replace domain1 with the correct domain obviously. This should correspond to the account names specified in the /etc/msmtprc file.
Alternatively you need to instruct your middleware or framework to use MSMTP instead of Sendmail/Postfix to send mail and pass the same account parameter whenever called. Most have some form of configuration option to allow this.
It’s spring or at least that’s what the calendar says and that means it’s time for some spring cleaning. As a result of the changes ‘round these parts I now have a handful of software licenses that are no longer being used along with one shiny, good as new 24” iMac computer that’s for sale (the other ones are already accounted for).
At this point I don’t have much need to keep a second iMac around in the office since there’s already two other Macs and a PC at my disposal. The iMac is one of the current aluminum models (though prior to the last hardware minor update a few weeks back), approximately 6 months old and includes the obligatory AppleCare extended warranty.
Built-in stereo speakers, microphone and iSight video camera
Apple Keyboard and Mighty Mouse
Mac OS X 10.5 Leopard + iLife 08 software bundles
$1,800 — SOLD
If you’re interested or have a question about any of the above items, get in touch by sending an email to springcleaning {at} wishingline.com. Everything is first-come first-serve and once something is gone it’s gone. Shipping is not included and will be determined on a per-item basis as required.
Since I seem to be on a roll blogging for the first time in ages, I was thinking this morning that now would be a good time to assemble a new set of wallpaper images for the iPhone and iPod touch. As with previoussets, these are taken from a handful of recent favourite photos from my Flickr photostream.
Wishingline iPhone lock screen wallpapers (set 3)
As before I only ask that people link back to this post instead of redistributing the individual download archives or wallpaper images themselves.
Since June of last year (following attending WWDC in San Francisco) I’ve had an item on my To Do list — “experiment with improving the overall performance of the Wishingline Notebook site.” In other words, do some under the hood optimizations.
Yahoo! has a terrific set of guidelines that can be used to squeeze the most performance out of your site. This, along with a talk from WWDC last year piqued my interest in learning more — especially any simple things I could put into practice in my client work as well.
First on my list was experimenting with minifying and concatenating Javascript and CSS files. This is easily done with the YUI Compressor or other similar utilities. The trick is automating everything when changes are made. For example, generating minified versions automatically when deploying files to your site.
Second on the list was moving the site’s CSS, Javascript and images to their own subdomains, allowing browsers to download assets faster since most are limited to two connections per server. By splitting things up browsers can use more than just two concurrent connections, thereby loading the site faster.
1 domain = 2 concurrent connections. Ok but not great.
4 domains = 8 concurrent connections. Zippy!
Unfortunately it wasn’t until this past week that I had a chance to look into this one.
I started with two simple goals:
Provide separate URLs for Javascript, CSS and images.
Make the code change across the site templates simple.
Setting up subdomains in Apache is simple and adding the necessary DNS entries and virtual subdomains to accomplish the first goal took less than 10 minutes.
On the other hand, being smart about how to handle putting those subdomains into the template code elegantly was a bit trickier. Sure I could just hard-code the URLs into the site templates — but that kind of sucks. I had a better idea.
The Notebook site has been running on Movable Type since 2003 and a better way to accomplish this would be by using template tags. And so I did, though it meant creating a special plugin for Movable Type to do so.
Enter MediaURLs for Movable Type 4.x, a new plugin that allows users to specify a series of URLs for serving CSS, Javascript and image assets each from their own domain or subdomain while providing a set of corresponding template tags to make applying those changes DRY, easy, and fast.
MediaURLs plugin congiguration screen
Each of the four setting options provided by the plugin settings (shown above) are optional and should be fairly self-explanatory. A simple example of how to use these is included in the documentation.
The general “media” option was added at the last minute for the sake of simplicity — to allow the use of a single generic domain/subdomain to serve any type of asset — for example, serve all CSS, JS and images from a single secondary domain.
The MediaURLs source is being hosted at Github and will be regularly maintained. This is really only a first release and I’m open to suggestions for further improvements. Enjoy and happy optimizing!
For the past few weeks we’ve been working on designing and building out a site for a client and since selecting Movable Type 4 as the CMS, we thought it would be worth giving the relatively new Virtual MT a try as part of our development process. Although our overall experience using VMT so far has been great, we ran into one small nit: the default site isn’t served from the root URL of the server and instead uses a subdirectory path. This (probably) should be a user-defined option, but isn’t currently, so we set out to resolve this for ourselves.
Let’s be honest — Movable Type has always been a bit of a pain to run on Mac OS X unless you happen to be or know someone well-versed in the black art of the command line and Perl. A black art if you’re a designer at least. This is exactly why VMT is great, particularly if you’re already used to running Windows in Parallels or VMWare for browser testing and debugging.
Virtual MT comes pre-packaged as part of a lightweight Ubuntu Linux OS. Downloading and running an instance (or multiple instances) of VMT is simple and we’ll cover the process using Parallels 4 before walking through the configuration change to allow the default site to be served from the root path of the included Apache web server.
Downloading and Running VMT
Get started by downloading a copy of Virtual MT which comes in both Open Source and Commercial (Pro) flavours. Unzip the downloaded archive and read the included Read Me file. No really, read it.
Parallels Virtual Machine list
Next, locate the VM Image file for Parallels (or your preferred Virtual Machine software) in the unarchived folder in your Downloads directory. In the case of Parallels, this file should end with a .pvs extension. Double-click the file to add it to the Parallels Virtual Machine library. Parallels 4 will request the VM image be converted to the newer bundle format.
The Virtual Machine book screen in Parallels
Click on the Virtual Machine and start it. In a web browser, go to the Configuration Page URL displayed in the running Virtual Machine window.
The running Virtual Machine window in Parallels
Complete the base configuration to enable access to the VM and Movable Type itself.
The configuration screen for the Movable Type JumpBox
Once the base configuration is complete, go back to the main Configuration Page and click on the SSH/SFTP icon. Check the checkbox to enable SSH/SFTP access and then save the change.
The Movable Type configuration home screen
At this point you should have a fully functional, ready to customize virtualized install of Movable Type. No mucking about in the command line or Perl module installation required. Next — improving the configuration.
VMT Configuration Changes
In order to “correct” the configuration of VMT, provide access to the VMT install at the root of the included Apache web server and make accessing the MT insall and any published templates easy, you may want to install either MacFuse or ExpanDrive which let you access the virtual OS filesystem just like any other shared disk. Alternatively, Transmit or any other software that supports SFTP connections will also work, though direct access in the Finder is considerably more user-friendly.
And now the nerdy part. To make the necessary Virtual Machine configuration changes, run the following two commands in a new Terminal window. Replace VIRTUAL_IMAGE_IP_ADDRESS with the one provided in the VM window on your computer.
After entering your admin password when prompted, in the pico text editor, change the contents of the jumpbox-app file to match the following:
# Alias /movabletype/blogs /var/data/mt-blogs
Alias /movabletype /var/data/movabletype

<Directory /var/data/movabletype>
  AddHandler cgi-script .cgi
  Options +ExecCGI
  # Uncomment the following lines to enable FastCGI
  # <FilesMatch "^mt(?:-(?:comments|search|tb))?\.cgi$">
  #   SetHandler fastcgi-script
  # </FilesMatch>
</Directory>

<Directory /var/data/mt-blogs/*>
  AllowOverride All
</Directory>

# Uncomment the following lines to enable FastCGI
# FastCgiServer /var/data/movabletype/mt.cgi
# FastCgiServer /var/data/movabletype/mt-search.cgi
# FastCgiServer /var/data/movabletype/mt-tb.cgi
# FastCgiServer /var/data/movabletype/mt-comments.cgi

RewriteEngine on
# RewriteCond /jumpbox/var/widget-on !-f
# RewriteRule ^(/?|/index.(html|php|htm))$ /movabletype/blogs/my_blog [R]
# RewriteCond /jumpbox/var/widget-on !-f
# RewriteRule ^/jblogin.(html|php)$ /movabletype/mt.cgi [R]

# DocumentRoot /var/www
DocumentRoot /var/data/mt-blogs
Save your changes by typing Control-O and then Control-X. To then restart Apache so it will reload the newly updated configuration, type the following in the Terminal.
sudo /etc/init.d/apache2 restart
Updating Movable Type’s Publishing Paths
The last thing that needs to be done is to update the Publishing Path values for each blog instance in Movable Type so content will be published to /var/data/mt-blogs instead of the default location. This is done from the Preferences > Publishing screen in the Movable Type admin interface.
Set the value of Site URL to the IP address of the VM and set the Site Root to /var/data/mt-blogs. If running more than one blog instance, change these values apporpriately. Save the changes and re-publish. And that, as they say, is that. Enjoy!
Note: The current (as of this writing) release of Virtual MT is slightly out of date with the recent 4.23 release of Movable Type though it’s simple enough to update your own base install in VMT.
One of the things that annoyed me with the process of setting up a Subversion server with SSH access, aside from the sheer complexity, was the number of steps required just to create a new project. Once was bad enoug, but repeating those steps each time to create a project just didn’t scale…
So, a bit of Bash scripting later and everything is much, much easier.
Assumptions
The instructions and script that follow assume you completed the earlier tutorial carefully when setting up your own Subversion server. It may not be appropriate or work as expected otherwise. As always, YMMV.
Creating, Configuring and Using the Script
Somewhere in your $PATH on the system acting as your Subversion server (I suggest /usr/local/bin), create a new file named svnproj, set the file as executable and then finally open the file for editing.
#!/bin/sh

REPOSITORY="/svn"     # Set to your repository path
USER="admin_user"     # Set to your system admin user

# ====================================================
# Do not change anything below the line above

PROJECT_NAME="$1"

if [ $# -eq 0 ] ; then
  echo "Usage: newproj PROJECT_NAME"
  exit
fi

echo "------------------------------------------------"
cd ${REPOSITORY}
svnadmin create ${PROJECT_NAME}

echo "Created project: '$PROJECT_NAME'"
echo "Configuring svnserver.conf for restricted access"

cp ${REPOSITORY}/${PROJECT_NAME}/conf/svnserve.conf \
${REPOSITORY}/${PROJECT_NAME}/conf/svnserve.conf.default
cat > ${REPOSITORY}/$PROJECT_NAME/conf/svnserve.conf << "EOF"
[general]
anon-access = read
auth-access = write

[realm]
realm = Projects
EOF

echo "Successfully set svnserve.conf"

chown -R ${USER} ${REPOSITORY}/$PROJECT_NAME
chmod -R 770 ${REPOSITORY}/$PROJECT_NAME
chmod g+t ${REPOSITORY}/$PROJECT_NAME/db

echo "------------------------------------------------"
echo "Done"
The script requires you to set two internal variables in order for it to actually work; one which sets the location of your repository, and a second which sets the admin username on your system which will be the default owner of files and folders in the repository. You can find these at the top of the script, named REPOSITORY and USER respectively.
Running the script is as simple as:
sudo svnproj PROJECT_NAME
If you happen to run the script without the PROJECT_NAME parameter, it will simply output the usage note and exit gracefully. Whether you need run the script via sudo ultimately depends on where your repository is located on your server.
Our particular version of this script does one additional thing — it creates a post-commit hook script and automatically inserts the necessary code to output commit messages as an RSS feed per these instructions.
As Wishingline has slowly grown beyond just one person, the need to change workflows and improve our ability to communicate and collaborate with clients, peers and partners has prompted us to do things a bit differently than in the past. One of these things has been to set up our own internal Subversion server. Yeah — we know git is the new hawtness, but the tools available and integrating git are few, and honestly, our own experience with it has not left us paricularly enamoured.
In setting up a new Subversion server for us to use internally, secured on our network, but also accessible remotely, we started off with our own tutorial from back in 2007, a bit of help from the official Subversion book, and our old friend Google. We ran into a few problems along the way, and so in the hopes of saving others from running into the same issues, this entry will hopefully serve as a straightforward and complete guide to setting up a Subversion server using svn+ssh authentication on Mac OS X (Client and/or Server).
Prerequisites
In order to complete everything below on your own systems, you will need:
At least two Mac systems: one which will act as a central Subversion repository (server) another as a development workstation.
Mac OS X: Leopard 10.5.x (ideally 10.5.5) Client or Server. There’s a good chance that you’ll be able to follow this guide on Tiger as well, but YMMV.
Xcode 3.0 or newer, included on the Leopard install DVD, included with the iPhone SDK and otherwise available free from the Apple Developer Connection site.
A sufficient degree of comfort in working in the Terminal application.
Administrative access.
A few Notes Before we Start
Nearly all the instructions to follow require extensive use of the Terminal application which can be found in the /Applications/Utilities folder on your Mac. Each line in the code examples that follow should be entered into the Terminal and followed by the Return key.
Setting Up Your Envrionment
As with other Unix operating systems, Mac OS X uses the PATH environment variable to determine where to look for applications when working on the command line. It’s common to install custom builds of Unix software in /usr/local in order to avoid interfering with core system software. A big benefit being that you don’t have to worry about updates to Mac OS X inadvertently overwriting your custom software installs.
To set your the PATH for your user account on your workstation, you will need to either create or edit a .bash_login file which is commonly used to customize the default shell environment on a per-user basis. To open or create the file, in the Terminal, type:
pico ~/.bash_login
If the file does not exist, the following needs to be added at the end of the file in order to set the necessary PATH variables so that you will be able to use the various Subversion applications without needing to specify the full path to them on your systems.
The one oddball in the above PATH is the path to the aliasbin directory. We’ll explain what that’s all about later on. Patience grasshopper!
Save and close the file by typing Control-O and then Control-X. You’ll be returned to a new prompt in the Terminal. Close the window and open a new one to load your changes.
Xcode and Subversion
When you install Xcode 3.0 or newer, a version of Subversion (at the time of this writing, version 1.4.4) is also installed. Although you could use this version and skip a few steps, this tutorial is based on using the latest and greatest.
Step 1: Installing Subversion Prerequisites
Before installing Subversion there are a number of prerequisites which can or should be installed depending on your specific needs. In this particular case, the only one necessary is zlib which is used to add compression support to Subversion.
In order to keep things neat and tidy, source downloads can be saved to the Downloads folder in your home directory or wherever you prefer.
Installing zlib
To download, compile and install zlib, type the following in the Terminal:
cd ~/Downloads

curl -O http://zlib.net/zlib-1.2.3.tar.gz
tar -zxf zlib-1.2.3.tar.gz

cd zlib-1.2.3

./configure --prefix=/usr/local
make && sudo make install

cd ..
Once you get to the sudo make install command, you should be prompted for your administrator password. Enter that when requested in order to complete the installation.
Installing neon
If you want or need WebDAV support in Subversion, you can also install the neonHTTP and WebDAV client library. neon is entirely optional, but if you want to install it, type the following in the Terminal:
cd ~/Downloads

curl -O http://webdav.org/neon/neon-0.28.3.tar.gz
tar -zxf neon-0.28.3.tar.gz

cd neon-0.28.3

./configure --prefix=/usr/local \
--enable-shared=yes \
--with-ssl=openssl \
--with-libxml2

make && sudo make install

cd ..
At this point you should now have the two primary prerequisites installed, meaning you’re now ready to download, build and install Subversion itself.
Step 2: Installing Subversion
Compiling Subversion with all the necessary support libraries is straightforward. If you did not install neon as in the prerequisites above, be sure to omit that line in the configure command below.
cd ~/Downloads

curl -O http://subversion.tigris.org/downloads/subversion-1.5.4.tar.gz
tar -zxf subversion-1.5.4.tar.gz

cd subversion-1.5.4
./configure --prefix=/usr/local \
--disable-mod-activation \
--with-apxs=/usr/sbin/apxs \
--with-ssl \
--with-zlib=/usr/local \
--with-neon=/usr/local \
--without-berkeley-db \
--without-sasl

make && sudo make install

cd ..
You should now have Subversion installed on your system(s) in /usr/local/. You can verify this by checking the version of one of the Subversion applications. Type svn --version in the Terminal.
In order to create a complete client-server configuration with remote repository access, you will need to complete Steps 1 and 2 on both Macs. If you’ve got more than two Macs, repeat as necessary.
Step 3: Workstation Public/Private Key Creation
Public/private keys can be used to secure your network communications even more than relying on simple password authentication. In this particular case, these keys can be used to provide secure authentication to your repository. To create a public/private keypair, in ther Terminal, type:
cd
mkdir ~/.ssh

ssh-keygen -t rsa
If you do not want to use a passphrase as an extra level of security, just press Enter when prompted. The ssh-keygen command will create two files in the .ssh directory, ida_rsa.pub and ida_rsa.
The first, with the .pub extension is your public key which you’ll need to copy to the Mac acting as the repository server into a file named authorized_keys. The second is your private key. Do not share this with anyone. Seriously. The private key will be unique to each system/user and identifies that particular Mac when authenticating to the server or to any other systems sharing the public key. Simply put, in order to authenticate successfully, you need both halves of the key.
Step 4: Setup Users and Groups on the Server
There’s a few different ways users and groups can be managed: the Accounts system preferences panel, the command line and the Mac OS X Server Admin Tools which can also be used on the consumer version of Mac OS X and not just the server edition.
Launch the Workgroup Manager application from the /Applications/Server folder and press the Cancel button when prompted to login to the server. Instead, select View Directories from the Server menu and click the lock icon on the Workgroup Manager window to authenticate yourself as an administrator.
Create a Subversion Users Group on the Server
Before users can be given access to the repository, users all need to belong to a common group which will have read/write permissions for the repository on the server.
Creaing a new group in Workgroup Manager
Click on the Groups tab to switch to the Groups view and then click the New Group button to create a new group. Give the group a Name and Short Name and press Save. Click on the Members tab to add users to the group or switch to the Users tab and add users to the group from there. Depending on how many users you need to provide access to, one method might be faster than the other.
Adding members to a group in Workgroup Manager
Create User Accounts on the Server
Unlike other Subversion authentication methods (file://, svn://), accessing a repository via SSH requires that real user accounts exist on the server. In theory at least, these users should be able to access the server via SSH as any other user, though this can be restricted. More on that later.
Create any needed user accounts by clicking on the New User button in Workgroup Manager.
Creating a new user account in Workgroup Manager
Under the Basic tab, enter a Name, Short Name, Password, and set Administrator Access. Under the Home tab, press the Add button and enter /Users/USERNAME in the Full Path field and press Ok. Save your changes and click the Create Home Now button. This should create a new user just as if you did so using the Accounts preference panel in System Preferences and also generate their home directory.
Setting a user’s home directory in Workgroup Manager
To finish configuring access for each user to allow passwordless access using their individual public/private keypair, the user’s public key needs to be copied to an authorized_keys file in a .ssh folder in their home directory on the server.
Copy each user’s public key file to the server into their home directory. Exactly how you do this isn’t particularly important, but putting the key in the right place, named correctly and with the correct permissions is.
The cat command will take the contents from a file named id_rsa.pub and append it to the end of a file named authorized_keys or create a new file if it doesn’t exist. Repeat for each user needing access the Subversion server and replace USERNAME with the appropriate value. You can do this from a single administrative user account or by logging in as each individual user in sequence.
If a user has more than one computer which may require access to the repository, you can include more than one public key in the authorized_keys file; just ensure each is on it’s own line. Using the cat command above will do just that.
Step 5: Secure SSHD on the Server
Out of the box on Mac OS X, SSH is relatively secure, but there’s more we can do to improve it’s resiliance, particularly on the server side of things. To enhance the security of the server, edit the /etc/sshd_config file in the Terminal.
cd /etc
cp sshd_config sshd_config.orig
sudo pico sshd_config
Locate and edit the following list of configuration properties for the SSHD daemon process so they appear as shown below. Press Control-O, then Control-X to save the changes.
Protocol 2
PermitRootLogin no
PasswordAuthentication no
X11Forwarding no
UsePAM no
UseDNS no
AllowUsers [list of users -- see Step 4]
The list of users to be allowed should be based on the user’s short name and separated by a space. Note that you can skip changing the PasswordAuthentication setting if you may need to provide password access.
Note: If you need to add a new user later, you will also need to add that user to the AllowUsers setting in the sshd_config file and restart the SSH process on the server. Also, if you really want to secure things a bit more, change the default port to something other than 22. The catch is that you will have to include the custom port as a parameter when connecting via SSH.
Step 6: Create Aliases of the Subversion Applications
In case you were wondering… this is where we get really nerdy.
To allow more than one user commit access to the repository, when logging in via SSH, each authenticated user will run their own instance of the svnserve process on the server. As such, the process needs to run with a specific umask in order to prevent permission problems.
There’s two things we need to do in order to make this work:
Create a few simple shell scripts that run the appropriate svn application using the required umask. This should be done for svnadmin, svnlook and svnserve.
Then in the pico editor, type the following. Replace svnserve in the example with each of svnadmin, svnlook and svnserve.
#!/bin/sh
umask 002
/usr/local/bin/svnserve "$@"
Press Control-O and then Control-X to save your changes, quit the editor and return to a new prompt. Finally, set the necessary ownership and permissions on the scripts.
In order to ensure that the new svnserve alias is used when a user is interacting with the Subversion server, a special command must be prefixed before each public key listed in a user’s authorized_keys file.
sudo ~USERNAME/.ssh/authorized_keys
Replace USERNAME above with the specific user’s shortname.
Replace USERNAME above with the specific user’s shortname and note that the command above should be added on a single line with no line breaks, including the entirety of the public key. The value of PUBLIC_KEY should be the existing public key. Save the changes by pressing Control-O and then Control-X.
Step 8: Create a Repository on the Server
You’re most of the way there now… You’re now finally ready to create a new repository and project to test things out. The basics of this are no different than if you were using basic file:// or svn:// methods to access the repository.
Note that you shouldn’t need to specify /usr/local/aliasbin before the svnadmin command because you should have that included first in your PATH variable. If you haven’t done that, go back to step one before proceeding any further.
To create a new repository and versioned project at the root of the server and set the necessary permissions (though technically you could really put this anywhere you wanted on the system), simply execute the following, replacing SVN_USERS_GROUP_NAME with the name of the group set in step four:
The above commands create the repository directory itself, create a new test project (named “test_proj”) and then set the necessary permissions. The one critical command above is the last one which sets a sticky bit on the project’s “db” folder which ensures that permissions are maintained, particularly since more than one user will have write access to the project. This will save you frustration in trying to sort out why a second user all of a sudden cannot commit a change to the repository…
Finally, in order to secure the project so that only authorized users can read and write to it, you should edit the svnserve.conf file for the project and set the appropriate permissions as below. By default anyone who can login to the server should be able to access the repository in a read-only state, but no one has write access. This is clearly not right, so let’s fix that.
Press Control-O and then Control-X to save your changes and return to a new prompt.
At this point you should have a basic project created and the necessary permissions set to ensure that all users will be able to access it as needed. A caveat to repository access using svn+ssh is that there is no mechanism to restrict access to only specific users on a project by project basis unlike other methods which provide simple facilities for this using configuration files. These configuration files are not used when accessing a repository via svn+ssh.
Note that when you create a new project in your repository, repeat the process of creating the project as illustrated above. You can obviously skip the step of creating the actual repository directory itself.
Step 9: Check out Your Test Project
That’s it. Everything should be set and ready to roll. You can test that your Subversion server is configured properly by performing a simple checkout of your test project.
In a Terminal window on your local workstation, type:
cd ~/Sites
svn+ssh://USERNAME@IP_OR_HOSTNAME/test_proj
If all goes well, the project should download securely over SSH to the Sites folder on your Mac workstation. You’re then free to test committing a change back to the server.
If things work the way they should (cross your fingers), you should see a message indicating your change was committed to the server as version 1.
Wrapping Up and Final Notes
Setting up secure access to a Subversion repository is not for the faint of heart as it turns out and hopefully you made it this far.
As noted earlier, there’s a few other things you might want to know about how things are configured. You’re best to grab a copy of the official Subversion book and read through the relevant chapters. In particular, although you’ve provided secure access using public/private keypairs and set a command value in the authorized_keys file which otherwise prevents normal SSH access into the server, it is possible that a user could gain SSH access through other methods. In order to provide as few permissions as possible, you may want to set a few more restrictions by setting additional options immediately after the command in the authorized_keys file. You can read more on this on page 168 in the official Subversion book.
Questions, comments, or errors/typos in any of the above can and are encouraged to be noted in the comments. Finally — as with any such tutorials, YMMV.
One of the small tasks I set out to accomplish as part of moving this site (and numerous others) over to Slicehost was to fix a few plugin-related problems and template logic that broke at some point, possibly due to Movable Type updates, other template changes or just insufficient testing.
Fixing Gravatar support in the Notebook was one such problem. There are a number of versions of the Gravatar plugin for Movable Type floating around on the internets, but all are outdated and as such, incompatible with version 4.x. So I set out to figure out why, and as it turned out, the fix was simple and straightforward.
The problem came down to this: the URLs being constructed by the plugin were wrong, likely due to the plugin being developed long before Gravatar’s 2.0 re-launch a couple years back and whatever changes were introduced as part of that. So for anyone else who’s run into this issue, or wants this functionality for their own site, hopefully this saves you a few gray hairs.
This updated version of MT-Gravatar is also available from the Movable Type Plugins site, and the necessary documentation can be found within the plugin itself.
It only took 9 months, but it seemed like a good time to put together a second set of free (as in beer) wallpaper photos produced specifically for the iPhone or iPod touch. These are taken from some of my favourite photos from my Flickr photostream over the last few months along with a few other unpublished photos.
A preview of a 2nd set of iPhone lock screen wallpaper images
As with Set 1, I ask that instead of redistributing the download, that people link back to this post.
Whenever there’s been a few spare moments since we first released our Webkit CSS bundle for for TextMate, we’ve been diligently making progress at adding the handful of missing Webkit CSS properties and making minor adjustments to the organization of the bundle contents.
More than that though, we’ve been working on implementing the ability for the bundle to be easily updated from within “TextMate”: textmate itself without having to restart the application. Today, we feel confident to say that it’s working properly although with a couple minor caveats.
Caveats
In order to support auto-updating, and to get an initial build of the bundle itself, you’ll need to have Subversion installed somewhere on your system. The easiest way to get this is to install Apple’s Xcode developer tools or the iPhone SDK. Both are free downloads (and available on your Tiger/Leopard install DVDs).
The updater will do its best to locate the svn binary in order to perform updates, but if not found, will output a short error message.
The other caveat (we hope to eliminate or make easier to manage soon) is that the updater expects the bundle to be installed in the Library/Application Support/TextMate/Bundles/ folder your home directory, though technically you should be able to install bundles for all users on your computer in the Library folder at the root of your drive.
Updater Usage Notes
Updating the bundle periodically is simple. Select ‘Webkit’ from the Bundles menu, and then the ‘Self-update bundle’ command which will do the rest.
You can update the bundle directly within Textmate through the magic of version control
We’ve done a bit of testing in the wild on our own, but we’re of course interested to know if you’re using the bundle and run into any problems with the updater. Feel free to drop a note in the comments or file a bug on the project’s Google Code page.
Recently we’ve found ourselves working on a few projects that lended themselves to either allowing, or requiring us to use some newer Safari/Webkit-specific CSS3 features, and in the time since we’ve started to put together a bundle of language snippets for TextMate (our preferred editor) to make us more efficient, and to make remembering this stuff a bit easier.
The bundle, which currently contains nearly every new -webkit-prefixed property currently listed in Apple’s Safari/Webkit documentation along with a few snippets of code related to creating and using offline SQLite databases in Webkit is available via the project’s Google Code repository at:
http://code.google.com/p/webkit-css3-bundle/
In the spirit of open source, we’re releasing this software under the MIT license (which we hope is a suitable option), meaning you’re free to download, use, modify and redistribute it. Of course rather than distributing it yourself, we’d appreciate it if you’d instead simply refer folks to the project’s repository. No specific ownership or warranty is implied (YMMV) in the included language snippets.
Although Subversion access to the project is currently restricted, if you’re interested in contributing to improve and enhance this bundle, please get in touch with us and we can discuss providing access to the project. Errors and omissions should be reported via Google Code. Any general comments and feedback is welcome here in the comments though.
And no, we’re not dead. Busy. A bit dozy in the mornings, but starting to come up for air.
Way back in February 2006 I put together a pair of Mac folder icons for Rails developers consisting of one to use for Rails projects and another for the Lighttpd server folder. Due to the recent release of Leopard which completely changed the standard folder design used throughout the system (for better or worse depending on your point of view on the obvious accessibility problems this introduced), I’ve revised the icons so they’ll blend in more naturally with their new surroundings.
512px size Ruby and Rails and Lighttpd folder icons for Leopard
The new icon set includes the whole range of sizes from 16px all the way up to the giant 512px icon size. As is the case with any downloads I make available here, please do not redistribute the icons or attempt to pass them off as your own.
As an early Christmas present to whomever would like them, I’m offering up a set of free (as in beer) wallpaper photos produced specifically for the iPhone. These are taken from some of my favourite photos from my Flickr photostream over the last few years.
I’m calling this “Set 1” assuming that I’ll eventually do more.
A preview of a first set of iPhone lock screen wallpaper images
My only request is that they are not re-distributed (please link back to this entry instead) and any contained/embedded attributions remain intact.
Leopard, despite having 300 new features being promoted has still managed to tuck away a few more interesting and useful tricks which are now slowly being uncovered. A couple such useful features revolve around what might be one of my favourite new features - screen sharing.
Basically Apple included a full VNC client right into the core of Leopard; something previously only available either via third-party apps or Apple’s own Remote Desktop. If you haven’t tried it, find a friend running Leopard, connect via iChat and share your screen or connect to theirs. Cool, no?
Screen Sharing toolbar in Mac OS X 10.5
But there are a few more hidden features tucked away in the System/Library/CoreServices folder on your drive. The first is a browser view to see any active systems via Bonjour. You can access this by running a simple defaults command in the Terminal and then opening the Screen Sharing application which you can find in that CoreServices folder.
The browser may be a bit buggy which would explain why it’s disabled by default, but it’s handy nonetheless. On top of this, you can also access a number of other useful features via the toolbar in the screen sharing app window which bring it a few steps closer to Remote Desktop such as Full-screen mode, Control the other screen, Share Control of the other screen, Capture (take a screenshot), Curtain and adjust Quality. Adding these is simply a matter of editing the application plist file which you can find in your Preferences folder.
Open the com.apple.ScreenSharing.plist file using the Property List editor (installed with the Xcode developer tools included with Leopard) and expand the list items to show the following.
In starting (somewhat) fresh with this new version of the notebook, one critical thing on the list of must do items was to finally do away with the old popup window style comments. These were a throwback and perhaps unfortunate decision made when this site was first built on Movable Type 2.x and I chose to use monthly archives as the primary archive type instead of individual entries. Hindsight is 20/20 I’ve heard…
Upgrading to Movable Type 4 and cleaning out the attic presented an opportunity to rectify this problem. The primary archive type used throughout, now individual entries, allows inline commenting without requiring popup windows. Changing the commenting behaviour provided a second opportunity — to allow the use of John Gruber’s Markdown syntax instead of vanilla HTML in the comments, something I’ve wanted to do for some time now.
Essentially this means dropping in plain old links in the comments will be converted but will definitely receive the rel="nofollow" treatment.
My reasoning is simple. One — I use it myself. Every post in the notebook has been written using Markdown. Two — it’s easy to learn, use, and has the right amount of syntax flexibility in terms of what I’m willing to allow.
Movable Type 4 blog comment settings
While setting up commenting to allow Markdown formatted comments I discovered a problem: certain parts of Markdown’s formatting syntax were being ignored and converted into plain text. My first thought was that this was a bug in either Markdown or in Movable Type itself, but after a bit of digging using Google and in the documentation for Movable Type itself, I recognized the problem.
Out of the box, Movable Type’s comment feature will only allow certain HTML tags to be included. Anything else will be automatically stripped out — for example: code, blockquote, h4, h5, h6. To change this behaviour, it’s simply a matter of specifying your own subset of HTML elements which will be acceptable in comments and setting the appropriate text filter in the Movable Type blog comment settings. The specific details on how to do this are:
In your blog’s comment settings, choose Markdown for text formatting.
Click the “Allow HTML” checkbox to enable comments to accept plain old vanilla HTML.
Under the “Limit HTML Tags” options, use your own settings to specify the tags you want to allow in comments.
Uncheck the “Allow HTML” checkbox one you are finished entering tags in step 3. Save your settings and rebuild you entries.
Although I haven’t tested this, I suspect the same procedure will also work if you choose to use Textile formatting for comments.
Believe it or not, I’m in the midst of a not-insignificant design refresh of the blog (no, seriously!) and as part of that I’ve been looking at making some modest accessibility improvements under the hood. Part of that has been adding or improving accesskey support which I quickly discovered has changed in Leopard depending on if you are using the new Spaces feature.
Under normal circumstances accesskeys are triggered by pressing the Control key plus the specific alphanumeric key. If you’ve enabled Spaces, using Control and a numeric key will instead switch spaces, at least by default. Instead you need to use Control-Option plus the number key.
You can change the keyboard settings (use Control, Command, Option or none) from the System Preferences for Spaces to potentially avoid this issue entirely though using Command would conflict with Safari’s bookmark handling features.
On the other hand, using Control and some other alphabetic character should still work as expected and as they did in Tiger if Spaces is not enabled (which is the default in a clean, out of the box Leopard install).
Leopard is out and it’s generally good aside from a few minor hiccups, surprises and unexpected changes deeper down in the OS affecting the Unix core.
One such hiccup is that the native bindings that allow Ruby and MySQL to communicate are a bit harder to get working than in Tiger unless you happened to just go a straight upgrade to Leopard in which case they should still be working.
Once you’ve got that installed along with the Xcode Developer Tools (found on your Leopard DVDs in the Optional Installs folder) you are ready to fire up the Terminal and install the MySQL Gem. You’ll be prompted for your admin password after the first command.
sudo -s
ARCHFLAGS="-arch i386" gem install mysql -- --with-mysql-dir=/usr/local/mysql
If you’re on a PPC system, just replace `-arch i386` with `-arch ppc` and you should be good to go.
In July I bought an iPhone while down in Austin on a business trip with the understanding that although I would be able to activate it, allowing me to use it as an iPod with WiFi functionality, the phone-related features would not be functional until someone figured out how to un-tether the device from AT&T so that it could be used on the networks of other, non-US carriers such as Rogers in Canada.
The first generation iPhone from Apple
In late August, the iPhone was unlocked by a group of industrious hackers. The unlock process wasn’t that simple, but certainly nothing insurmountable for those with a bit of technical knowledge, and made easier shortly after by the release of GUI tools to accomplish the task.
The various tools developed by those interested in the iPhone as a new platform, and otherwise unsatisfied with Apple’s web-oriented SDK, allowed the installation of additional applications on the device — both commonly used open-source applications and software designed just for the iPhone thus making the device even more appealing to many. Games, servers, ringtones, theme customizations and more.
Everything was golden until last week when Apple released a new version of the firmware software for the iPhone which would, in essence, cripple hacked phones. Although this was not unexpected, it essentially sent that group of hackers back to the drawing board to find new methods to activate and unlock the device.
The reason I can live with my iPhone as-is for now is simple: there’s no official word on a Canadian launch of the device. Unless a new method of activating and unlocking the device are developed, I will not be upgrading my iPhone to version 1.1.1 or newer.
My speculation is that by the time Apple and Rogers, the only carrier in Canada with the network capabilities to handle the iPhone (can you say lack of competition?) come to any licensing and marketing agreements, a second generation device will be on the market or near ready for release.
At that point or whenever there is an official release in Canada, moving to an un-hacked, official device will (should) be as simple as purchasing a new iPhone and inserting my existing SIM card from Rogers or getting them to switch the SIM associated with my account. This should mirror the process existing AT&T customers went through when they switched to an iPhone. I do not expect that an existing device purchased in the US will function, even with a valid SIM card.
At least I hope it will be that simple.
The real problem as I see it, ultimately, is two things: Rogers and Apple. There’s no cellular competition in Canada. There’s Bell, Rogers, and Telus. Rogers owns Fido, so they don’t count. Neither Bell nor Telus support GSM so they’re immediately ruled out, leaving only Rogers as a possible carrier. To some extent I think this puts Rogers on the high ground in negotiations, not Apple.
As most Canadians using any kind of smart-phone, mobile carrier data pricing is off the charts, something a lack of competition does not help. $20 a month for 5MB of EDGE data is shameful and unrealistic.
This presents a problem for Apple because they need to force a sea change in how data plans are priced on the chosen carrier here in order to make the iPhone appealing to both existing and new customers. I don’t expect people would stand for an iPhone-only data plan that is miles better than those offered for other devices.
Time will tell how this will all play out in Canada but for now I will continue to happily chirp away on a 1.0.2 firmware version of the iPhone. Oh — and yes, the phone part is actually good. I’m considerably happier with it than the Sony Ericcson device my SIM card came from.
In releasing Creative Suite CS3, Adobe forgot, or for whatever reason decided not to update the Flash Player icons as part of the general installation thus adding one of a few rough edges around what is otherwise a pretty good software package (truly horrible and inconsistent software updaters aside).
Replacements for missing Adobe FlashPlayer CS3 icons
Although there are a number of different sets of replacement icons for the various Creative Suite applications to be found around the net, for myself at least, I prefer having something that blends in seamlessly with the originals, at least until Adobe releases a proper update (since we know they’ve designed the icon already). Therefore I took it into my own hands to put something together and have decided to share it.
Included are resources for the Mac OS X and Windows versions (sorry, no 512 px versions yet) along with 16, 32, 48 and 128px transparent PNGs. I will not be releasing the PSD source for this, so don’t bother asking. Thx.
Taking a cue from Shaun Inman, author of the original implementation, and the fellow who wrote this handy Rails helper, I’ve put together a plugin for Mephisto providing a new text filter/tag to bring better typography to headlines, lists, and more.
In conjunction with this, I’ve created a new git repository and made the plugin available publicly so any updates are handled more easily, at least from my end. The initial release is now available by running:
I’ve given the plugin some limited testing in an existing Mephisto install (running off a now slightly out of date build of Mephisto, later than the 0.7.3 release) with no problems noted. There’s nothing special in the plugin so it should work fine in 0.7.3 and higher. Of course, YMMV.
I’m not quite done with Subversion yet and have a few more tutorial-type entries planned over the next while provided the day-to-day comings and goings don’t get too much in the way along with finally getting an article I’ve been very, very slowly chipping away at (sorry Caroline!) for the last few months out the door and onto the editor’s desk.
That said, today I want to cover a simple nicety you can add to your Subversion install allowing you to more easily stay on top of incoming changes. This is particularly useful when more than one person has commit access to a project.
Monitor Subversion commits via RSS
Today we’re going to generate RSS output of changes being committed to Subversion. As usual, you’ll need your web browser, a text editor such as TextMate, and a Terminal window.
Getting Our Tools Together
To accomplish our goal of having an RSS or Atom-formatted XML file of repository changes output, the first thing we need to do is grab a copy of svn2feed.py, a hook script that will do the heavy lifting for us.
You can download svn2feed.py here (Right or Control-click and choose “Download Linked File” from the contextual menu).
Now that you have the file downloaded to your Desktop, using the Terminal, copy (or move) the file to the “hooks” directory in your repository. Using the example from the previoustutorials, let’s assume that is /usr/local/svn/.
Note that there’s a “hooks” directory in each versioned project, but also a global one for the repository itself which is the one we’re interested in.
Next, change the file permissions on the script to ensure it is executable.
sudo chmod ugo+x
/usr/local/svn/hooks/svn2feed.py
Our script to do most of the work is now in place. Next we need to create a post-commit script which will be executed - you guessed it, after a user commits a change to Subversion.
Automating RSS
In this case, we’re only interested in generating a feed for one project in the repository. Using our previous example, let’s create a new file called post-commit in /usr/local/svn/metropolis_blog/hooks/ and open it in your preferred text editor.
Take the contents below and copy/paste it into your post-commit file.
You can see the full documentation for what each of these items do in the svn2feed.py script, but the gist of it is that we’re telling the script to execute svn2feed.py using Python (which is installed by default on Mac OS X), keep the last 100 entries, use the Atom format, set the revision number based on the commit, set a permalink using the item-url, the full address of the feed itself via http, and where to actually save the XML file that gets output.
The REPOS variable is the path to your project in the repository.
Save the changes and close the file. We’re almost done.
Creating The Output Directory
Lastly, create the rss directory on your web server (eg. in /Library/WebServer/Documents) and make sure it is writeable by the script.
You’re now ready and can easily verify that everything is functioning by committing a change to the repository. If no XML file is output, odds are that the permissions are not set correctly. Assuming everything works as it should, simply subscribe to your RSS or ATOM feed and enjoy!
Before I forget, you might want to make sure Apache is running prior to attempting to subscribe to the feed ;-)
In the earlier post we ran the svnserve daemon manually. While this is fine as a one-off event, if you ever need to restart your system, we shouldn’t have to worry about remembering to start the process manually. Instead you’ll want to automate it. Thanks to the powerful launch facilities built into Mac OS X, this is a simple process and I’ll make it even easier for you.
The preferred way of launching background processes in Mac OS X means using launchd by creating LaunchDaemons and LaunchAgents which are simple plist (Property List) files which instruct launchd on how to start or stop these processes. The important difference in the two is that LaunchDaemons are intended for processes which should remain running even with no users logged into the system; perfect for Subversion.
Download this LaunchDaemon plist file and copy it to the LaunchDaemons folder in the Library folder on your system. Open the file in your preferred text editor and look at line 16. If you followed the earlier post on setting up Subversion, then you don’t need to do anything. If you created your repository in another location, you’ll need to edit the path to the repository on that line. When you’re done, save the file.
We’re now ready to make sure it will work. If you’ve got the svnserve daemon running, open up the Activity Monitor and locate the svnserve process. Select it and press the Quit Process button in the Activity Monitor toolbar. You should be asked for your administrator password. When the process exits it will disappear from the list.
After the process has closed, switch back to the Terminal. We’re ready to test our LaunchDaemon to start it up again. In the Terminal, type the following:
Enter your administrator password. You should be returned to a new prompt in the shell if everything goes well.
To verify that our process is registered with launchd, we can print out a list of all the processes run with launchctl by running:
sudo launchctl list
You should see the org.tigris.Subversion item in the list. You can further test that the LaunchDaemon works by simply restarting your system and again checking the Activity Monitor to verify that the svnserve process is running.
Source control is something thought to be geared more towards developers and those doing more traditional computer science-type programming, especially when working in a team environment. Source control is also an invaluable tool for web designers and developers alike.
Source control comes in many flavours — the two most popular and widely used systems being CVS (Concurrent Versions System) and Subversion, a successor to CVS which significantly improves on the major gripes most people have with the CVS source control system.
The problem with both is mostly from the aspect of approachability. Once you get the hang of them, it becomes natural and there will be times when you wonder how you ever survived without it, but until then, using, and more so, setting up your own source control system is a daunting task.
First steps: pick one. Your best bet is Subversion as it has been gaining in popularity and is under active development in the open-source world. Ask anyone doing serious development in Ruby on Rails for example and I’d bet 10 out of 10 times they’ll say they’re using Subversion.
If you’re a lucky developer working on Mac OS X, getting up and running with Subversion is trivial provided you have a handle on a few basic Unix commands. In this mini tutorial, I’ll walk you through installing Subversion, creating a new repository and importing a project. Ready to get started?
Step 1: Installing Subversion
We can cheat here and go the quick route using an installer package created by Martin Ott of The Coding Monkeys, the fine folks behind SubEthaEdit. Once you’ve downloaded and un-zipped the .pkg installer file, double-click the installer and run through the setup screens. Subversion will be installed into /usr/local which is where you want it since it won’t mess with anything in the core Mac OS X install.
The Subversion binaries are installed in /usr/local/bin. Of interest are svn, svnadmin and svnserve. The first two are your administrative tools for interacting with Subversion, the the svnserve binary (application) will allow you to run your own Subversion server that you can work from.
At this point you should have Subversion installed.
Step 2: Customize Your $PATH
To make working in the Terminal easier, we should tell your shell of choice (typically Bash), where to look for executable programs such as the Subversion binaries. To do this, you need to create a file in your home directory (eg. /Users/your-user-name named one of bash_login, bash_profile or bashrc.
In order for the file to be recognized by the shell as a configuration file it needs to be saved with a period (.) at the beginning of the file name. To create the file, open up your text editor (TextMate or BBEdit will do fine) and add the following:
When you’re done, save the file. Remember to prefix the file name with a period: .bash_profile, for example. You’ll need to open a new Terminal window for the change to be loaded. You can test that things are working by typing sv and press Tab. If the name auto-completes, you’re good to go.
Step 3: Setting Up A Repository
We’re now ready to create a new repository. This is where our files will be stored. This is not where we directly interact with and modify files though, but where data is pulled from and committed to when we make changes. If it’s not all clear, it hopefully will be shortly.
Open a new Terminal window (you can find the Terminal application in the Applications/Utilities folder on your computer). Type the following command:
sudo mkdir -p /usr/local/svn
This will create a new folder named ‘svn’ in /usr/local after you’ve entered your administrative password which you will be asked for. This will be our Subversion repository. If you’d rather use a different location, feel free to change the path. For example, an external drive or in your Home directory.
Assuming you followed the above, you’ll need to change the group ownership on the ‘svn’ directory in order to be able to write to it. To do this, type the following at a new prompt in the Terminal:
sudo chgrp -R admin /usr/local/svn
This changes the group associated with the main folder and recursively down into the folder to the admin group in Mac OS X. As long as you belong to that group, then you should be able to write to that folder.
Step 4: Create a New Project in Subversion
We’re now ready to create our first project in Subversion. This will get us our initial setup from which to work from. As an example, let’s say we’re creating a new blog for a client named “Metropolis & Co.”. We might name the project metropolis_blog. To create the new project, back in the Terminal, enter the following:
If all is successful, you should be returned to a new prompt in the Terminal.
Step 5: Securing Our Project
The next thing you might want to do is secure access to your project, especially if you’re working in a team environment with different people on different machines or in different places. There’s a bunch of different things you could do here and I’m going to keep it simple for now. Just the basics — controlling read/write access and adding usernames and passwords.
In order for multiple people to interact with your new Subversion repository, you need to run svnserve on the system you ran through the previous steps on. So, before we start up the server, we need to configure the access details which can be done on a per-project level. So in our case, we want to edit the settings for our ‘metropolis_blog’ project.
In the Terminal, switch to the project directory by going to:
cd /usr/local/svn/metropolis_blog
In that folder you should find a series of directories and files. Right now we’re only interested in the conf directory’s contents.
cd conf
or
cd /usr/local/svn/metropolis_blog/conf
In the conf folder you will find three files: authz, passwd and svnserve.conf. We won’t look at the authz file now, and instead start by editing the passwd file:
sudo pico svnserve.conf
You can read through the usage notes in the file, but the basics of what we want to do here is enable read-only access anonymously and make write-access require a username/password which we will specify next. To do this simply change the matching lines in the svnserve.conf file by removing the preceding hash mark (thereby uncommenting the lines).
If you wanted, you could create a new password file in a different location and point to it in the file, but in this case, we’ll just use the defaults. Save the file by pressing Control-O and then Control-X to quit the pico editor. If you have TextMate installed you could alternatively edit these files with it.
Next, let’s create two user accounts for which we’ll grant write access to the repository. In the Terminal, type:
sudo pico passwd
Using the examples already present in the passwd file, add a couple new username/password combinations. For example:
user1 = password1
user2 = password2
These are obviously crummy account credentials. I trust you to come up with something a bit tougher to figure out. When you’re done, press Control-O and then Control-X to save and quit.
We’re now ready to start up our Subversion server and import some files into our project.
Step 6: Start the Subversion Server Daemon
Starting the background daemon process for Subversion built-in server is as simple as running:
Here we’re telling the daemon to run as the root user on the system, run as a daemon (background process) and use our repository (the —root here indicates the root of the repository, not the root user in Mac OS X which is simply implied by executing the command with sudo).
If you check in the Activity Monitor application on Mac OS X, you should see the svnserve process listed. If so, you’re set to go to the next step.
Step 7: Importing Files into our Project
Now let’s create a fictitious project structure which we can import into our project. On your Desktop, create a new folder called import. Inside that folder create three subdirectories named trunk, branches and tags. We’ll use this as the base for our import.
Once those folders have all been created, in the Terminal, type:
Assuming all goes well, you should see some output in the Terminal indicating that your folders were added along with a revision number. Now is where the fun starts. Now we need to test that we actually, really did commit something to Subversion.
Step 8: Sanity Check
To verify that we did in fact commit something into our repository, the best way to do a sanity check is to check it back out somewhere. So let’s do that, make a quick change and commit the change back to Subversion.
To check out your project into a working directory (often called a ‘sandbox’), do the following in the Terminal:
svn co svn://localhost/metropolis_blog ~/Desktop/my_checkout
This should checkout the contents of the project into a new folder called my_checkout on the Desktop. If it worked you should see a nice confirmation message in the Terminal and find a new folder on your Desktop named my_checkout with the previously imported folders inside. Cool, eh?
Now we want to create a new file, add it to our repository and then commit the file into the repository. You can add and remove files to your hearts content with Subversion, but until you commit the changes you don’t actually affect the repository, only your local working sandbox.
So create a new file in your favourite text editor. In this case, let’s create a file called readme.txt inside the trunk subfolder. Now back in the Terminal we’re going to add the file and then commit it to Subversion (press Return after each line).
As usual, Subversion should provide you with some feedback indicating whether your new file was added or not. If so, you’ll see a new revision number. At this point you’ve got a nice little development environment setup for source control for your projects. And now that we’ve done our sanity check, you can safely delete the import folder you started with.
If this was helpful or if you have any comments or corrections, please feel free to leave them. I do have another small piece to add to this tutorial but which will be included separately in the next day or so.
*Updated on March 4, 2007 to add details for customizing your $PATH variable in the Terminal.
It’s amazing the little things you can learn when you RTFM. Like the other day when I came across mention of a new command in the RubyGems gem program (version 0.91 or newer) which makes it easy to check against a remote repository to see if your installed gems are up-to-date.
The command is straightforward: sudo gem outdated
You’ll get a nicely output list of your outdated installed gems showing the current version followed by the most recent version number. The usual gem update procedures apply from there. Happy updating!
I can’t recall where I saw this tip, but for the sake of propagating it across the interweb, I’m going repeat it.
To give DiskWarrior a swift kick in the pants when booting your machine and during general operation of the application, make yourself a backup copy of the original DiskWarrior CD on DVD instead. Simply pop the disc into your Mac, launch Disk Utility and create a new disk image of the DiskWarrior CD on your Desktop. Burn to DVD media. Done.
Alternatively, use Toast to accomplish the same thing.
After a long transition, I’ve officially made the move over to TextMate from BBEdit during the last 6 months or so as the amount of Rails development I’ve been doing has increased. In that time though I haven’t had much opportunity to really dig into some of power features or to really even get a handle on all the keyboard shortcuts which brings us to the impetus behind creating this desktop — to help improve my (and possibly others’) TextMate skills.
I changed my mind since there’s been enough interest that I’ve put together a smaller 1280 × 800 size version for MacBook users (myself included). You can grab the smaller version here and a new, updated large version here (with a correction suggested by Wolf Rentzsch).
Comments and suggestions for improvement are welcomed.
Am I missing something or are the scrollbars in the standard theme in Windows XP 1 pixel wider than those in Windows 2000 and Mac OS X? I haven’t had any luck in getting an answer via Google so I’m turning to you, my ever-so wonderful readers to point me in the right direction.
On the Mac and in Windows 2000, scrollbars are 16 pixels wide. In Windows XP they appear to be 17 pixels wide based on a quick CSS test I performed earlier tonight. This is incredibly annoying to say the least.
Don’t get me wrong, Firefox is a great browser as are its numerousoffspring, but like competitive browsers such as Safari and Internet Explorer, it has its own set of quirks and anomalies to frustrate web designers and developers.
Absolutely positioned scrollbars within Firefox
My current gripe is the way scrollbars are handled in relation to absolutely positioned elements. Simply: they’re not handled well.
The problem is that if you attempt to position an element (such as a DIV) above another element which has `overflow: auto` set and a lower z-index value, the scrollbar from the lower element pokes through the element with the higher z-index as you can see in the screenshot. Ugly.
Safari gets it right and there’s no show-through of the scrollbar since the z-index values seem to be honoured correctly. Heck, even IE6 gets it right.
I’ve scoured countless pages via Google looking to see if there’s an answer to this and haven’t found one. Even the latest build of Bon Echo, Firefox v2 still contains this bug/quirk.
The worst part is that I’m not even sure what the problem is other than its specific to Mozilla-based browsers. Is it an XUL problem? General CSS spec implementation problem? Something else…?
Mac OS X is great in part for its flexibility and the ease at which you can get all different types of software running and working together; whether it is Unix, Cocoa, Carbon, Java, Ruby, PHP, etc. Dan, as always, did a great job at demonstrating how to get a custom Ruby on Rails environment setup on Tiger. I felt it was just that good that I used it myself recently when I spent a couple days rebuilding my primary development environment.
Lighttpd and Rails icons preview
For the coupe de grace, I decided to whip up a set of special icons — one of Lightty and another for Rails and I’m making them available for whoever wants them. Both icons included in the set contain open and closed folder states at 128, 32 and 16 pixel sizes.
Normally OS upgrades seem to go so smoothly… But this one left me (and I’m sure many others) with a nasty surprise — no communication between PHP and MySQL. Not nice. After a couple quick searches and no answers I decided to search out one myself. Discovering the problem was simple, and so apparently, was devising a solution.
If you fire up a quick PHP info file, you’ll see that the MySQL socket specified in the included version of PHP is wrong (or at least different and not what is expected) compared to older OS releases.
In 10.4.4, it is set as with-mysql-sock=/var/mysql/mysql.sock, whereas previously it was /tmp/mysql.sock.
Thankfully, there are at least two things you can do to remedy this.
Locate and edit a php.ini file (by default it should be in the /etc directory and find the mysql.default_socket line and simply add /tmp/mysql.sock following the equals sign, save and restart Apache.
In a plain text editor, create a new file in /etc/ named my.cnf. In the file, include a line which reads (on two lines):
[mysqld]
socket=/tmp/mysql.sock
Edit: The original second solution has been removed due to security concerns as indicated by Apple. A revised alternative solution has been added in its place.
Given the lastfewposts here, backing up data and important files has obviously been on my mind. It’s coincidental more than anything, but I’ve continuously had problems with the primary removable Firewire drive I had bought to store my daily and weekly backups. So much so that it’s now in many pieces in the garbage with the disk platters more or less obliterated. It’s definitely unrecoverable and I feel much better given how much time was wasted repairing the drive and trying to get good successful backups.
What I’m really interested in here, and the main point of this post is this: How are you backing up your important files?
In particular, this is for the web developer folks. How are you backing up your design files (Illustrator, Photoshop, Fireworks) and your code files (HTML, PHP, Rails, MySQL). Perhaps the real first question is: Are you backing up? If so, how often? And to what form of media? If not, why not?
Once you’ve completed a project and it goes live, what then? Do you make a full backup of all the project files? Do you keep data available “online” (on disk) so that it’s easy to make changes down the road? Are you using a version control system such as CVS or Subversion? Do you develop using a local environment such as is available on Mac OS X? Do you clone your backups and keep a second copy offsite somewhere?
I’m pondering how I want to proceed with backups since my experiences with a certain brand of Firewire hard disks has left me with an extremely low opinion of their hardware and service technicians. The immediacy and economical value of using hard disks as opposed to tape has become more apparent in recent years as disks have grown larger and the cost per GB has decreased.
Tape is a good longer-term archival medium, but in my experience I often have to retrieve files for old projects quickly to make minor changes. Being able to mount a hard disk, grab the file and make the changes is just so much more efficient than finding the right tape, un-archiving the file off tape, making the change and then re-archiving the file.
Perhaps it makes sense to use both. Tapes for archival purposes. Once a week, perform a full backup to tape as well as archive completed work. And do daily backups to hard disk. I guess it ultimately depends on needs and practicality.
Because I apparently can’t help myself — I’ve added 4 more Quick Picks to what is now somewhat officially dubbed the ‘Backup 3 Quick Picks Pack’, bringing the total number of included Quick Picks so far to 14.
I’m likely going to stop posting regular updates here unless there’s a good reason not to do so. Instead, you’ll be able to get updates via MacUpdate or Apple’s Mac OS X Downloads page. I’m still debating whether I want to list it at VersionTracker.
After the release of my Catalog Quick Pick plugin for Apple’s Backup application, I had a request for two more Quick Picks, so I whipped them up and updated the full archive. Easy peasy.
Thanks to David Watanabe for his improvements to the NewsFire RSS Quick Pick. A new version has been posted along with three new Quick Picks for ecto, Transmit and Linotype’s FontExplorer X.
Like most people, in practice I don’t end up backing up my system as often as I should. Knock on wood — I haven’t ever really been bit badly by this.
That said, the latest version of Backup included with my .Mac account has inspired a new sense of purpose in making backups and really utilizing all that storage space included with the account. Sure I used it before, but certainly not enough to feel like I was making the most of the service.
So, in the hopes of kicking my own butt and hopefully one day saving my bacon, I’ve put together a few Quick Pick plug-ins for Backup 3 which I’m making freely available to anyone who wants them.
Ah, the thing I missed yesterday… Right. Easy as pie. Unzip the archive and drop the Quick Pick file(s) into /Library/Application Support/Backup/QuickPicks/. I could build an installer for all this, but I don’t think it’s necessary or worth the effort.
If you can think of something else you’d like a Backup 3 Quick Pick for, drop a note in the comments. I’ve got a few more ideas cooked up, but this is good for now. Enjoy!
I had 10 seconds to spare today and decided to whip up a quick Backup 3 plug-in to backup my Catalog disc database. It was partially an excuse to see how easy it was and an excuse to skip out on doing real work for a few minutes and let my mind unwind.
It’s so easy to get Quick Picks working that I may have to write a few more of them so I can really get my money’s worth out of my .Mac account. If I do and they’re useful to others, I will certainly post them here for your downloading pleasure.
My Dashboard Widget Xcode Template is now listed on MacUpdate with 704 downloads and counting. Since there are scattered rumours of Tiger already being delivered to some users (a week early), get your copy while it’s hot!
The Dashboard is a bit of a web developer’s paradise - standards-based code with only one browser required for development and testing. Plus, the use of web plug-ins as well as system level scripting languages (AppleScript, Ruby, Perl, etc.). The possibilities are almost endless really.
Widgets in the Mac OS X Dashboard
Creating widgets for the Dashboard isn’t really that hard, but there are a handful of useful things to know before you get started and I’ll try to outline a few that will hopefully save a bit of debugging and gray hairs along the way.
RTFM. Read the developer documentation. No, seriously there’s good, useful information in there.
Always, always, always have a default image in the main directory of your widget. Name it Default.png. It gets used as the drag image when a user decides to try your fancy new widget in the Dashboard.
Create a version.plist file and keep it up to date if you modify your widget.
Be sure to create an Icon for your widget to show in the Widget Bar. Name the file Icon.png and keep it in the main directory of your widget bundle.
Test your widget in Safari during development and keep an eye on the Console for debugging messages.
Download my Dashboard Widget Xcode Template (Works in Xcode 1.x and above, so yes, it works on Panther). Decompress the archive and place the contents in a new folder called Dashboard under this path:
The template will do a lot of the preliminary work for you. It creates the base HTML, CSS and JS files along with the necessary property list XML files - and will automatically modify certain properties in and of those files based on the name you give the project.
The Info.plist file contains all the current allowed properties for a widget. Disable or remove as necessary, but they’re all there to save you looking them up in the documentation.
Well… what are you waiting for? Let’s see those widgets!
Server-side parsing tools are fantastic and can save you enormous amounts of time and effort in producing large-scale websites. At the same time they tend to have their own bugs and intricacies which can confound and perplex the best of us. This was the case today.
Background and the Problem at Hand
We’re preparing to promote a number of changes, fixes, new features and general improvements tonight on the Masterfile.com site. In the testing of said features we’ve encountered the usual fare — bugs. The latest one being related to a small, but generally significant change we’ve been trying to get out the door for some time — moving the site completely to UTF-8.
In a nutshell, we encountered a problem where somewhere along the way, character encodings were getting mangled. As a result, text was not rendering properly and search links generated zero result queries. This is bad and obviously unacceptable.
The Solution
While perhaps not the most elegant solution, we found a little piece of JavaScript code which batch-translates the raw UTF-8 encoded pages to the equivalent HTML entities. It’s simple and not overly tedious. It kindly ignores the surrounding HTML code completely and only translates accented characters as well.
Here’s the code and a brief description of how to use it:
Create a simple form in a new HTML page with two textarea fields and a submit button. The first will be the input, the second will display the output and should be set with the readonly attribute. The submit button should have an onclick attribute which calls the javascript function. Take a quick look at the sample page I’ve put together to see how it works.
Arvind at Movalog, along with some assistance created a nice alternate version of the Livesearch functionality that integrates with Movable Type and still allows the traditional CGI-style search function to work. While I haven’t had much time to investigate this in depth, it doesn’t strike me as quite the same thing as I’ve implemented and described, but is instead closer to the Google Suggest functionality or something in between.
Nevertheless, it’s very interesting and I’m going to look at how these two options might be combined to overcome the shortcomings I outlined in the earlier post. I’d really like to see the original search functionality remain available as a fall-back alternative for users in unsupported browsers or with Javascript disabled.
I’ve been waiting for a good solution to secure ftp for a long time now and finding this link just made my day. The English translation isn’t perfect, but follow along with the Terminal commands and you should be good to go.
Do make a backup of any files first though — just in case.
During the process of making some of the small design and features changes that have seen the light of day on this site, I split out the sidebar calendar widget into its own include file. The Movable Type manual suggests this as a way of reducing the processing required during rebuilds of the index templates. Makes sense. Why do something more than once if you don’t have to.
One of the other things that made the cut was a complete refactoring of the actual HTML for the calendar since it was unnecessarily bloated. This was a good opportunity to play with the CSS a bit and give the calendar a bit more visual flair.
The thing I want to point out is that there’s a single TD element with an ID applied, indicating the current date. I made this change/addition but then realized that it’s not practical if I don’t post every day or I don’t rebuild the template every day to have the ID change positions appropriately.
Given that I’m currently using static publishing through Movable Type, I needed a way to automatically rebuild this template daily and ideally without me needing to remember to actually do it myself. Due to limitations at my host, I discovered that my options for automating this were limited so I rolled my own solution using a bit of AppleScript and a cron job on my main development system which stays on pretty much all the time.
Turn On System Events Scriptability
For this to work, you first need to turn on the option for “Enable Accessibility for Assistive Devices” in the Universal Access preferences in Mac OS X which allows you to target menus and execute keyboard commands programatically using AppleScript. Essentially this allows you to make just about anything scriptable whether an application supports it natively with a built-in scripting dictionary or not.
Mac OS X Universal Access for assistive devices preferences
How It Works
The general rundown of how the script works is this - the script launches via cron, opens a specified URL (the path to the Movable Type rebuild script along with the template ID) which, once loaded, causes the button on the page to be clicked using an accesskey which then rebuilds the template at which point the script closes. Sounds simple right? There was one snafu along the way, but luckily it was easy to resolve.
That one snafu? I had to modify one of Movable Type’s internal templates (specifically /tmpl/cms/rebuild_confirm.tmpl) to add the necessary accesskey which would allow the script to programatically press the button causing the template to be rebuilt. Not having the accesskey meant that there was no mechanism to actually press the button on the page.
The script then, when running and after the page has fully loaded (checked using do JavaScript( document.readyState = "complete" )) uses the keystroke command to execute the keyboard command for the accesskey. In this case set to Control-S in the template.
I had a tough time sorting out exactly how to format the keystroke command (lousy AppleScript docs…), but for future reference and anyone else struggling it is:
tell application “System Events” to keystroke “s” using {control down}
I was missing the tell statement. It was late when I was working on this part so I’ll blame it on being tired…
Making It Run
Mac OS X, being a Unix-based OS includes the cron scheduling utility. cron is used in the system to run a series of regular tasks for doing things like cleaning up and archiving log files but is really a general-purpose scheduling utility and a perfect fit for what was needed here to automate running this script. To add the task to the schedule, it’s simply a matter of editing your crontab file and adding the new command. In this case, I set it to run every day at 12:01 AM.
CronniX, cron process management for Mac OS X
Note that you may want to prepend the command with /usr/bin/open in order to actually open the application bundle (the AppleScript) via the shell. This shouldn’t be necessary since the path is already included in the default Mac OS X shell environment, but it’s probably good form just in case.
The crontab file can be edited by typing crontab -e in the Terminal or you can use a GUI application such as CronniX which is a bit easier and also makes testing things easy. If everything works, you’re good to go.
A (Minor) Caveat
One minor caveat to all this is that you need to have saved your Movable Type administration login information so the browser can access it without intervention. This means in your System Keychain. I don’t recommend running something like this on a public computer, but in a secured environment (e.g. home computer behind a firewall), you should be sufficiently safe.
Code Download
You can download a generic version of the script via the link below.
Following up on a tip posted yesterday over at Mac OS X Hints which made the little (invisible) bell above my head go “ding ding ding” — I noticed that menu items in applications on Mac OS X use curly quotes and not straight quotes which follows good typographic form. That being said, I realized that this might be the reason why I hadn’t been able to create a new keyboard shortcut for the “Update songs on …” command in the iTunes File menu.
Apple iTunes File menu screenshot
Earlier I tried with regular quotes and noted that it simply didn’t work. I gave up quickly on this one because it wasn’t terribly important, but I’m now happy to report: problem solved.
So for anyone who may not know how to create curly quotes (or typographers quotes as they’re often called), press Option-Left Square Bracket for the opening quotation mark and Option-Left Shift-Square Bracket for the closing quotation mark. For single quotes, use the Right Square Bracket key; the remainder of the key sequence is the same.
Taking cues from an old project originally started by Aaron Faby, I’m making a new version of the MySQL Preference Pane available for public consumption as part of my MySQL Tools package.
The MySQL Tools package includes a Startup Item and a custom PreferencePane for Mac OS X 10.2 or 10.3. The software is being distributed via an installer package which will install the files in the /Library folder at the root level of your hard drive. Some manual configuration is currently required following the installation though I am going to work on adding the necessary preflight/postflight scripts to the installer to take care of this.
MySQL Server PreferencePane for Mac OS X
There is also one potential security issue with the software (see the Read Me portion of the installer for additional details) which I am also intending to address so I do not recommend using this in potentially high-risk deployment environments at the moment. It should be fine for local testing and development though.
New in this version is:
Full Mac OS X installer for the software
First implementation of a Software Update mechanism to look for new versions of the software
Link to get more information on MySQL
Small improvements to the StartupItem
Code cleanup and bug fixes
I have a few ideas for additions and fixes to improve the tools which will appear in future releases.
Following in the footsteps of John Gruber I’ve put together a codeless language module for BBEdit 8 for the Velocity template engine. I have a few thoughts on the new version of BBEdit but I will save them for another day.
For those unfamiliar with Velocity (the large majority I suspect), it is, according to the Velocity overview “…a Java-based template engine. It permits anyone to use the simple yet powerful template language to reference objects defined in Java code.”
Continued, “When Velocity is used for web development, Web designers can work in parallel with Java programmers to develop web sites according to the Model-View-Controller (MVC) model, meaning that web page designers can focus solely on creating a site that looks good, and programmers can focus solely on writing top-notch code. Velocity separates Java code from the web pages, making the web site more maintainable over the long run and providing a viable alternative to Java Server Pages (JSPs) or PHP.”
Martin Pittenauer of The Coding Monkeys, tired of looking at poorly formatted source directly in Apple’s Safari web browser cooked up a small hack which instead hijacks Safari’s source view and instead displays it in SubEthaEdit. He was also good enough to post the source code for this making it possible to change it, allowing the source to be viewed in applications other than SubEthaEdit.
While I think SubEthaEdit is really cool, it’s not my primary editor. I’m a BBEdit man myself as are many of my contemporaries. And so out of SubEthaFari comes my switched-up bundle renamed (for lack of a better idea at the time), “BBEditSource”.
Why is this useful you ask? The answers should be at least partly obvious. Automatic syntax colouring, line numbers, and the ability to sort out rendering problems and code validation (especially if you use a lot of includes and need to be able to figure out if there are missing tags and such).
Being the responsible developer I strive to be, I’ve made the bundle available for download along with my modified source code. The download links are available at the end of this post.
Installation Notes
BBEditSource can be installed in two different locations in Mac OS X, your Library folder or within the system-level Library folder found at the root level of your hard drive where it will be available to all users on the system.
BBEditSource is known to work in Safari 1.2 and the 1.3 Developer Beta. It’s possible that it may work in earlier versions no access to those versions currently limits my ability to test again this theory to deny or confirm it. Your mileage may vary.
Note that you should not have SubEthaFari and BBEditSource installed at the same time to avoid potential conflicts. If you are experiencing problems or unexplained crashes using BBEditSource, leave a post in the comments.
Create a new folder called InputManagers inside the ~/Library folder or in /Library/ at the root level of your computer.
Drag the folder named “BBEditSource” to the InputManagers folder to install the bundle.
Launch Safari and visit a web site. In the View menu, choose View Source. The source code should be displayed inside a local copy of BBEdit instead of within Safari.
Downloads
Files are available for download as compressed Stuffit (.sit) archives. Click on the link to download the files to your Desktop. The source code has been saved in Xcode 1.2 format and may not be fully compatible with older versions. Visit Apple’s Developer Connection web site to download the latest version of Xcode for Mac OS X (free).
In the hope of solving my own problem, I put together a straightforward cheat sheet for John Gruber’sMarkdown text formatting software. The cheat sheet, available in PDF format has been designed for 11×17 printers though it will scale happily to 8.5×11 size for those wanting a smaller-scale version. Print it out, hang it on your wall, share it with your friends.
I’m considering revising it to include more extensive, in-context examples though comments and suggestions will help lead me either way.
Having had the benefit of using Mac OS X Panther since it’s introduction at WWDC back in June of 2003, I’ve had a bit longer than the average user to tinker, poke around and undoubtedly break things. One welcome addition in Panther has been the inclusion of X11 (XFree86), albeit one that is not installed by default (it’s included on Install Disc 3). X11 is not something terribly useful to most users, which is why it’s an optional install, but for those that do, having the software available saves us from using other third-party implementations.
The X11 environment brings a wide variety of X-Windows-based GUI applications running on other Macs, Linux or other *nix flavours to your desktop.
For myself, this is extremely useful since I need access to server tools which would otherwise be difficult to access remotely, leaving me stuck sitting in freezing cold server rooms. Not much fun for anything longer than 5 minutes. While I try to do as much admin work as possible through the commandline, sometimes it’s just faster and easier to use a GUI. The big difference, though one which likely only affects a small selection of apps is that Apple’s X11 implementation is integrated with the Quartz graphics engine in Mac OS X itself.
A good example of how I’m using X11 in a real-world situation is using rdesktop to access Windows Terminal Services, a replacement option for Microsoft’s own Remote Desktop application to manage an Exchange Server run out of Chicago, IL. One less piece of proprietary Microsoft software is always a good thing in my books.
I’m also using X11 to help manage a few IRIX-based SGI servers. Combining SSH and X-Windows on Mac OS X is a great set of tools to securely access GUI services running on the SGI servers. For example, once I SSH into the server, it’s just a matter of typing toolchest to bring up the GUI tools on my Mac in the X11 environment.
Setting Up X11
First, make sure you’ve installed X11. You’ll find it in your Applications/Utilities folder if it has been installed otherwise get installing (Disc 3 in Panther). In order to continue you’ll also want to be comfortable working in the Terminal. The instructions will be reasonably verbose in case you’re not quite a Unix guru.
Launch the Terminal application (found in your Utilities folder).
Start by making a copy of the /etc/sshd_config file which is the configuration file for the SSH daemon.
sudo cp /etc/sshd_config sshd_config.orig
The sudo command will allow you to execute the cp (copy) command with root permissions giving you full read/write access to the filesystem. You will need an administrator password. Enter it when prompted.
Edit the original file we just made a backup copy of using your preferred text editor. Be sure to use a plain text editor such as BBEdit, pico or vi in order to preserve the integrity of the file. In this case, using pico.
sudo pico /etc/sshd_config
The contents of the sshd_config file should now be visible in your Terminal window. Locate that line that reads #X11Forwarding no and change it to remove the octothorp character at the beginning of the line to activate it. We also need to change the line to replace no with yes.
The final line should look like: X11Forwarding yes
Save your changes by pressing Control-X which will display a save prompt. Press ‘y’ (or Return) to accept and then press Return a second time to select the previous filename. This will save the file and return you to a new Terminal prompt.
Restart the SSH daemon. In the System Preferences under Sharing, toggle the Remote Login checkbox which will restart the SSH background process. You should now be ready to connect to your computer and run X11 applications remotely. So, now how exactly does one do this?
Connecting To Remote Servers
Now that we have X11 configured, if you have a second computer available you can test a remote connection.
Open X11 in your Utilities folder. A window that looks deceptively like the Terminal will open.
In the new xterm window, use the following command to remotely login to a second computer (Mac OS X, Linux or other *nix): ssh -X [USERNAME][IP_ADDRESS]@@.
Replace @ and [IP_ADDRESS]@ with the appropriate values and enter a password for the requested remote account. Assuming you are successful here, pass go and collect $200 and go to step 3.
Once remotely logged onto the second computer you’re ready to run one of the simple X11 applications included with Mac OS X. Try these on for size:
/usr/X11R6/bin/xeyes
/usr/X11R6/bin/xclock
Type exit in the xterm window when you are done. This will disconnect you from the remote server.
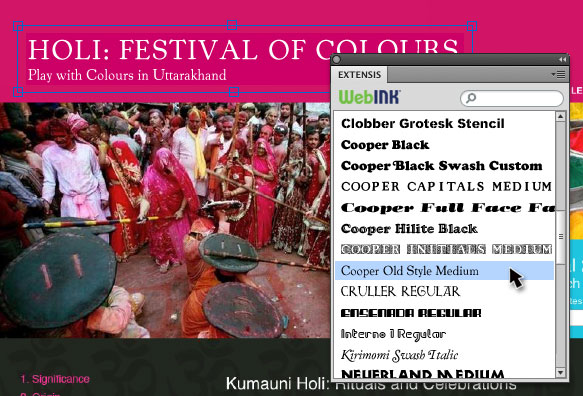


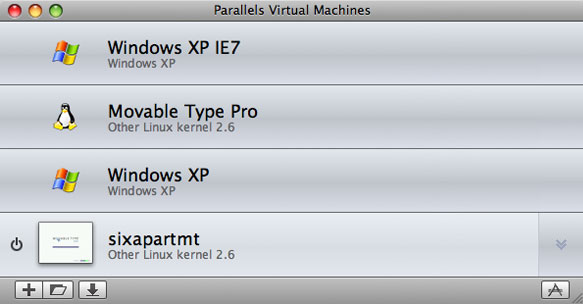
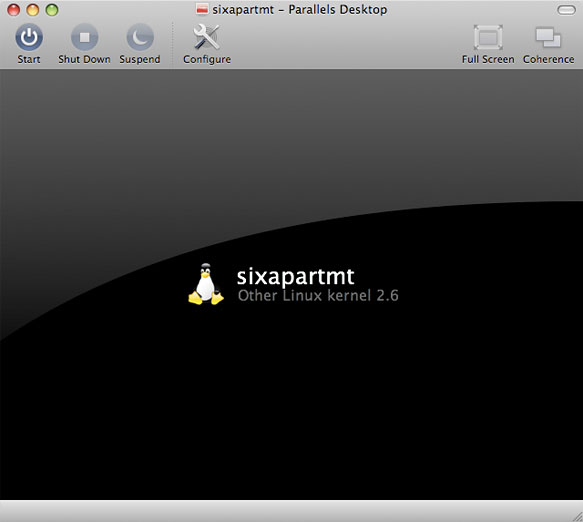
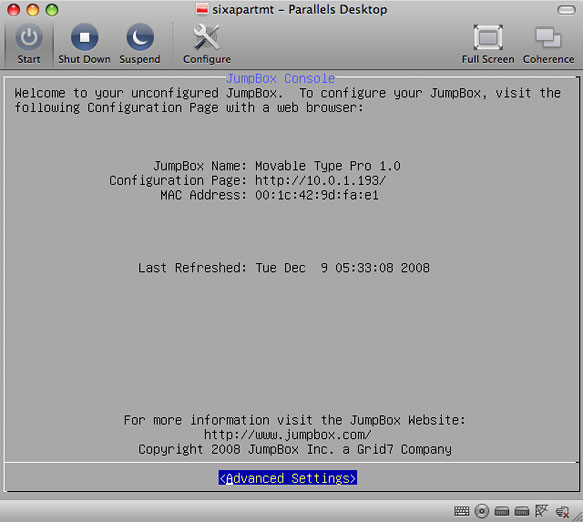
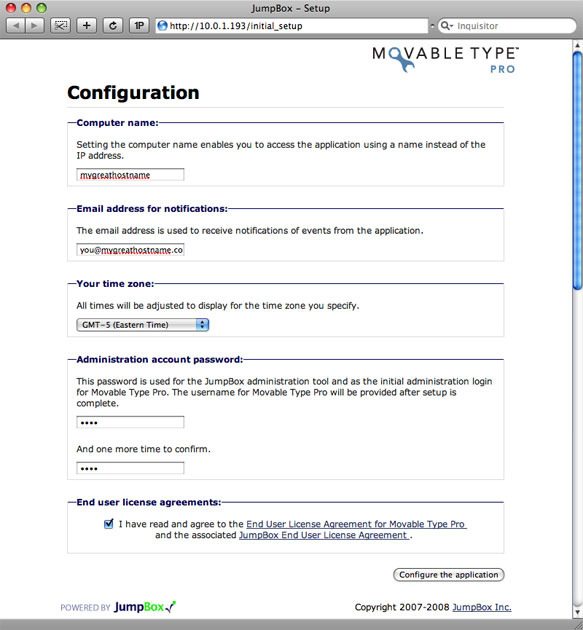
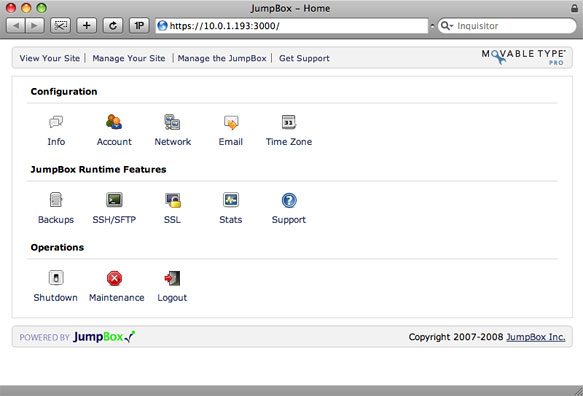
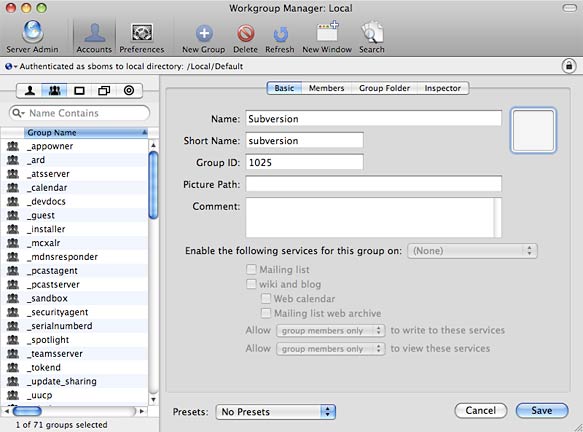
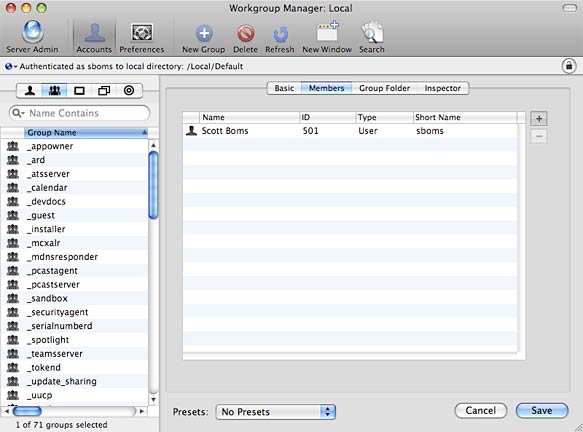
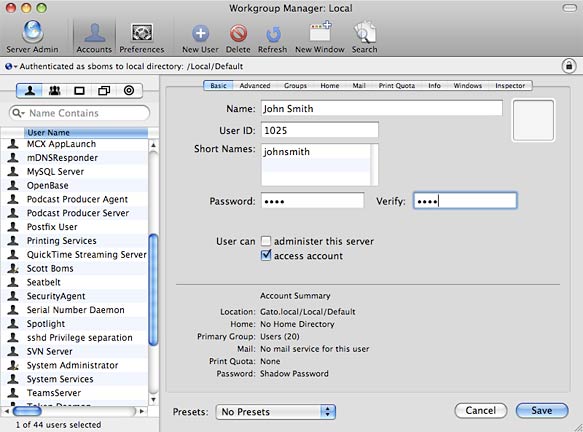
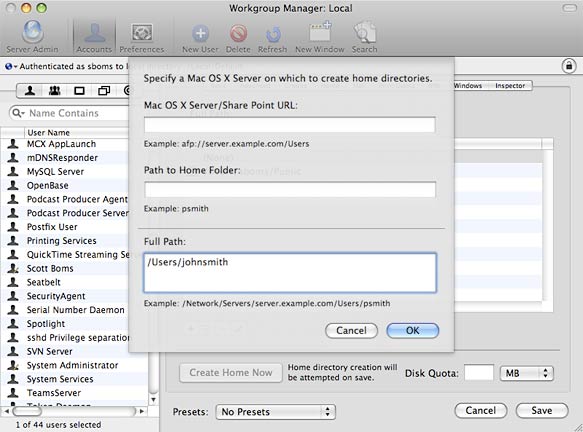

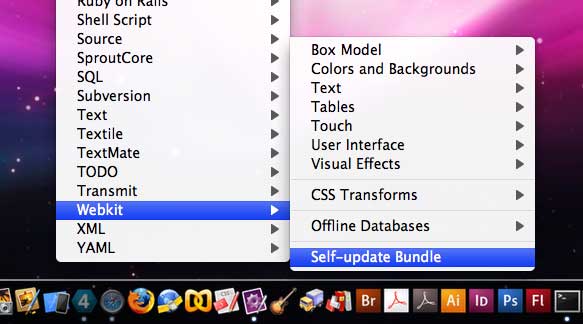


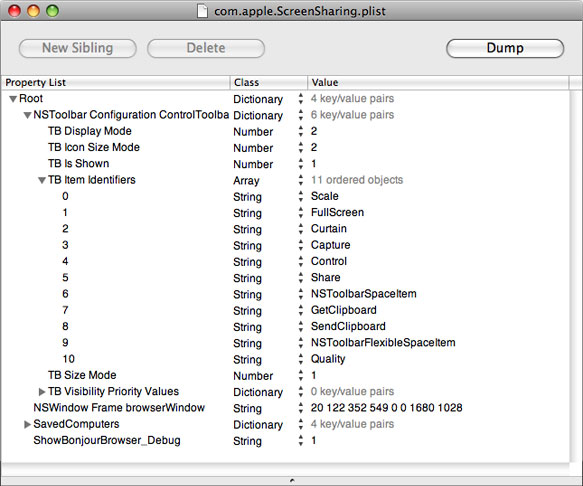


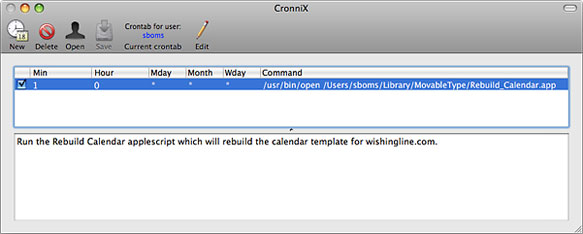
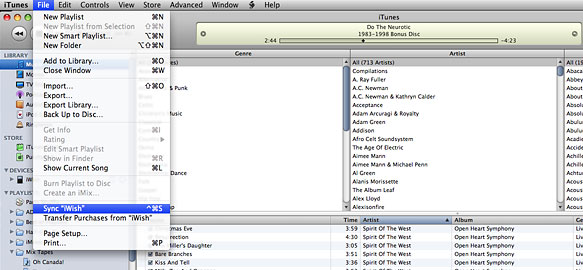
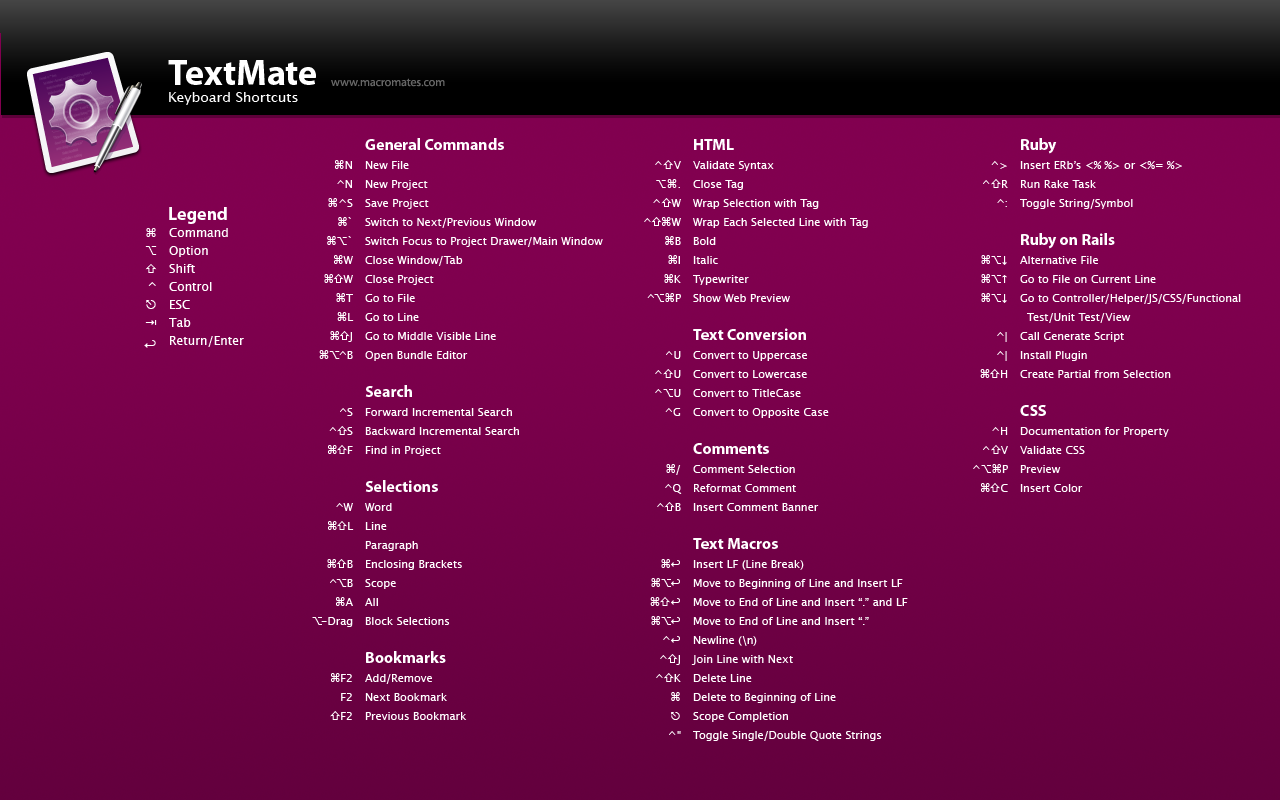